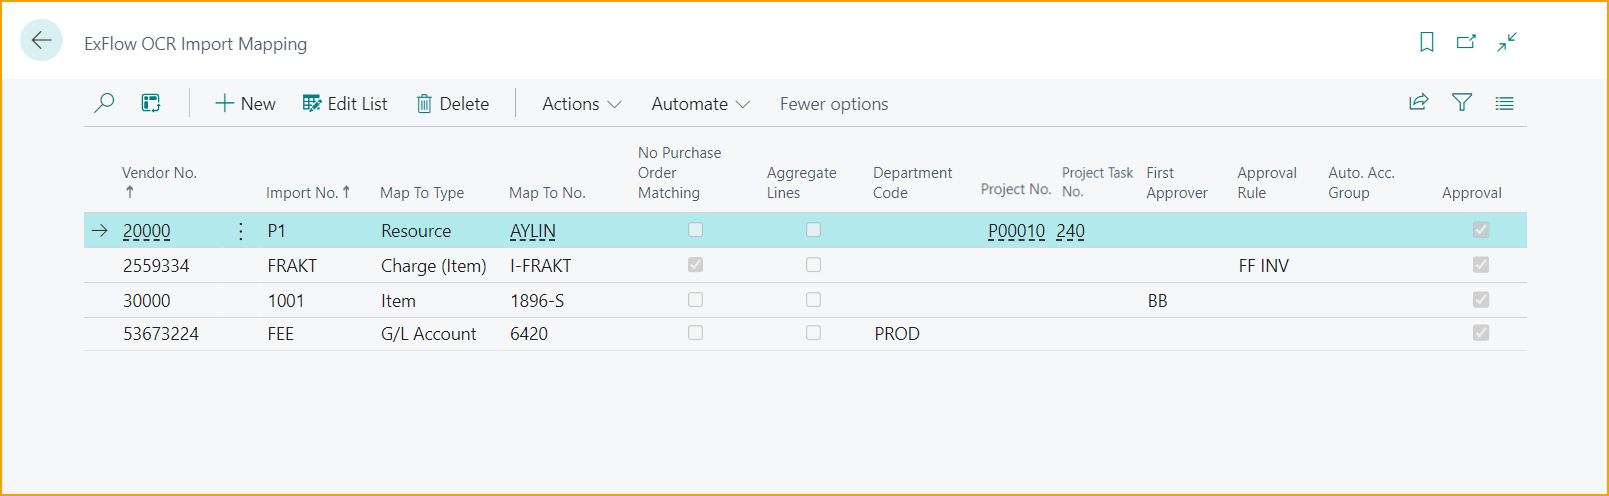
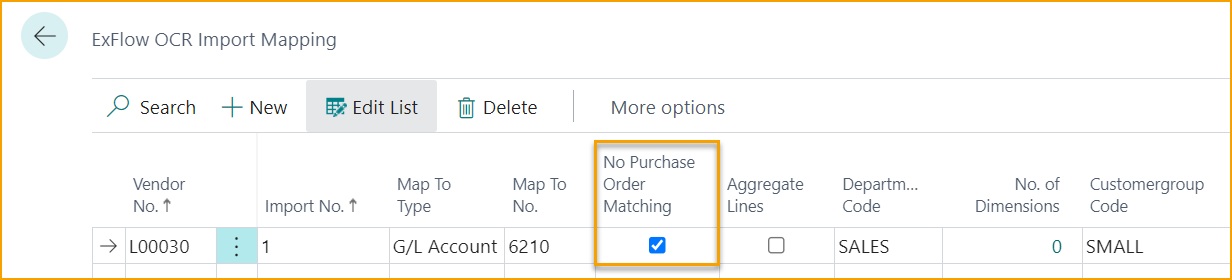
OCR Import Mapping
Go to: ExFlow OCR Import Mapping
ExFlow OCR Import Mapping is used to set a coding from a specific interpreted value for a specific vendor. This page contains the fields which populate the line with the entered values when invoice is imported to ExFlow Import Journal.
It is possible to get a fully coded line with a G/L Account, Dimensions, Project No. etc. just from a setup on "ExFlow OCR Import Mapping" page that can be unique for every vendor.
| OCR Import Mapping | |
|---|---|
| Vendor No. | Choose vendor no. |
| Import No. | Specify the imported value to be mapped |
| Map To Type | Choose the a map -to type option. It can be an G/L account, Item no etc. |
| No Purchase Order Matching | Choose if PO matching should be skipped in this specific mapping combination. |
| Aggregate Lines | Enable this setting to aggregate all imported lines with the specified mapping criteria to one summarized invoice line. |
| Dimension Code | If a Dimension Code exist as an ExFlow Web column, then the dimension code will be visible and can be used in the OCR Import Mapping list. |
| Project No. | Specify the Project No. |
| Project Task No. | Specify the Project Task No. |
| First Approver | Specify the First Approver |
| Approval Rule | Specify the Approval Rule |
| Auto. Acc. Group | Specify the Automatic Account Group |
| Approval | The Approval checkbox is ticked per default. Disable if this mapping should not be apart of the approval flow. |
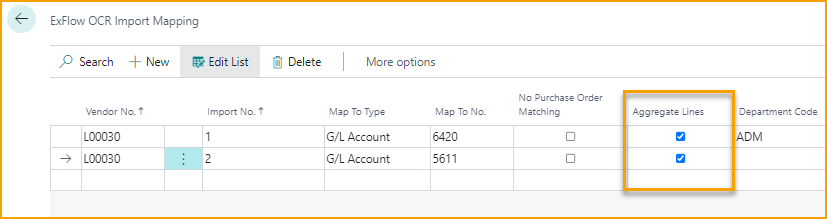
Aggregate Lines
This feature is used for interpreting lines on expense invoices, and not for purchase order related invoices.
It is possible to map a certain interpreted value to a particular Type, like a G/L Account. Edit the list and specify the chosen Vendor No. Add the value in Import No that will be interpreted and choose how ExFlow are supposed to map the interpreted value, for instance a G/L Account.
When importing the document to Import Journal, coding will be generated according to the setup in "ExFlow OCR Import Mapping" page with chosen "Map to Type" (i.e., G/L account) under Import Lines.
Dimensions will be added on lines, not header.

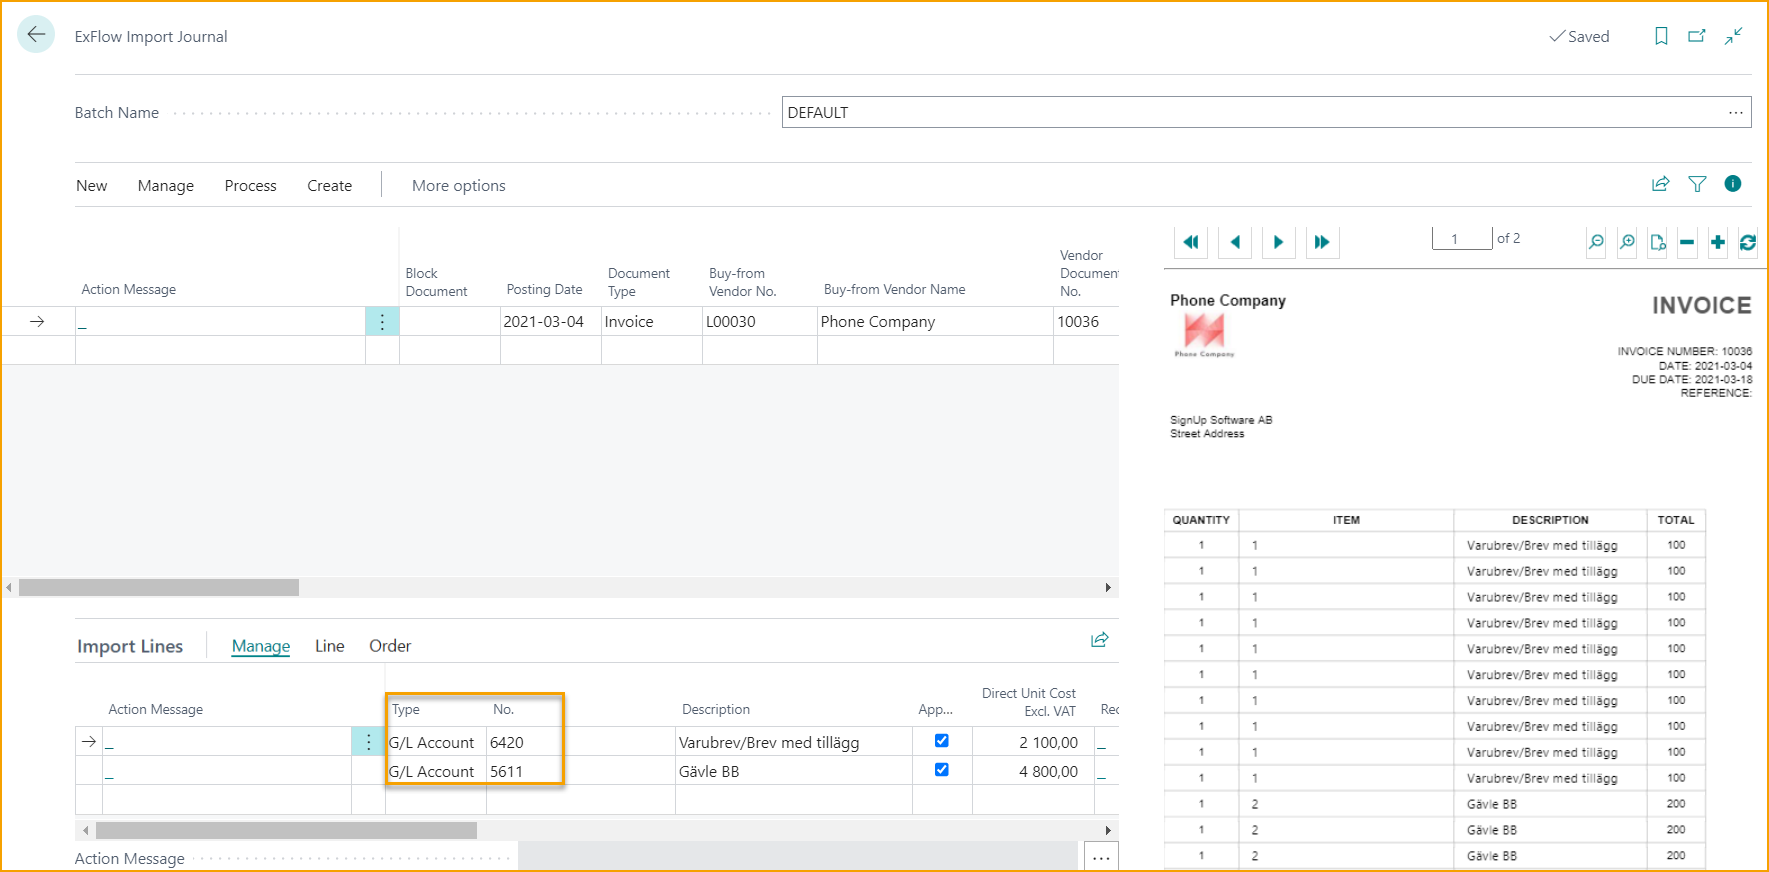
Example, if an invoice has 1000 lines (500 lines with value 1 and 500 lines with value 2), and the lines must be mapped to two different G/L Accounts according to below picture. By ticking "Aggregate Lines" all values with 1 will be aggregated into G/L Account 6420 and all lines with value 2 will be aggregated into G/L Account 5611 when importing the document to ExFlow Import Journal.
No Purchase Order Matching
If "No Purchase Order Matching" is disabled and the interpreted document has an interpreted Order No., then Order matching has a priority and will set lines as on the Order. It means that dimensions will be used from the Order, and not take eventual dimensions specified in OCR Import Mapping.
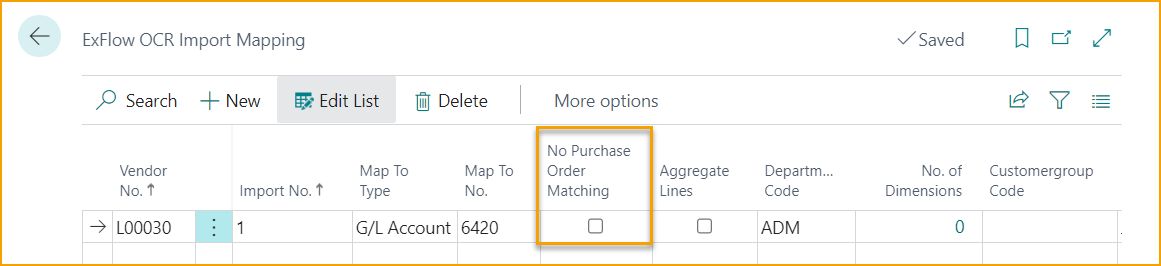
If "No Purchase Order Matching" is enabled and the interpreted document has an interpreted Order No., then the system uses values specified in "ExFlow OCR Import Mapping" setup, including the dimensions. Dimensions will be set on lines only, not on header.
OCR Import
Go to: ExFlow Setup --> OCR Import
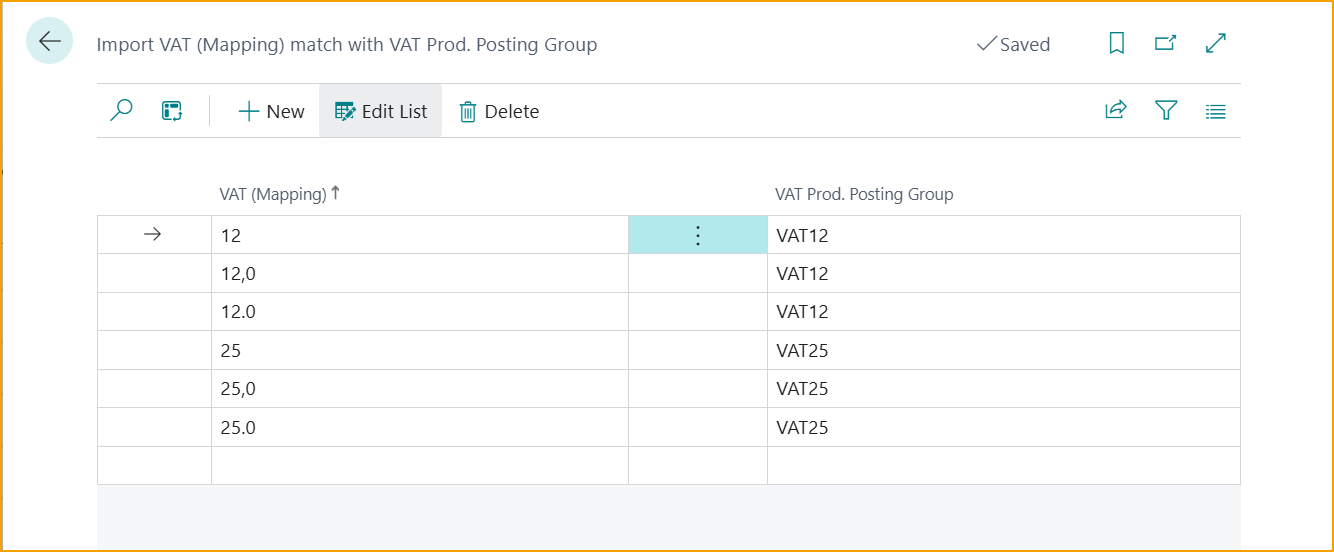
VAT Mapping
Let ExFlow help out with mapping of imported VAT % towards VAT Product Posting Groups.
With EDI it is very common that the percentage of the VAT on the line is carried over. However, this can't be utilized in Standard Business Central and ExFlow has now created an own mapping for this.
Setup ExFlow Data Capture
For customers using other services, like ExFlow Data Capture, a custom field on line level needs to be added in EDC where VAT % can be interpreted.
This field also needs to be mapped on line level in Data Exchange Definition in Business Central.
Read more about this under Field Mapping
VAT Mapping Setup
Go to: ExFlow Setup --> Actions--> Functions--> OCR --> VAT Mapping

Edit the list and add the VAT Mapping values to be mapped, and choose the VAT Prod Posting Group that it should be mapped towards, under ''VAT Prod. Posting Group''.
Disable Warning Messages for VAT Mapping
When VAT is incorrect, ExFlow will present a warning message. If no messages are wanted, then these can be disabled.
Go to: OCR Import --> Disable Warning Messages for VAT Mapping to turn off the warning messages for VAT mapping.
When disabled, no warning messages will be presented in the Import Journal for the imported values regarding mapping VAT Prod. Posting Group.
Vendor ID Fields
Go to: ExFlow Setup --> OCR Import --> ExFlow Vendor ID Fields
The ExFlow Vendor ID table is mostly used for two main purposes:
- Identifying the correct vendor when EDC is not used and the vendor number is missing from the XML file.
The Vendor ID in this table must be unique, which means the same bank giro number cannot be assigned to multiple vendors.
- Controlling how vendor information is displayed in EDC when an EDC account is used.
The field “ExFlow Data Capture export order” defines what appears after the vendor name in EDC. If the field is empty, the next available number is used. If no matching Bank Account record exists, “No” is added after the name in EDC.
| Vendor ID Fields | |
|---|---|
| Table No. | Table lookup on 23 (Vendor) and 288 (Vendor Bank Account) |
| Field No. | Field lookup options for the chosen Table No. |
| Field Caption | Specifies the Field No. Caption |
| Field Name | Specifies the Field Name |
| ExFlow Data Capture Export Order Caption | Defines what appears after the vendor name in EDC. If the field is empty, the next available number is used. If no matching Bank Account record exists, “No” is added after the name in EDC. |
| Actions --> Function --> Show Vendor IDs | Shows the list of listed Vendor ID for the company |
| Actions --> Function --> Update All | Click on Update all to get the pop up question: ''Do you want to synchronize all VendorIDs?''. Answer Yes or No. |
Creating Vendor ID Records
Creating a vendor with only a vendor number does not automatically create a Vendor ID record.
To generate a record, at least one additional field in the Vendor ID setup must be filled in.
If the XML import does not include the vendor number but the Vendor ID field has a value; and a vendor number is manually selected in the import journal header, a new Vendor ID entry is created (depending on settings)and marked as “User def.”
Show Vendor IDs
Go to: ExFlow Vendor ID Fields --> Actions --> Function --> Show Vendor IDs to see the complete list of Vendor IDs for the company.
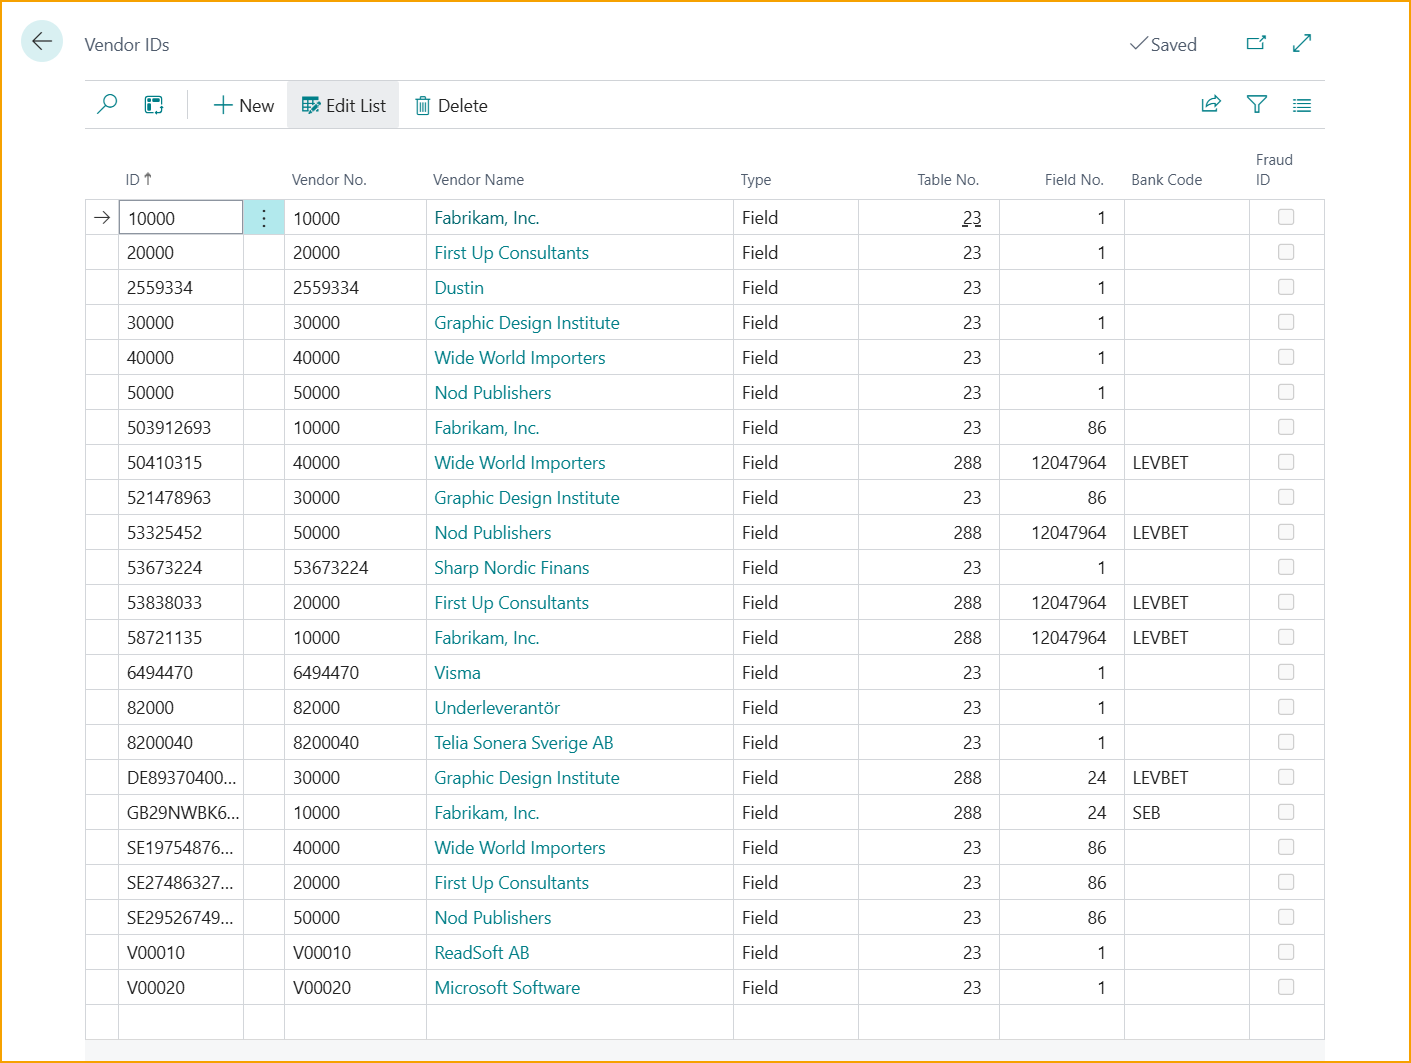
| Vendor ID | |
|---|---|
| ID | Unique table ID |
| Vendor No. | Specifies the Vendor No. |
| Vendor Name | Specifies the Vendor Name |
| Type | Specifies the Type. If set to Field, then value is from Vendor Card. If set to User Def. then it's a manually added value, from either Import Journal Header or created via ExFlow Setting ''Auto Create Vendor ID'' options: ''Ask'' or ''Always''. |
| Table No. | Specifies the table No 23 (Vendor) or 288 (Vendor Bank Account) |
| Field No. | Specifies the Field No. |
| Bank Code | Specifies the Vendor Bank Account Code (Table No. 288) |
| Fraud ID | Not in use for the moment. |
Relevant ExFlow Settings
Activate Vendor ID Sync.
Go to: ExFlow Setup --> OCR Import --> Activate Vendor ID Sync.
Enable the synchronization of vendor ID: Determines whether the Vendor ID table should be updated.
Specifies if the vendor id table synchronization should be updated or not
Vendor ID Fields
Go to: ExFlow Setup --> OCR Import --> Vendor ID Fields
If the XML import does not include the vendor number but the Vendor ID field has a value.
Specifies which vendor fields that should be in the vendor ID table (when first matching a vendor during document import)
Specifies which vendor ID fields are included in the Vendor ID table.
Auto Create Vendor ID
Go to: ExFlow Setup --> OCR Import --> Auto Create Vendor ID
Specifies how data should be updated if ''Activate Vendor ID Sync.'' is enabled.
Auto-create vendor ID defines how records are automatically updated when synchronization is enabled.
Available options are: ''Ask, Always and Never'':
| Auto Create Vendor ID | |
|---|---|
| Ask | ExFlow will ask (in pop up) if this Vendor ID should be connected (meaning created and added) to the Vendor ID table list as an User Def Type. |
| Always | If set to ''Always'' then vendor id links will be auto created by ExFlow and added to Vendor ID Fields table list as Type = User Def. |
| Never | Never automatically create a Vendor ID. |