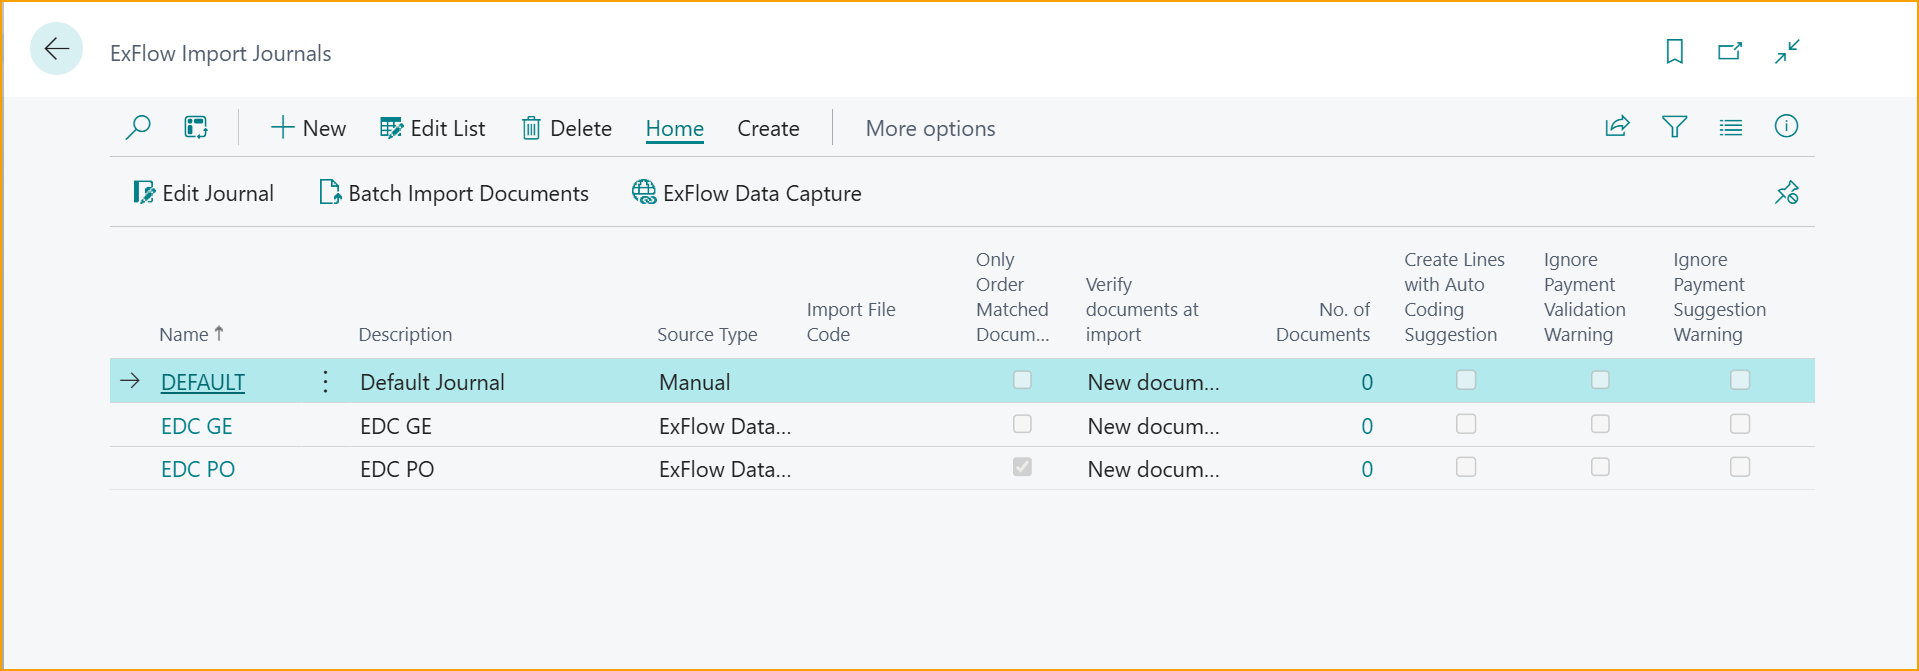
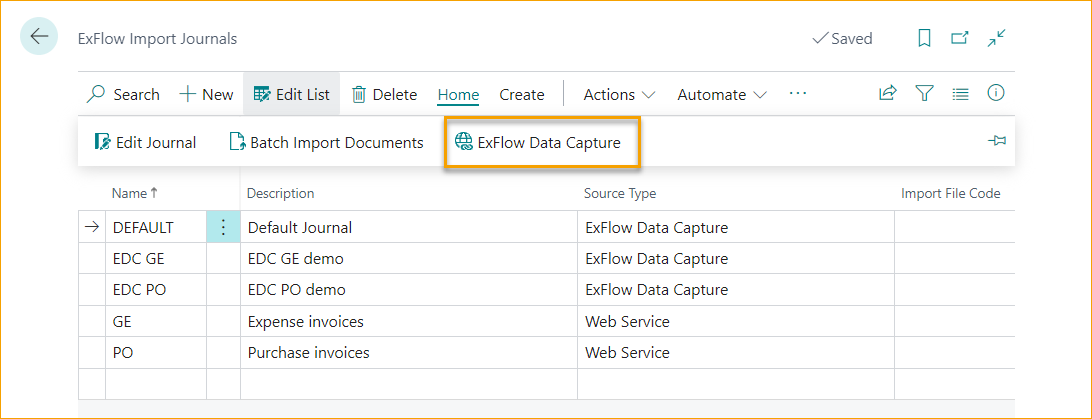
ExFlow Import Journals
Go to: ExFlow Import Journals
An "ExFlow Import Journal" is used for importing documents, applying coding, handling action messages, and creating Invoices/Credits Memos for approval. After scanning and interpreting the scanned documents, files are created and ready to be imported.
From the ExFlow Import Journals list it is possible to search, create a new journal, edit current journal rows, and delete journals. Users can also Batch Import Documents, Batch Create Invoices and Credit Memos, Edit/View OCR Import Queue, send Email Receipt Reminders and Batch/Verify Journals.
| Import Journals menu | |
|---|---|
| New | Add a new Import Journal |
| Edit list | Edit the Import Journal list |
| Delete | Delete an Import Journal |
| Home | Edit Journal: Opens the marked Import Journal to edit Batch Import Documents: Imports documents for all batches ExFlow Data Capture: Opens ExFlow Data Capture sign-in |
| Create | Create Invoice/Cr. Memos: Create documents from Import Journal Batch Create Invoice/Cr. Memos...: Batch create documents from Import Journal |
| Actions | Edit/View OCR Import Queue: Opens the ExFlow OCR Import Queue for not yet imported documents to be queued Email Receipt Reminders: Sends Order/Receipt Reminders |
| Actions --> Functions | Batch Verify Journals: Verifies all documents for all Import Journals Verify Journals: Verifies documents in chosen Import Journal About ExFlow: Opens a pop up box with information about the current ExFlow and Business Central version. Also provides links to ExFlow Documentation Platform and the latest release notes. |
| Actions --> Other | Edit Journal: Opens the chosen Import Journal to edit Batch Import Documents: Batch import documents to the journals ExFlow Data Capture: Opens ExFlow Data Capture sign-in |
| Import Journals list | |
|---|---|
| Name | Name of the journal |
| Description | Description of the journal |
| Source Type | Specifies the Source Type of the journal. Current Source Types are: ExFlow Data Capture, Web Service, Manual, Import Files and E-Documents. Read more about this here |
| Import File Code | Specifies the ExFlow File Import Setup to be used. Configuration for this is needed before usage. |
| Only Order Matched Documents | Enable this checkbox for a specific journal to have a dedicated journal only for purchase order matched documents |
| Verify documents at import | Choose if verification on the documents at import should be proceeded for all documents in the journal, or for the newly imported documents only. |
| No. of Documents | Specify the amount of documents in the journal |
| Create Lines with Auto Coding Suggestion | Enable this checkbox for a specific journal to have a dedicated journal for Auto Coding Suggestions |
| Ignore Payment Validation Warning | Enable this checkbox for a specific journal where documents will skip the Payment Validation process |
| Ignore Payment Suggestion Warning (hidden field) | Enable this checkbox for a specific journal where documents will skip the Payment Suggestion process. This field can be added via page personalization |
| Automatically Create Documents (hidden field) | Enable this checkbox to get an dedicated journal that will automatically create documents. This field can be added via page personalization |
| Credit Memo Nos. (hidden field) | Add a specific No. Series for Credit Memos to the journal. This field can be added via page personalization |
| Default Document Type (hidden field) | Add a default document type, such as Invoice, Credit Memo or Prepayment Invoice, for a specific journal. This field can be added via page personalization |
| Diff.Line Purch. Code (hidden field) | Add a specific Diff.Line Purch. Code for a specific journal. This field can be added via page personalization |
| ExFlow Purchase Code (hidden field) | Add a specific ExFlow Purchase Code for a specific journal. This field can be added via page personalization |
| Invoice Nos. (hidden field) | Add a specific No. Series for Invoices to the journal. This field can be added via page personalization |
| Posted Credit Memo Nos. (hidden field) | Add a specific No. Series for Posted Credit Memos to the journal. This field can be added via page personalization |
| Posted Invoice Nos. (hidden field) | Add a specific No. Series for Posted Invoices to the journal. This field can be added via page personalization |
| Predefined Account (hidden field) | Add a Predefined Account to the journal. This field can be added via page personalization |
| Self-Billing Invoices (hidden field) | Enable ''Self-Billing Invoices'' to specify if Self-Billing Invoices should be created in this journal batch. This field can be added via page personalization |
| User ID Filter (OCR) (hidden field) | Add a dedicated journal to a specific OCR User ID. This field can be added via page personalization |
Batch Import Documents from Interpretation
Go to: Home --> Batch Import Documents
Document images and the interpreted data will be imported.
Depending on the journal settings the documents will be separated into the different journals.
A journal with the setup checkbox "Only Order Matched Documents" ticked, will get order matched documents and documents containing Order No. information. There can be other ways to separate the documents but a separation in Expense/Purchase Invoices matched is very common.
Same setting can be made for "Create Lines with Automatic Suggestion". Tick the "Create Lines with Automatic Suggestion" box if ExFlow Automatic Coding Suggestion should be applied for a specific journal.
Read more about this under Section "ExFlow Auto Coding Suggestion".

In the journals there will be one document header record for each imported OCR document. "Import Lines" in the lower section is line details for each document.
Moreover, it is possible to setup a specific journal dedicated for Automatically Create Documents. Use Personalize and add the column "Automatically Create Documents" to ExFlow Import Journals list page.
Tick this box if interpreted documents should be automatically created from the ExFlow Import Journal. With this function set, all interpreted imported documents (with no errors or warning messages) will be automatically created and send out for approval.

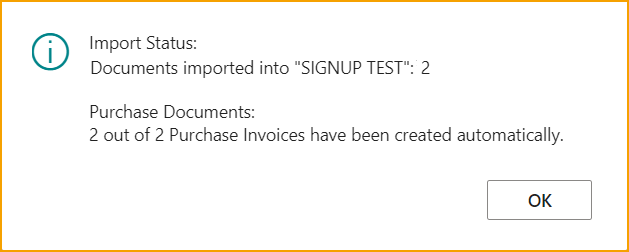
Import and a message will show how many received/imported documents, and the quantity of the automatically created document(s).
This setting can also be applied on specific vendors only. Read more about this under section Vendor Setup.
ExFlow Data Capture
Go to: Actions --> Import --> ExFlow Data Capture
Click on "ExFlow Data Capture" to get to its website. This only works if the company is connected to an ExFlow Data Capture account.
Import Journal - Header

| Import Journal --> Manage | |
|---|---|
| Delete | When the document has been imported in to ExFlow Import Journal it can be deleted. Then no Purchase Document will be created. |
| Card | Open the ExFlow Import Document card for the selected document. |
| Statistics | View statistical information about the selected document (F7) |
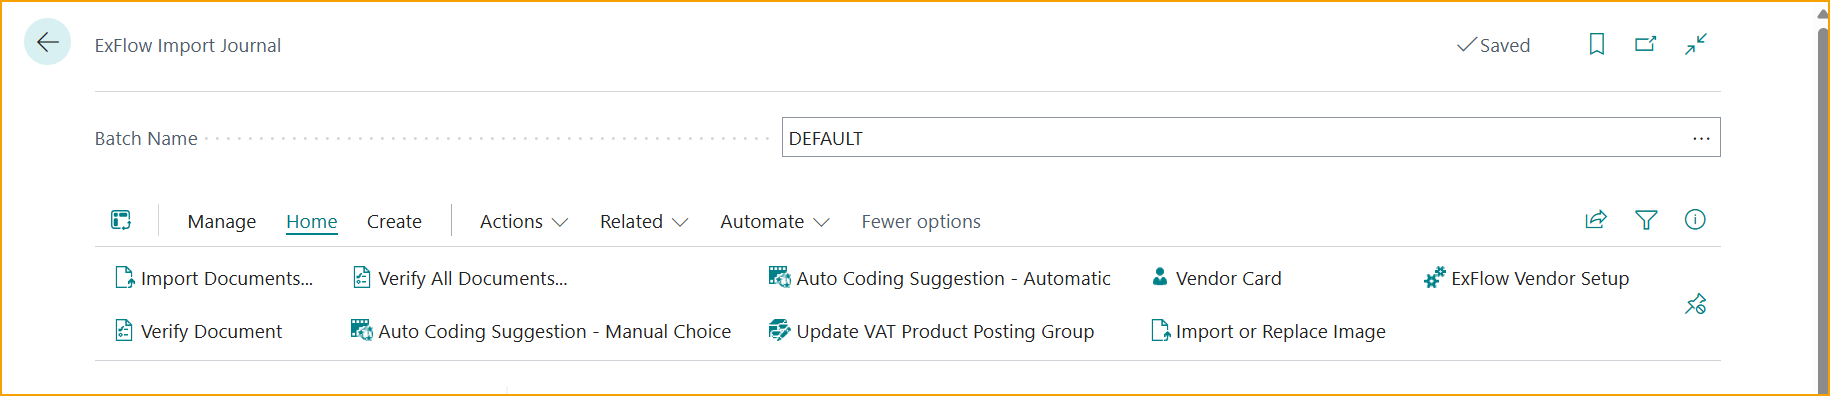
| Import Journal --> Home | |
|---|---|
| Import Documents | To import Documents to one selected journal, open the journal and Import Documents. |
| Verify Document | Select one (or more) document(s) to verify via Verify Document. This function will verify that the document is ready to be created. (Ctrl+R) |
| Verify All Documents | After correcting an error this will delete or create a new action message if a document still has an error. |
| Auto Coding Suggestion - Manual Choice | Auto Coding Suggestion - Manual Choice |
| Auto Coding Suggestion - Automatic | Auto Coding Suggestion - Automatic |
| Update VAT Product Posting Group | Due to Swedish Tax Rules regarding IT VAT, it is possible to update all VAT Product Posting Groups on Invoice Lines. This function can only be used together for customers that have SweBase installed. Read more under section SweBase --> Update VAT Product Posting Group |
| Vendor Card | Opens the Vendor card for the specific document. |
| Import or Replace Image | Import or replace current document image. |
| ExFlow Vendor Setup | This button will show/edit the ExFlow Vendor Setup for the current vendor. |
Auto Coding Suggestion
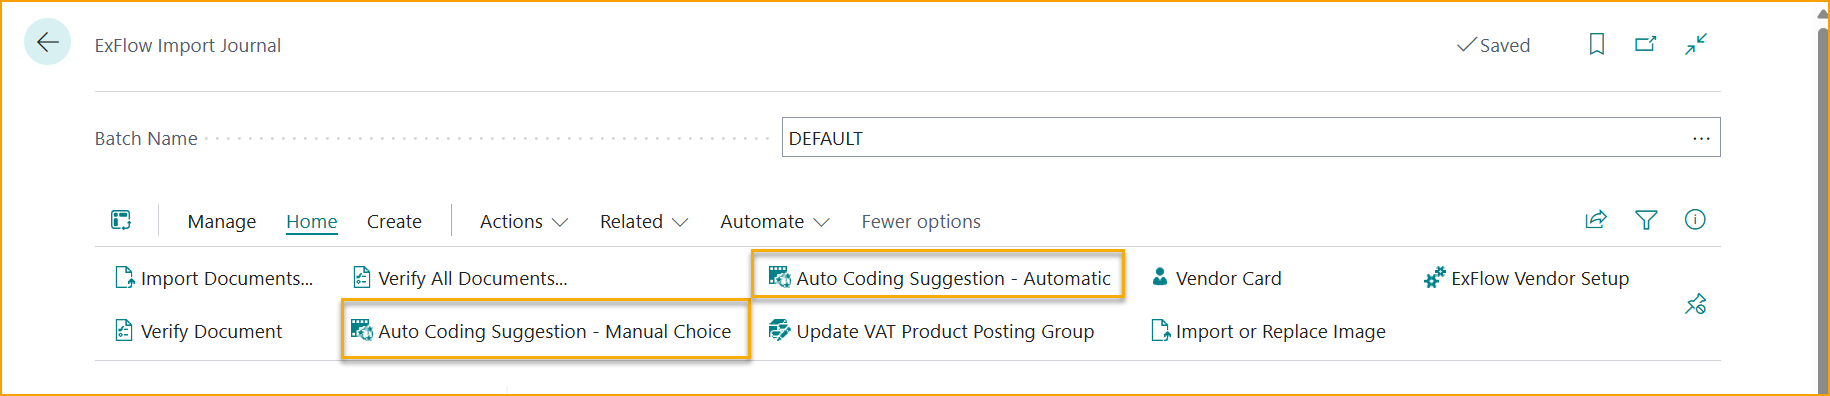
Auto Coding Suggestion - Manual Choice
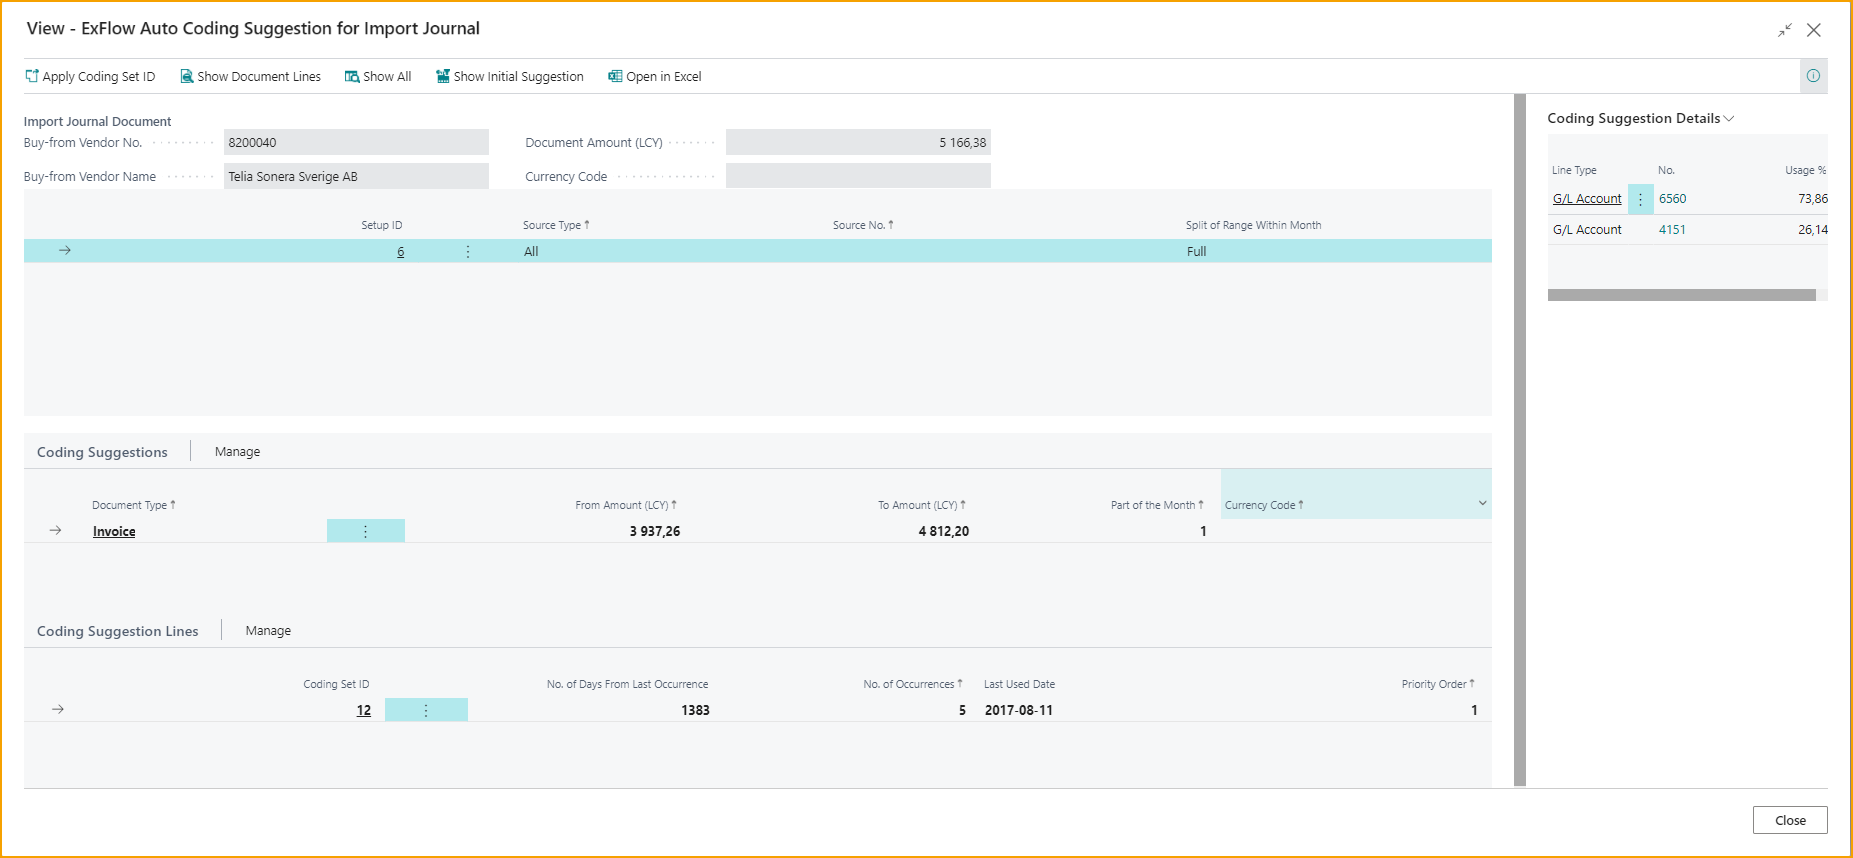
Go to: Home --> Auto Coding Suggestion - Manual Choice
Opens the Auto Coding Suggestion list related to the selected document.
Manual Choice give the option to navigate through different Coding Set ID and manually choose a coding suggestion.
This page will show the best match for coding for the invoice that was selected before pressing the button to manually choose coding suggestion. In the right-hand corner it's possible to see the coding from the selected Coding Suggestion Lines for that specific Setup ID.
Apply Coding Set ID: This will apply the coding seen in the right-hand corner to the invoice.
Show Document Lines: Will open up ExFlow Coding Suggestion Document page. Read more under section Coding Suggestion Document.
Show All: This will show all the Setup ID's for the possibility to manually choose a suggested coding for i.e. another vendor.
Show Initial Suggestion: This will go back to the initial suggestion shown from when the page first opened.
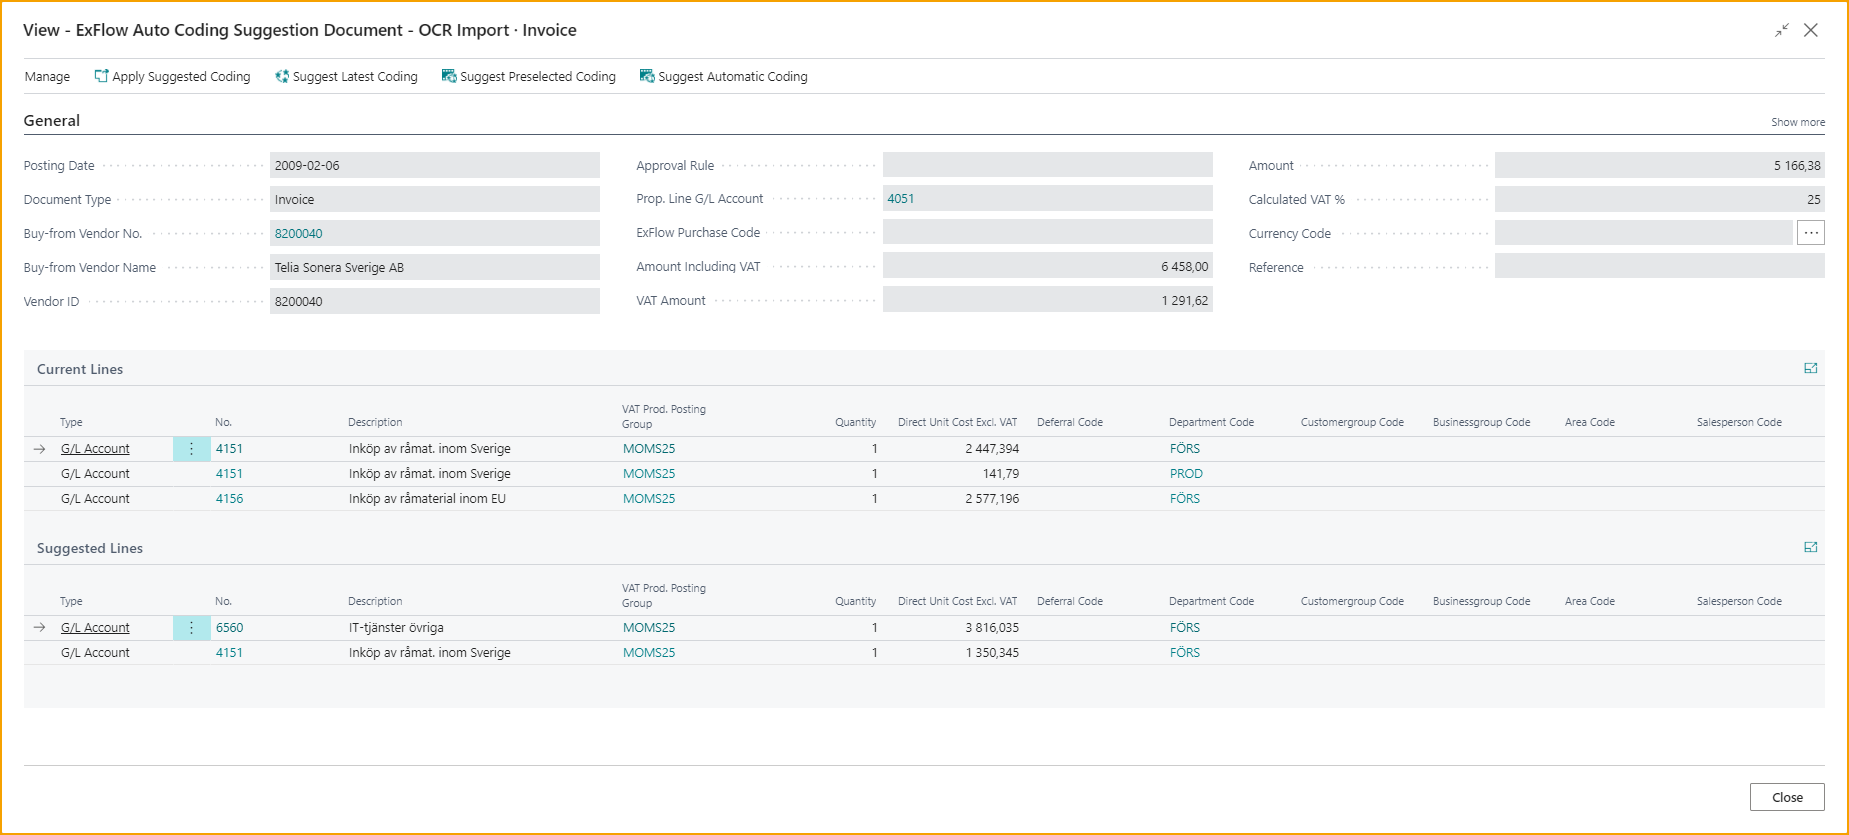
ExFlow Coding Suggestion Document
On this page the coding is shown in more detail. It is also possible to compare the Suggested Lines to the Current lines on the invoice.
Apply Suggested Coding: This applies the suggested coding to the invoice.
Suggest Latest Coding: This applies the coding from the last posted document from that vendor.
Suggest Preselected Coding: This suggests the coding which originated as the selection on the previous window.
Suggest Automatic Coding: This will suggest the automatic coding based on the Automatic Suggestion Setup.
Auto Coding Suggestion - Automatic
Go to: Home --> Auto Coding Suggestion - Automatic
Applies the line coding chosen by the suggestion algorithm.
This will enter a coding based on the information on the invoice. It will choose the coding based on the Automatic Coding Setup.
Read more under section Auto Coding Suggestion Setup
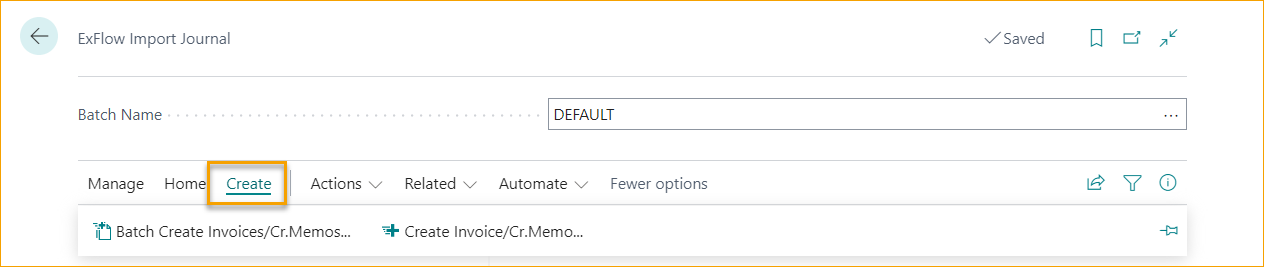
Batch Create Invoices/Cr.Memos
Go to: Create --> Batch Create Invoices/Cr.Memos
This will run both Batch Verify Documents and create Purchase Invoices and Credit Memos for all documents in this journal that do not have any action message.
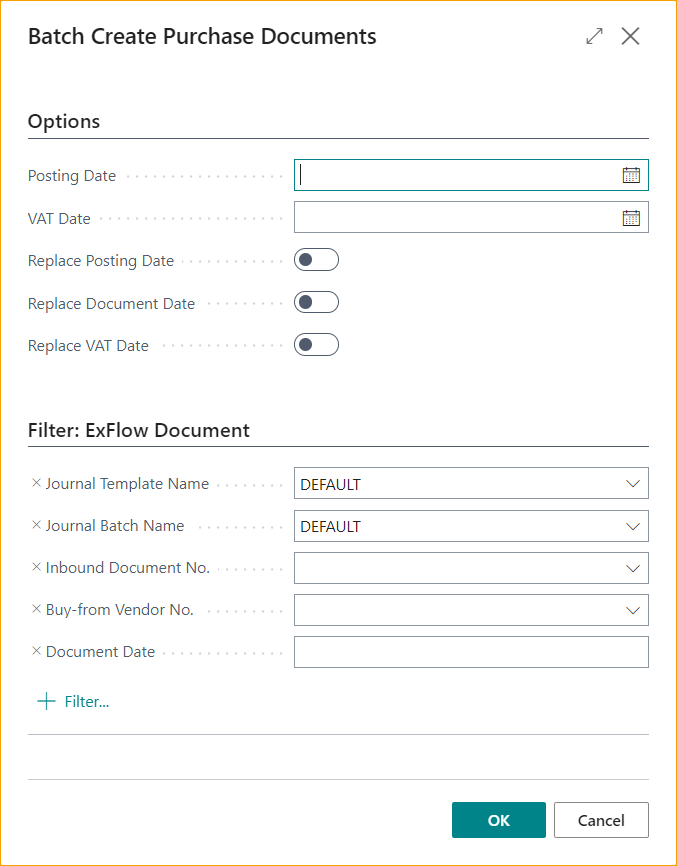
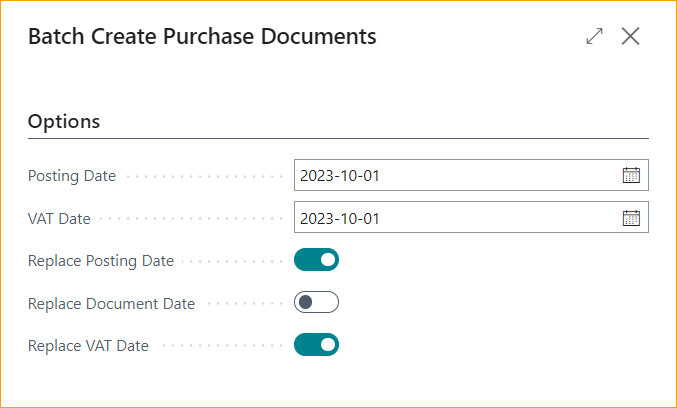
To update Posting Date on all documents, add a new date in field Posting Date and activate Replace Posting Date.
If VAT Date Usage is enabled and Default VAT Date is Posting Date in General Ledger Setup, Replace VAT Date will be activated automatically as a suggestion.
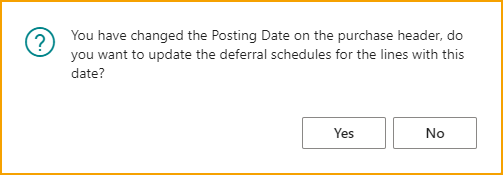
If one, or several documents, have Deferral Code when using Replace Posting Date, the following question will occur.
Choose Yes to update deferral starting date according to settings on Deferral Code for all document lines.
Choose No to keep deferral starting date as created on all document lines.
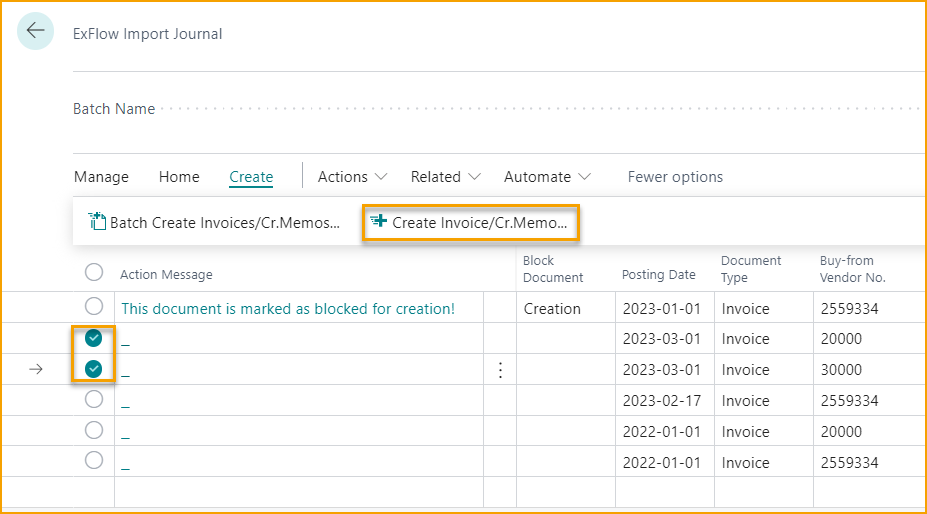
Create Invoice/Cr.Memo
Go to: Create --> Create Invoice/Cr.Memo (F9)
Stand on the selected document line and click on Create Invoice/Cr.Memo to create one document or use shortcut F9.
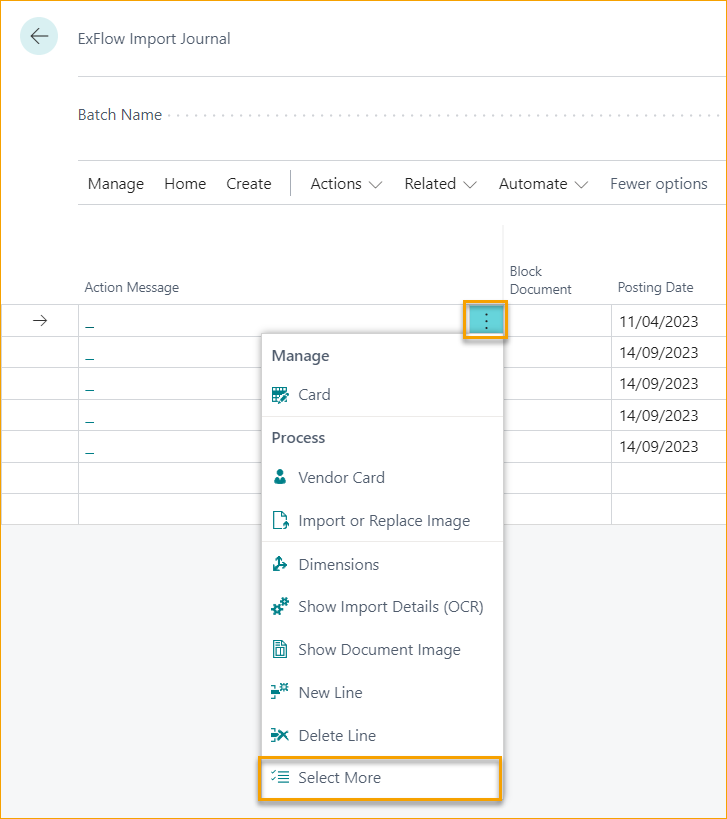
There is also an option to select multiple documents to be created. Use "Select More" to select the documents.
And simply click on Create Invoice/Cr.Memo create the chosen documents.
Import Journal --> Actions --> Import
Import Lines from Excel
Go to: Actions --> Import --> Download Import Line Excel Template / Import Line from Excel
Sometimes it is easier to work in Excel when the invoice includes several rows.
Start by "Download Import Line Excel Template".
Modify, add, and/or delete rows in Excel, save and use function "Import Lines from Excel".
Copy / Paste on Rows
It is possible to copy row from other document or from Excel and Paste in Import Journal. This function is working in the same way as in Business Central Standard.
Get Latest Coding from Vendor
Go to: Actions --> Import --> Get Latest Coding from Vendor
This function will find last posted invoice and copy rows with G/L Account.
ExFlow Data Capture
Go to: Actions --> Import --> ExFlow Data Capture
This function will open "ExFlow Data Capture" webpage (if the company is connected to ExFlow Data Capture).
Import Journal --> Actions --> Functions
Save Coding to Vendor
Go to: Action --> Functions --> Save Coding to Vendor
Use this function to save the current coding of invoice lines to an ExFlow Purchase Code that will be saved to the Vendor card.
Transfer Selected Documents to Another Company
Go to: Action --> Functions --> Transfer selected Document to another Company
If the Business Central database includes more than one Company, a document can be moved to another Company before the document is created.
Transfer Selected Documents to Another Batch
Go to: Action --> Functions --> Transfer selected Document to another batch
If the Business Central company have more than one ExFlow Import Journal, a document can be moved to another journal before the document is created.
This function can also be found on the Imported Document Card, found via Import Journal --> Manage --> Card.
Batch Update Posting Date
Go to: Action --> Functions --> Batch Update Posting Date
With this function it is possible to update Posting Date for documents in selected Journal within the filter.
Edit/View OCR Import Queue
Go to: Action --> Functions --> Edit/View OCR Import Queue
Use this function to view or edit the OCR Import Queue. Correct documents that contains incorrect information that prevents them from being imported.
About ExFlow
Go to: Action --> Functions --> About ExFlow
Open information pop up about ExFlow.
Return to EDC
Go to: Action --> Functions --> Return to EDC
''Return to EDC''- functionality allowing users to send the document back to ExFlow Data Capture for reprocessing. The document is deleted from the Import Journal after being sent, enabling re-verification and re-import through EDC.
If clicking on this function, then the pop up question will be shown for the user: ''Do you want to return the selected document to EDC and delete the document from the import journal?''. If choosing yes, the document will be sent back to EDC and the document will be removed from Import Journal.
Please note that this function only applies for ExFlow Data Capture integrations.
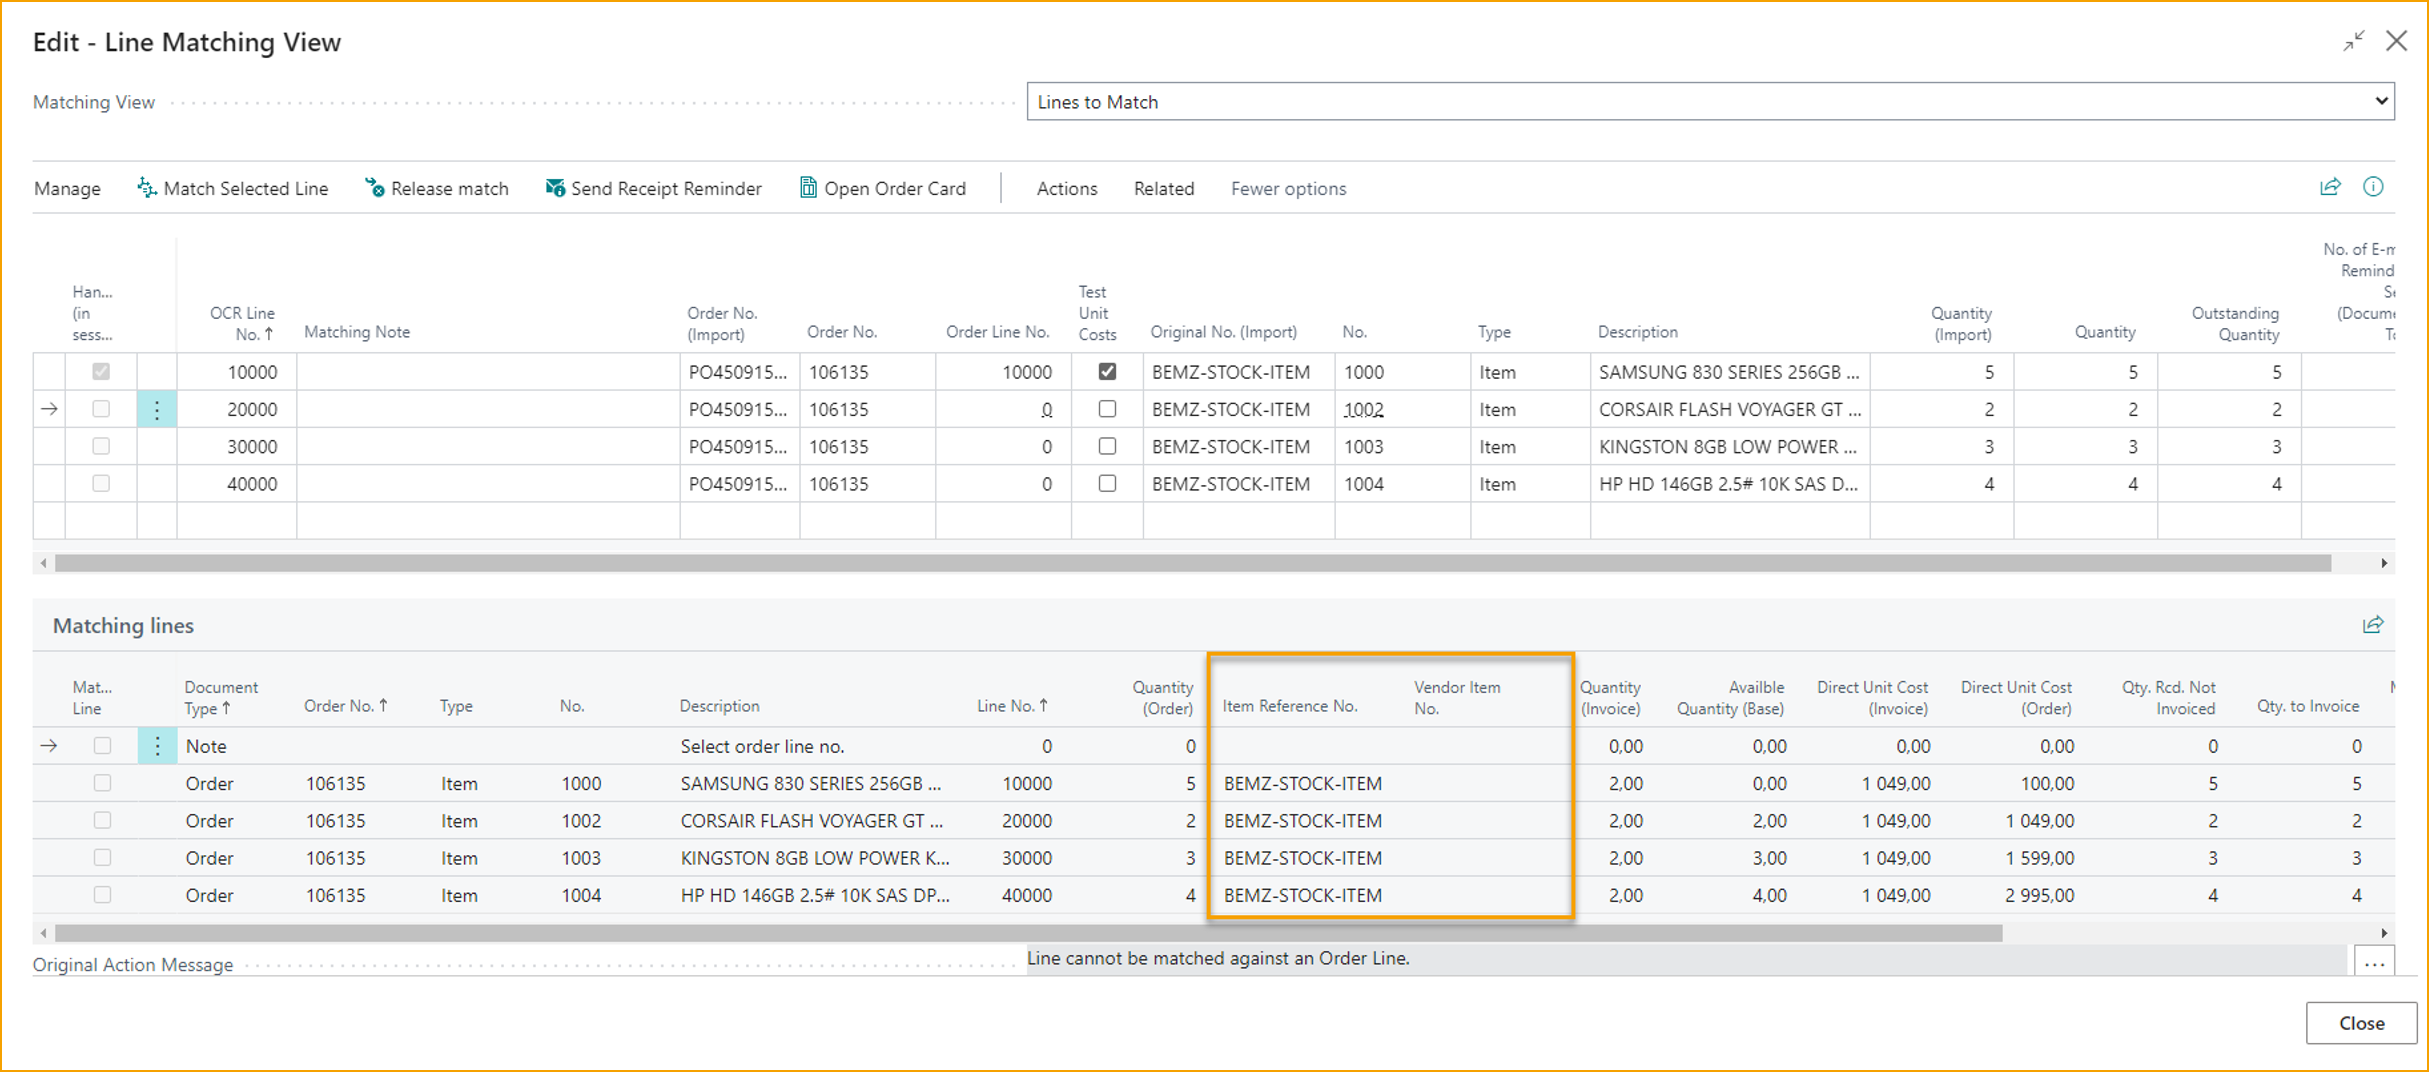
Import Journal --> Actions --> Order
Order - Match OCR Lines
Go to: Actions --> Order --> Match OCR Lines
Match document lines against purchase order(s).
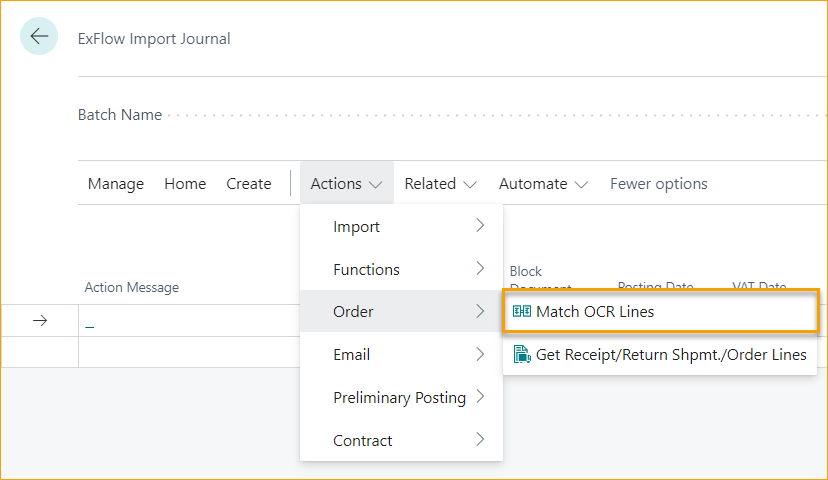
When using this function ExFlow collects information from Order and Receipts, etc.
To make manual line matching easier, it is possible to Personalize the "Line Matching View" page and add fields like "Item Reference No" and "Vendor Item No.".
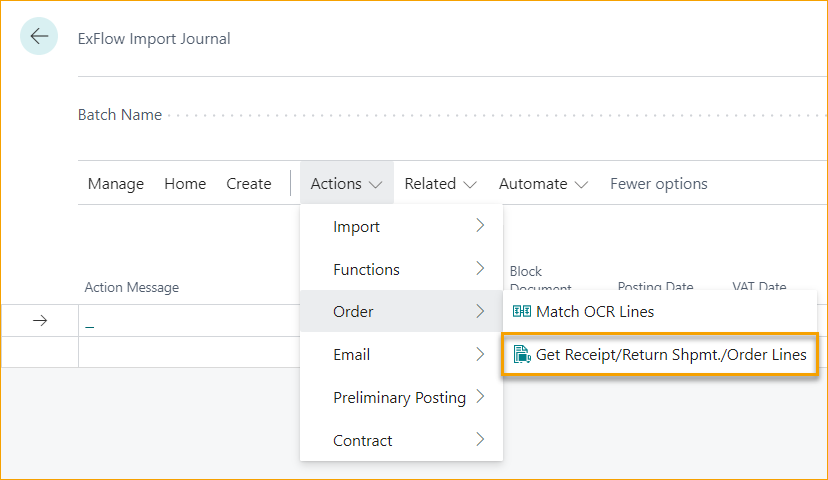
Order --> Get Receipt/ Return Shpmt./Order Lines
Go to: Actions --> Order --> Get Receipt/ Return Shpmt./Order Lines
With this button order/receipt lines are fetched and added to the selected document.
Read more under section Order matching on Header-level.
Import Journal --> Actions --> Email
Batch Send Receipt Reminders
Go to: Actions --> Email --> Batch Send Receipt Reminders
With this function emails will be sent to users regarding receipt reminders for any new documents. If the Purchaser Code value is blank in the Import Journal, a reminder will be sent to the Purchase Coordinator.
If a Purchaser Code exists, the reminder will be sent to the connected ExFlow user.
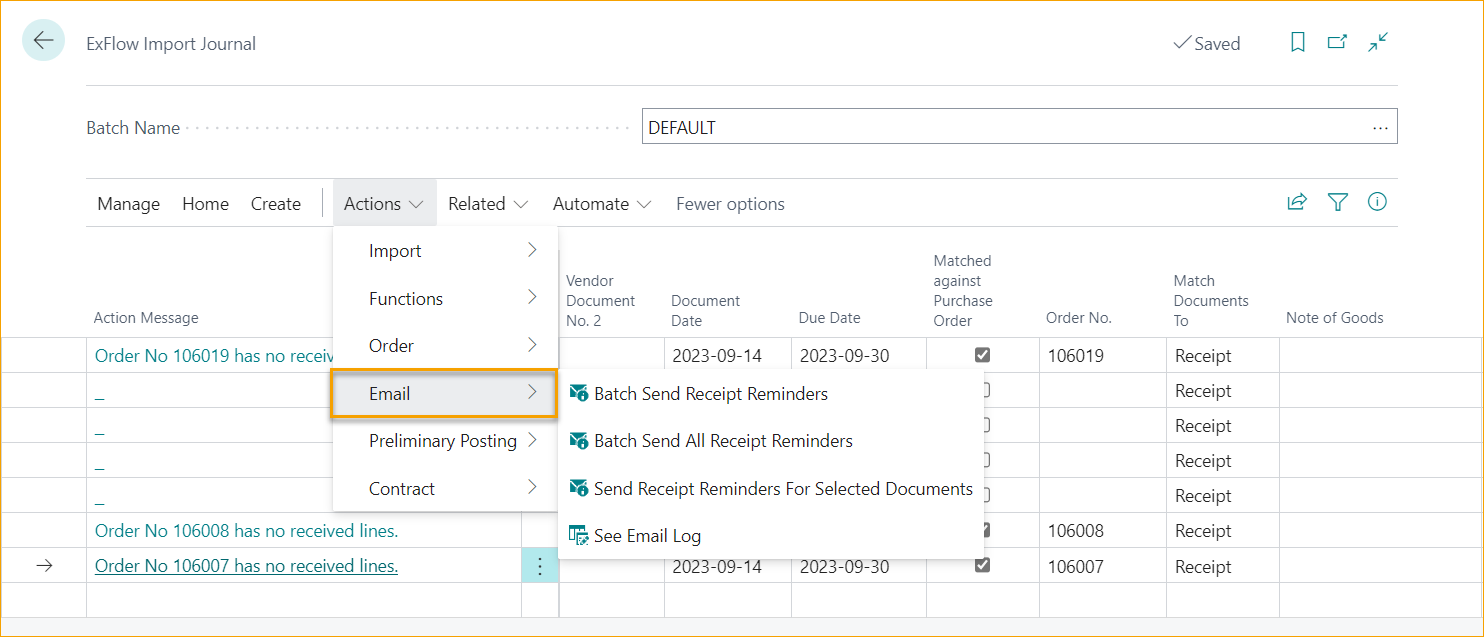
Batch Send All Receipt Reminders
Go to: Actions --> Email --> Batch Send All Receipt Reminders
This button sends emails regarding receipt reminders with no restrictions from timestamps from earlier sent reminders.
Send Receipt Reminders For Selected Documents
Go to: Actions --> Email --> Send Receipt Reminders For Selected Documents
This button sends receipt reminders only for selected documents. Reminders are sent at any time no matter when the last reminder for the document(s) was sent.
See email log
Go to: Actions --> Email --> See email log
This button will show an email log of sent receipt reminders.
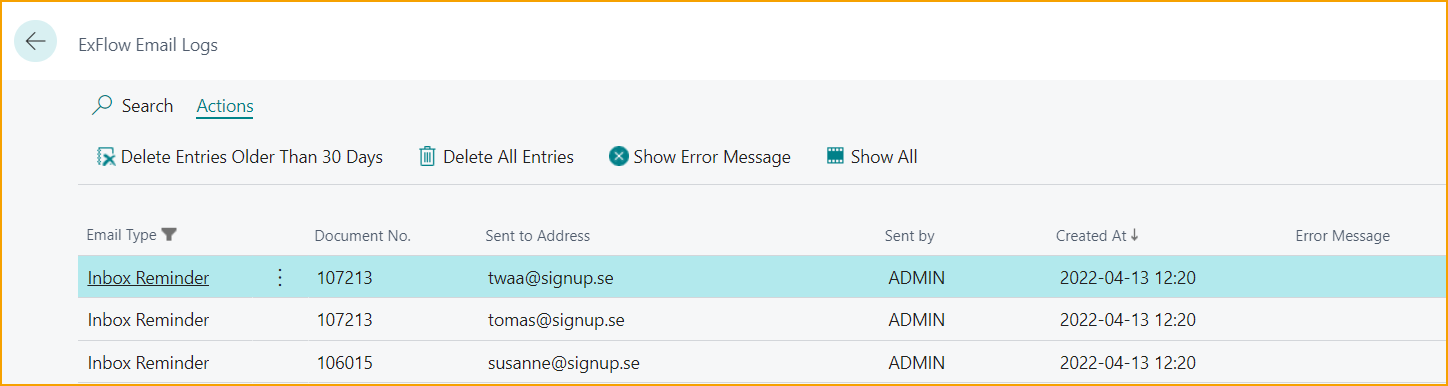
Delete Entries Older Than 30 Days
Go to: ExFlow Email Logs --> Action --> Delete Entries Older Than 30 Days
This button clears the list of log entries older than 30 days.
Delete All Entries
Go to: ExFlow Email Logs --> Action --> Delete All Entries
With this button all log entries of sent receipts can be cleared.
Show Error Message
Go to: ExFlow Email Logs --> Action --> Show Error Message
This button shows if there are any error messages related to send receipt reminders.
Show All
Go to: ExFlow Email Logs --> Action --> Show All
With this button all the records of email log are displayed. Records consists of an Email type, Document no, Sent to Address, Sent by, Created At and Error Message.
Import Journal --> Actions --> Preliminary Posting
Preview Preliminary Posting
Go to: Actions --> Preliminary Posting --> Preview Posting
This can only be used if Preliminary Posting is activated.
Read more under section Preliminary Posting
Import Journal --> Actions --> Arrival Preliminary Posting
Preview: Before posting an APP, it can be previewed via Actions ---> Arrival Preliminary Posting --> Preview Posting
Posting: Select the invoice (or credit memo) in the Import Journal and choose Actions --> Arrival Preliminary Posting --> Posting
Reverse will reverse the APP entries.
Find Entries will show the APP entries.
Read more about this under Arrival Preliminary Posting
Import Journal --> Actions --> Contract
Create Contract
Go to: Actions --> Contract --> Create Contract
If invoice is interpret and coding is added on the header for recurring invoices. Use this function to create a contract.
Fields in Invoice Header that will be copied to the new created contract:
- Vendor No.
- Reference to External Contract No.
- ExFlow Purchase Code
- First Approver
- Approval Rule
- Purchaser Code
To complete the setup on the contract, read more under section Contract
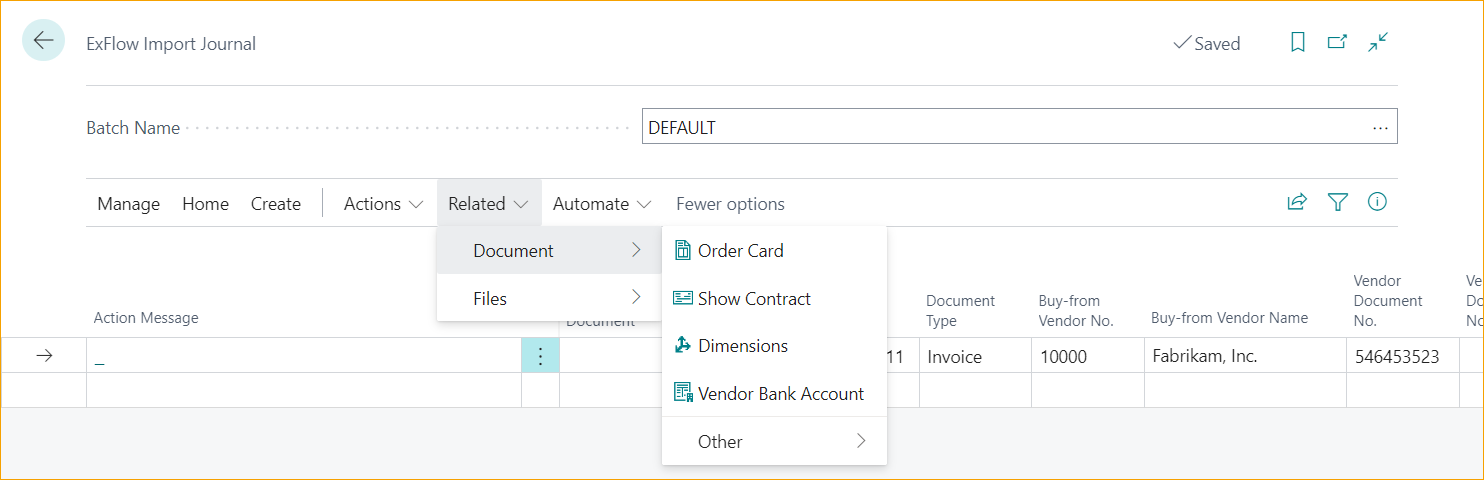
Import Journal --> Related --> Document
Order Card
Go to: Related --> Document --> Order Card
This button will open the connected purchase order card for the selected document.
Show Contract
Go to: Related --> Document --> Show Contract
Open the connected ExFlow contract for the selected document.
Dimensions
Go to: Related --> Document --> Dimensions
View dimensions set on the selected document.
View Vendor Bank Account
Go to: Related --> Document --> Vendor Bank Account
This button will show the preferred Bank Account of the Vendor. If it does not exist, it will show the list of Vendor Bank Account for the specific Vendor.
Import Journal --> Document --> Files
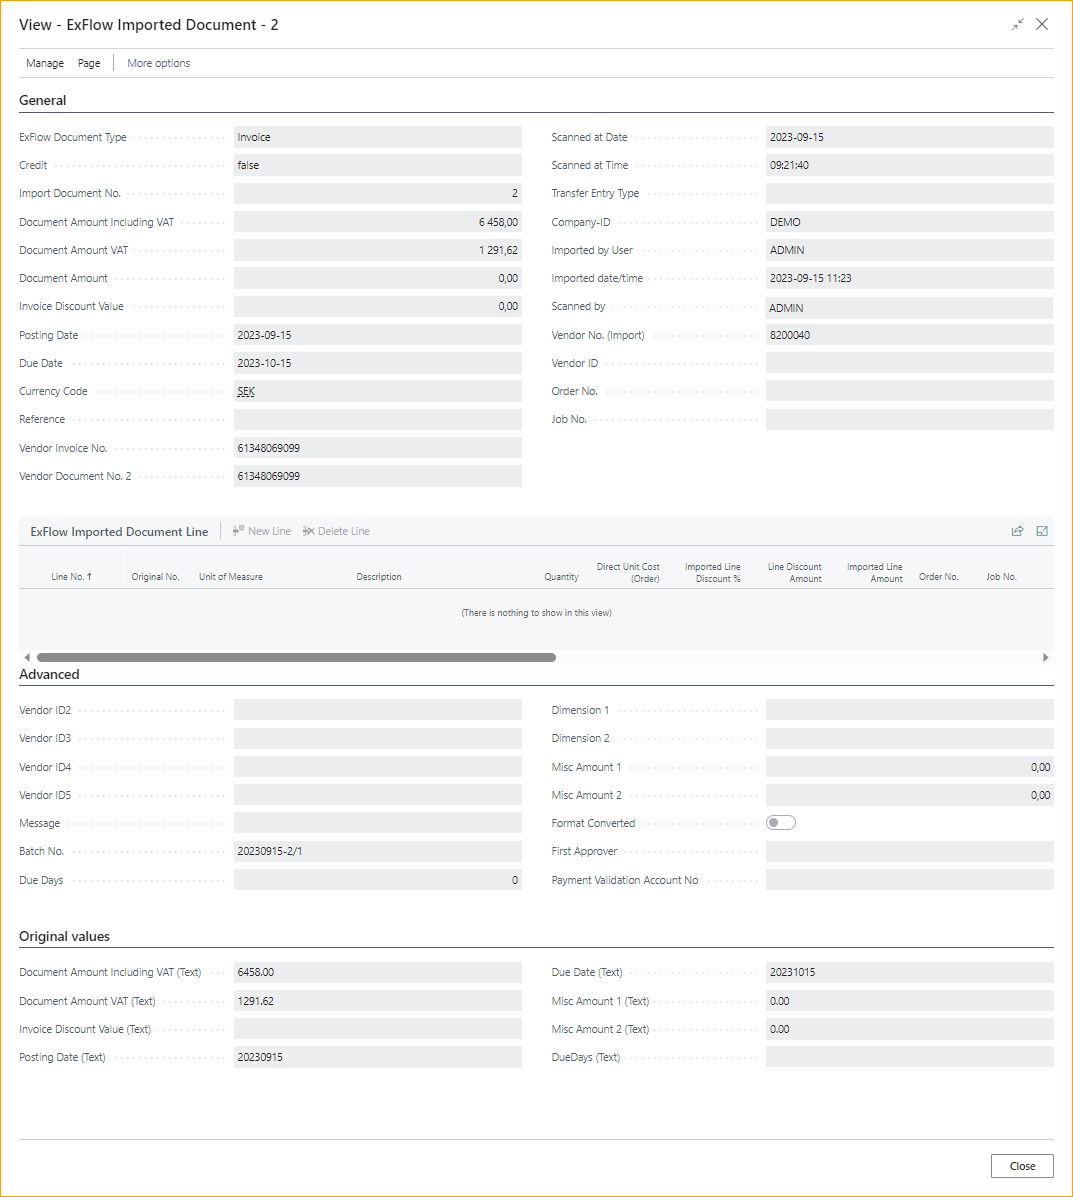
Show Import Details (OCR)
Go to: Related --> Files --> Show Import Details (OCR)
To be able to see the interpreted data mark the correct document line, go to "Show Import Details (OCR)". The data cannot be modified.
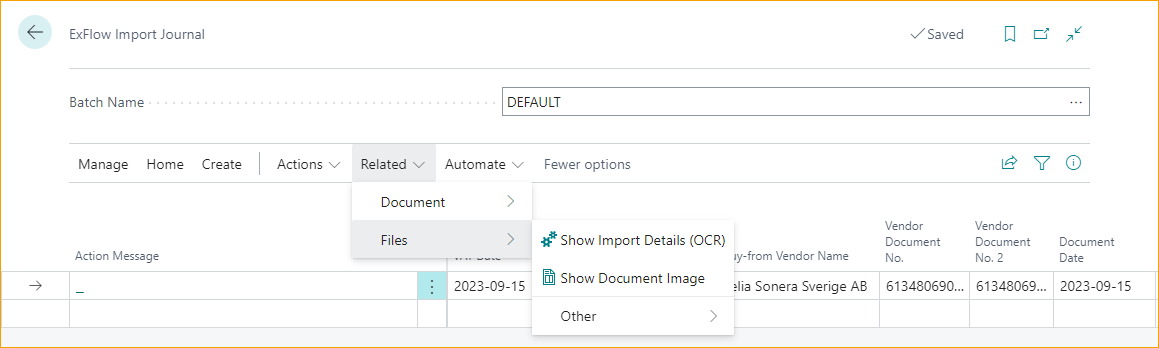
Show Document Image (Ctrl + I) / Export pdf
When a document is created for approval the Document Image (PDF) can be viewed by using short commando (Ctrl+I) in following places:
- Purchase Invoice
- Purchase Credit Memo
- Posted Purchase Invoice
- Posted Purchase Credit Memo
- Vendor Ledger Entries
- Posted G/L Entries
- Posted VAT Entries
- ExFlow Import Journal
- ExFlow Approval Status
- ExFlow Approval Status --> Verify Changes
- ExFlow Approval Status History
- ExFlow Search Documents
In Import Journal,Approval Status and Approval Status History, it is possible to select multiple documents before the usage of shortcut Ctrl+I:
If multiple files are selected, then there is an option to save a compressed file containing pdf files for all the selected documents at a specified location. This is a great way to export many pdf if needed.
"Show Document Image" can also be reached from menu under Related.
Open PDF- Viewer in New Window
It is possible to open the PDF in a new separate window to get a better view of the document image.
This function is moved from the Import Journal menu to the PDF FactBox on the right side.
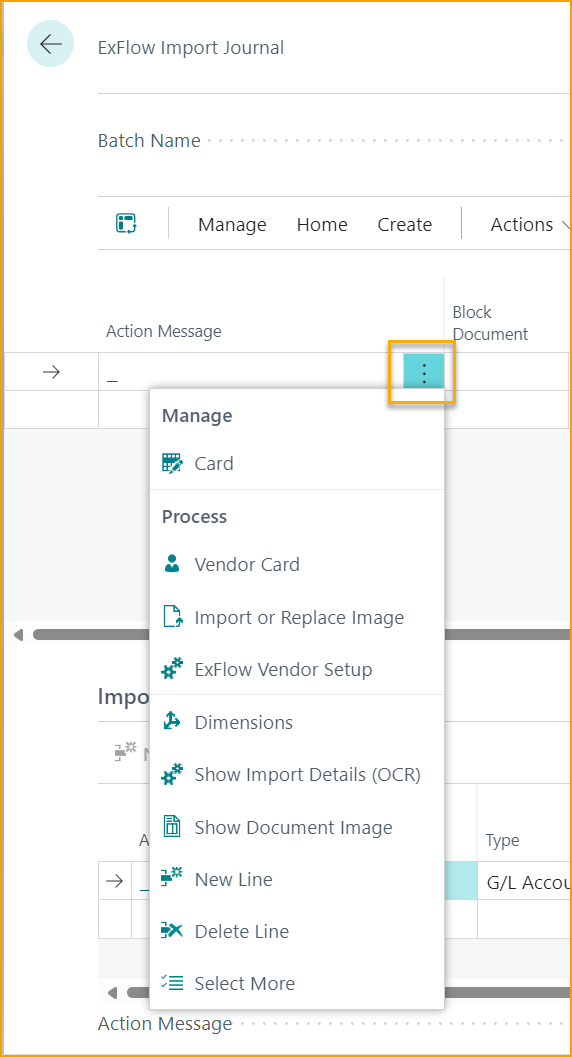
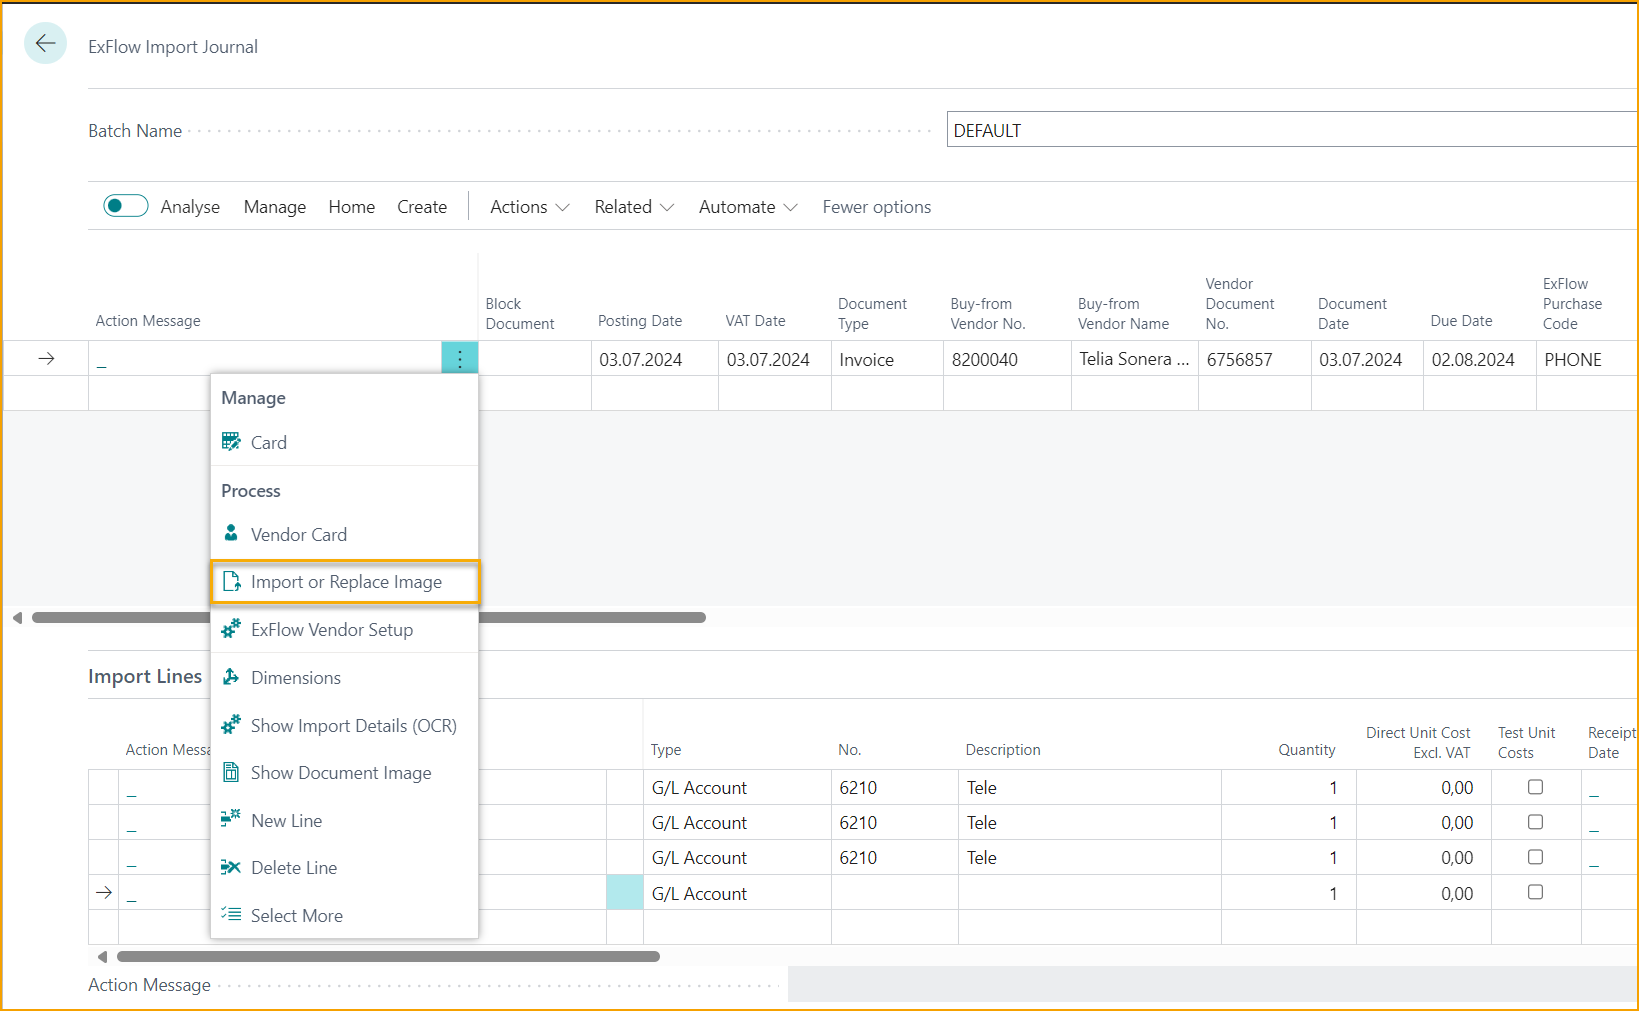
Document Header - Show more options
Click on the ''three vertical dots'' on the Document Header to find fast track options.
Open ExFlow Import Document Card
Go to: Manage --> Card
Open the ExFlow Import Document card for the selected document.
View Vendor Card
Go to: Process--> Vendor Card
This button will show the Vendor Card for the selected document.
Can also be found under Related --> Document --> Other --> Import or Replace Image
Import or Replace Image
Got to: Process --> Import or Replace Image
Import a file or replace an image to the context menu on the invoice header through function ''Import or Replace Image" in Import Journal.
Can also be found under Related --> Files --> Other --> Import or Replace Image
ExFlow Vendor Setup
Go to: Process --> ExFlow Vendor Setup
This button will show/edit the ExFlow Vendor Setup for the current vendor.
Dimensions
Go to: Process --> Dimensions
View dimensions set on the selected document.
Show Import Details (OCR)
Go to: Process --> Show Import Details (OCR)
To be able to see the interpreted data mark the correct document line, go to "Show Import Details (OCR)". The data cannot be modified.
Read more about show Import Details above
Show Document Image (Ctrl + I)
Go to: Related --> Files --> Show Document Image
To open PDF on full screen for a selected document or use shortcut (Ctrl+I).
"Show Document Image" can also be reached from menu under Related.
Header Fields
Here will some ''good to know about'' fields be presented.
Block Document
On the Import Journal Header, AP can block a document from creation or posting.
Block for Creation
Block the document for being created in Import Journal and send for approval.
Block for Posting
Block the document from being posted in Approval Status.
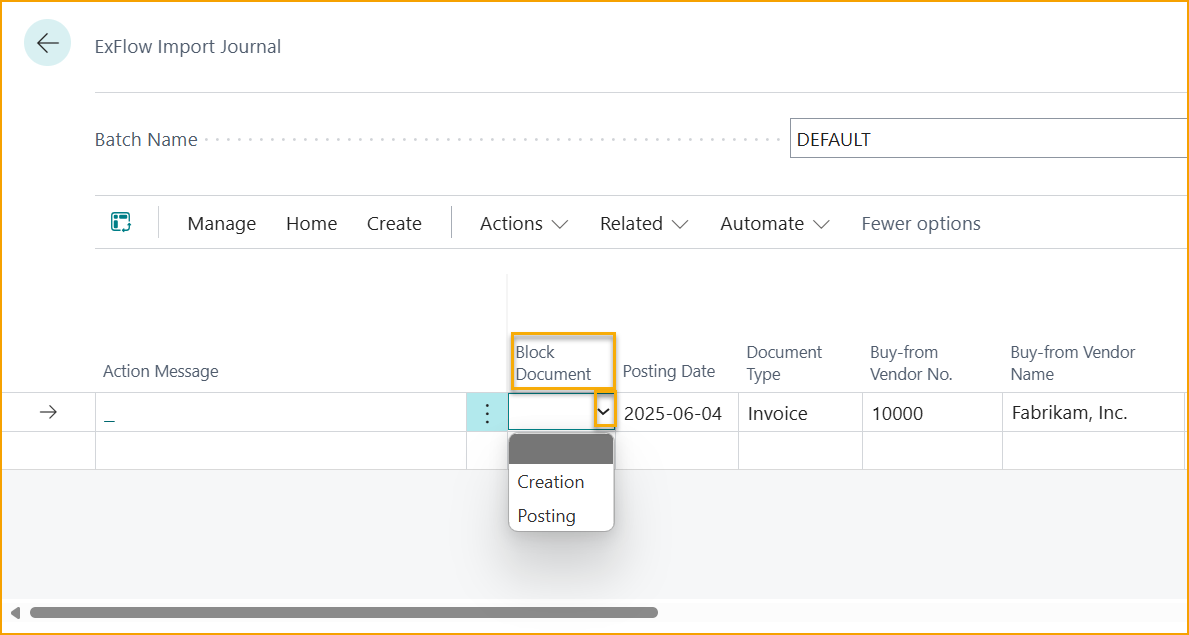
On the Approval Status Header, the field ''Block Document'' can be added via personalization for a better overview of all current document, blocked for posting.
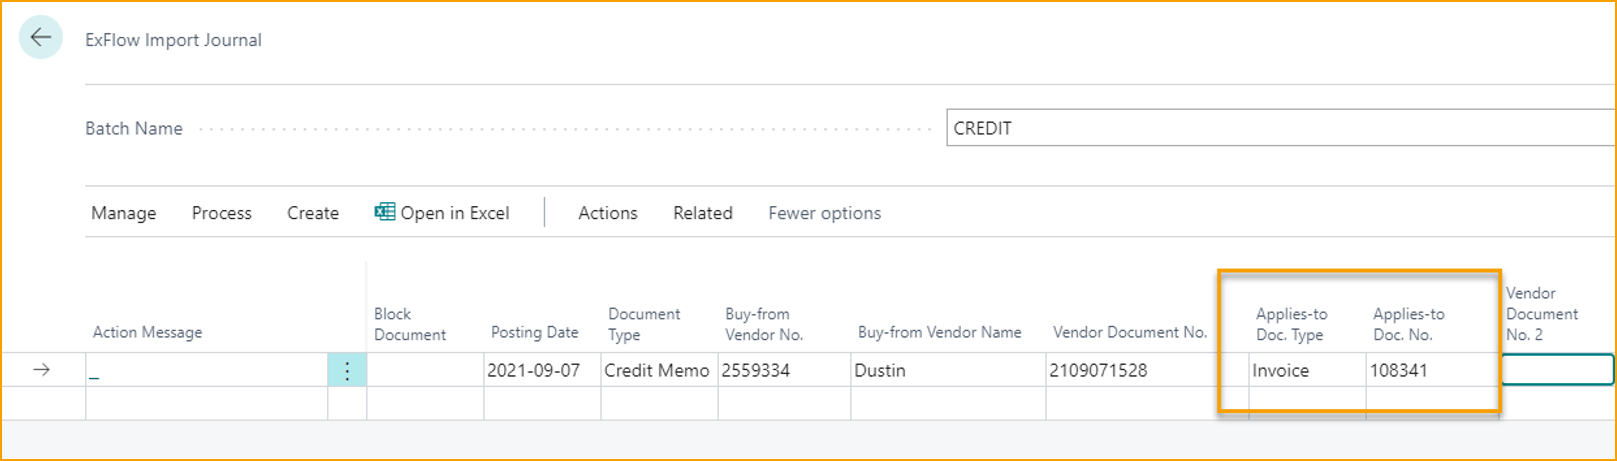
Applies-to-Document
There is a possibility to apply payments to a document. E.g., to apply an Invoice to a Credit Memo in Vendor Ledger Entries when posting the Credit Memo.
To use these fields, they must first be added by using personalize.
Applies-to-Doc. Type specifies the type of the posted document that this document or journal line will be applied to when posting, for example to register payment.
Applies-to-Doc. No. specifies the number of the posted document that this document or journal line will be applied to when posting, for example to register payment.
Predefined Account
ExFlow Predefined Account can be used to suggest only one G/L account for imported Invoices/Credit Memos.
This setting cannot be used together with ExFlow Purchase Code.
Predefined Account can be set on a vendor level. Read more about this under Vendor Setup
If "ExFlow Predefined Account" is empty the "Predefined Account" can be used from ExFlow Setup instead.
ExFlow Purchase Code
ExFlow Purchase Code is used when only one G/L account is not enough. Selecting this will replace existing import lines (if any).
This setting cannot be used together with ExFlow Predefined Account.
ExFlow Purchase Code can be set on a vendor level. Read more about this under Vendor Setup
If "ExFlow Purchase Code" is empty the "ExFlow Purchase Code" can be used from ExFlow Setup instead.
Read more about this under section Purchase Codes
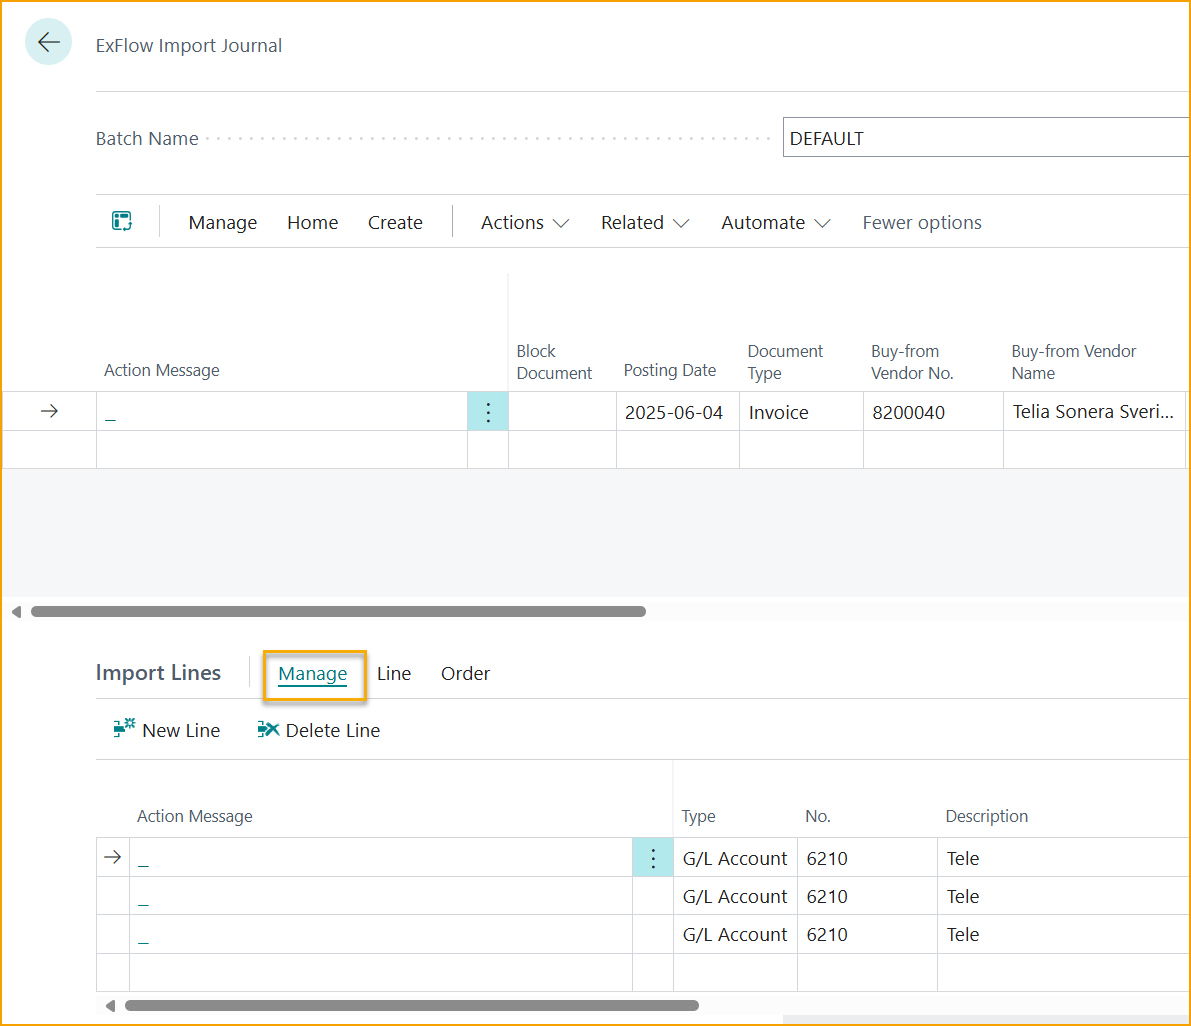
Import Journal - Import Lines
Import Lines - Manage
New Line / Delete Line
Go to: Import Lines --> Manage --> New Line / Delete Line
New Line: Add new line to create a new entry.
Delete Line: Delete the selected row.
Import Lines - Functions
Go to: Import Lines --> Line
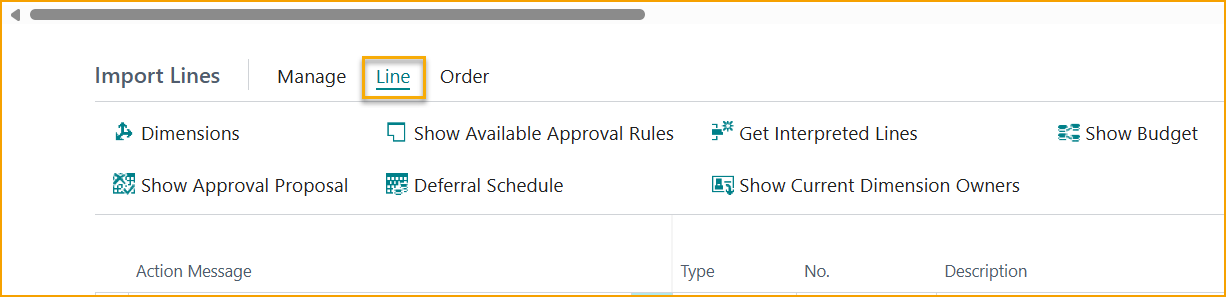
Dimensions
Go to: Import Lines --> Line --> Dimensions
Show all dimensions for current line.
Show Approval Proposal
Displays the current approval proposal for the selected document line.
Go to: Import Lines --> Line --> Show Approval Proposal
Show Available Approval Rules
Go to: Import Lines --> Line --> Show Available Approval Rules
This will display all available approval rules with the highest priority at the top.
Deferral Schedule
Go to: Import Lines --> Line --> Deferral Schedule
If a deferral template code is specified, click on Deferral Schedule to view/edit the deferral schedule for the selected document line. In ExFlow, Deferral Schedule is used for ExFlow approval document and not the purchase invoice.
Move Deferral Forward
Go to: ExFlow Setup --> General --> Move Deferral Forward
Move Deferral Forward will automatically move Deferrals within closed deferral periods to next open when posting for Purchase Invoices and Purchase Credit Memos even if the document is active for ExFlow Approval or not.
E.g. Allow Deferral Posting from 2023-01-15.
Create an Invoice with Deferral Schedule for three months and Start Date on Posting Date.
2023-01-15 // 5 000,00
2023-02-01 // 10 000,00
2023-03-01 // 10 000,00
2023-04-15 // 5 000,00
After monthly closing update Allow Deferral Schedule to 2023-02-01
When posting, Business Central will ask if you want to update Deferral Starting Date and update Posting Date to 2023-02-01.
If yes, then Business Central will move all periods forward.
2023-02-01 // 10 000,00
2023-03-01 // 10 000,00
2023-04-01 // 10 000,00
But if instead answer No and let ExFlow Move Deferral Forward, January will be added to February this this is the first allow posting period for Deferrals.
2023-02-01 // 15 000,00
2023-03-01 // 10 000,00
2023-04-15 // 5 000,00
Get Interpreted Lines
Go to: Import Lines --> Line --> Get Interpreted Lines
Use this function to retrieve lost or deleted interpreted lines. ExFlow will populate the invoice with interpreted lines from the OCR Import details.
If a user accidentally deletes all lines, it is possible to use "Get Interpreted Lines" to reset all changes made after import.
Show Available Approval Rules
Go to: Import Lines --> Line --> Show Available Approval Rules
This function displays all available approval rules for the selected document line.
Show Current Dimension Owners
Go to: Import Lines --> Line --> Show Current Dimension Owners
View the ExFlow Dimension Owners for the current list of suggested approvers.
Show Budget
If G/L Budget Control is activated, it is possible to view calculated. Read more under section G/L Budget Control
Import Lines - Order
Go to: Import Lines --> Order

Order Card
Go to: Import Lines --> Order --> Order Card
If the document line is matched against a order, click on Order Card to open the corresponding purchase order/ return order card.
Item Charge Assignment
Go to: Import Lines --> Order --> Item Charge Assignment
When using Charge (Item), assignment can be done in three ways. From Import Journal, automatically or manually from Invoice Card.
Manually from Import Journal:
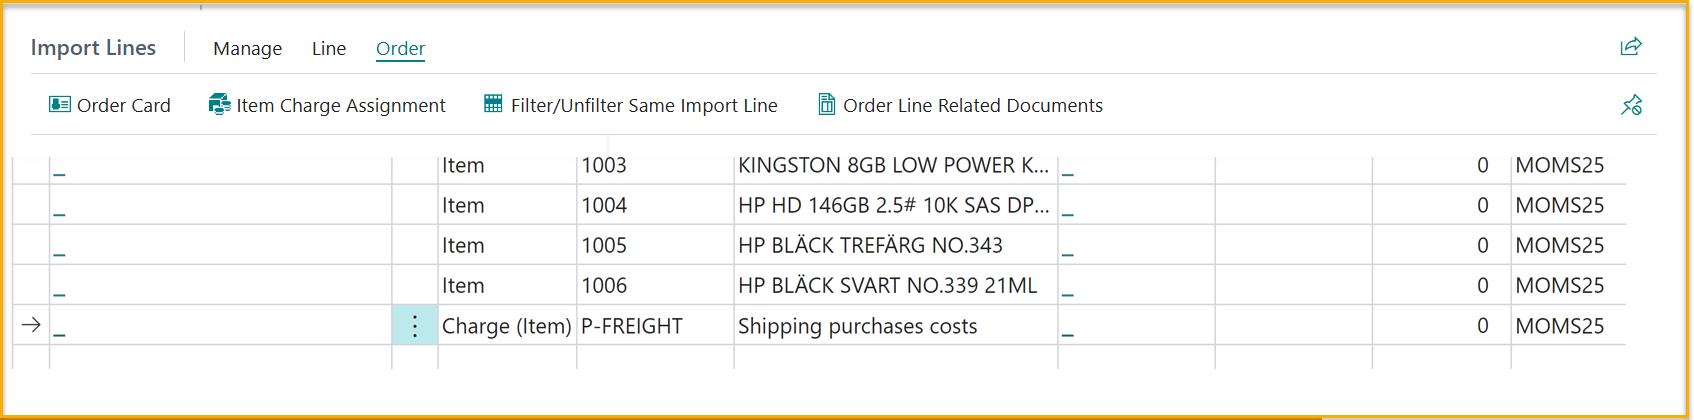
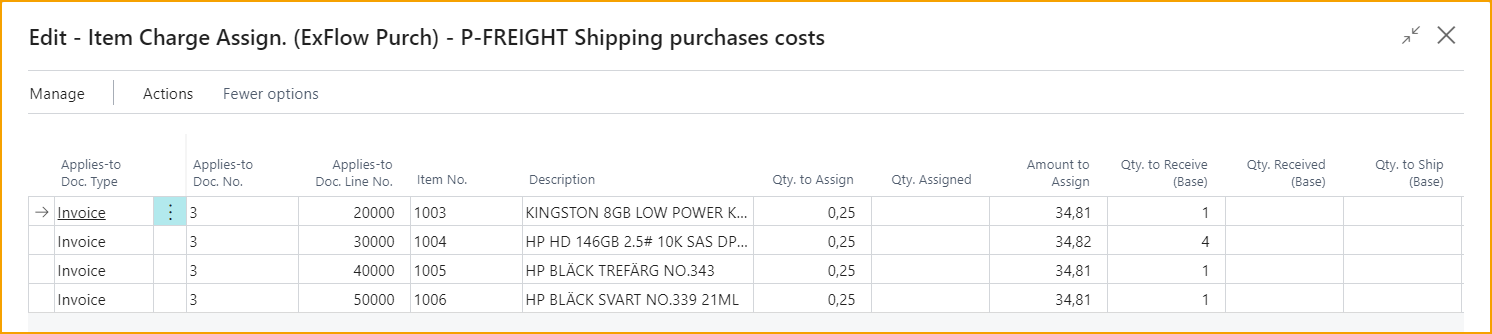
Let ExFlow automatically assign Item Charge. Add an option on how to calculate assignment "Equally, By Amount, By Weight or By Volume" in field "Automatic Item Charge Assignment" under Order Matching in ExFlow Setup.
If Automatically Item Charge Assignment is used, Charge (Item) will be assigned when running Verify Changes in Approval Status and it is no longer possible to assign manually from Import Journal.
Automatically Item Charge Assignment can also be set per vendor. Go to ExFlow Vendor Setup to assign a specific item charge option for a specific vendor, or to exclude a specific vendor (if this function is enabled in ExFlow Setup) by choosing option "None".
Filter/Unfilter Same Import Line
Go to: Import Lines --> Order -->Filter/Unfilter Same Import Line
Filter/Unfilter to show other documents or lines with the same Order No. and Order Line No.
Order Line Related Documents
Go to: Import Lines --> Order -->Order Line Related Documents
Shows where the selected order line is used on the chosen purchase document.
Auto create Multiple Fixed Assets
Go to: *Import Lines --> No. of Fixed Asset Cards
If the Line Type is set to ''Fixed Asset'', it's possible to enter a quantity of Fixed Asset to the No. of Fixed Asset Cards- field.
When the invoice is created and sent for approval, the import journal line number will be transferred to the purchase invoice card.
The selected number of Fixed Asset will be created and acquired automatically, when the invoice is posted.
For example, if 4 is added to ''No. of Fixed Asset Cards'', then 3 Fixed Assets will be automatically created together with original existing Fixed Asset that was added in the Import Journal Line. All four Fixed Assets will be acquired automatically, when the invoice is posted.
Allocation Account No.
Go to: *Import Lines --> Allocation Account No. Add an Allocation Account No. and the allocation account number that will be used to distribute the amounts during the posting process.
The Allocation Account No. column can also be found in the ExFlow Purchase Code Card and Approval Status' Document Lines.
Doc. Creation Checks
Match Vendor's Currency
Go to: ExFlow Setup --> Doc. Creation Checks --> Match Vendor's Currency Code
If ExFlow is needed to check that the currency code on each imported invoice matches the vendors default currency code, then the setting "Match Vendor's Currency" should be activated. Find the setting under Doc. Creation Checks in ExFlow Setup.
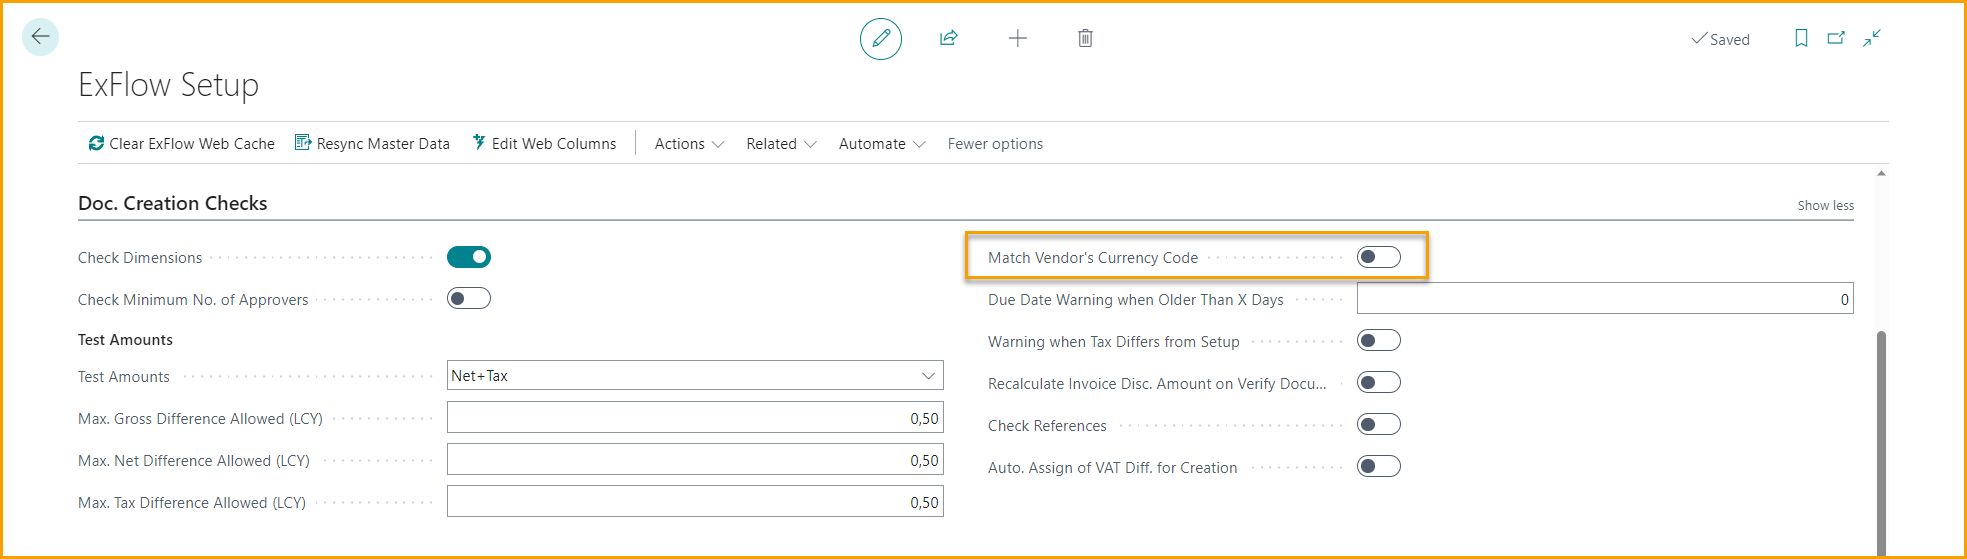
When this setting is active, ExFlow will give a warning for each document in the Import Journal where the document currency differs from the vendors' default currency.
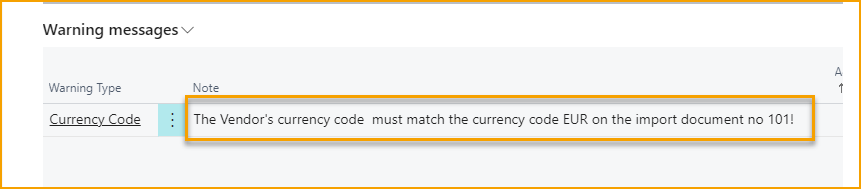
ExFlow compares the contents of the Currency field on the document in the Import Journal with the default currency on the vendor (i.e., the contents of the Currency field on the vendor card).
Allow VAT Difference
Go to: ExFlow Setup --> Doc. Creation Checks --> Auto. Assign of VAT Diff. for Creation
If Allow VAT Difference is activated in Purchases & Payables Setup, VAT Rounding can be added in Statistics in Import Journal before creating the document.
Max VAT Difference will be handled by settings in General Ledger Setup or from current Currency Code.
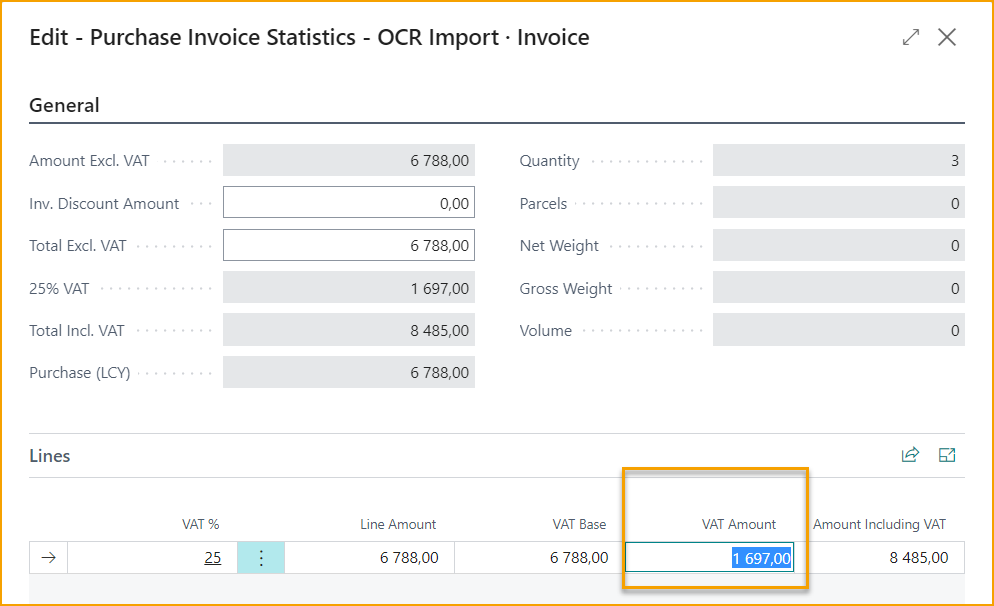
Via settings, ExFlow can assign VAT Difference automatically. Then VAT Difference will be proportionately distributed to all lines.
Activate "Auto. Assign of VAT Diff. for Creation" in ExFlow Setup under section Doc. Creation Check for Import Journal.
Activate "Auto. Assign of VAT Diff. for Posting in ExFlow Setup under section Doc. Posting Checks for Approval Status under Doc. Posting Checks.
Recommended to use both.
ExFlow will then add VAT Difference automatically if the VAT difference is within settings in General Ledger Setup or from current Currency Code.
If the amount is changed during the approval flow, Business Central will delete the VAT Difference on updated line. Then ExFlow can automatically reassign when running Verify Changes in Approval Status.
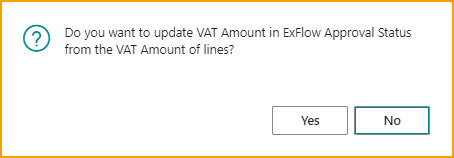
If VAT amount on lines is changed manually on Card after document creation, then ExFlow will ask:
"Do you want to update VAT Amount in ExFlow Approval Status from the VAT Amount of lines?"
Answer Yes, to update total VAT Amount in Approval Status.
Recommended settings:
If working with Automatic Assign of VAT Difference and Rounding on Invoices/Credit Memos when posting. Add NO VAT on G/L Account used for rounding.
VAT difference is not allowed on document that include lines with ONLY VAT. Only if VAT is calculated on lines.
Automatically Assign will override manually added VAT Amount in Statistics.
FactBoxes in Import Journal
To the right in Import Journal there are useful FactBoxes.
PDF Preview
| PDF Preview | |
|---|---|
 | Browse the PDF page number |
 | Open the PDF in a new separate window to get a better view of the document image |
 | "Zoom Out" and "Zoom In" |
 | Fit to width |
 | Fit to page |
Lastly, a reminder that it's possible to open PDF file in full size via shortcut commando ''Ctrl+I'' or to go via Related --> Files --> Show Document Image
Discussion Panel (Message will be sent when document is created)
When a comment has been added and sent in Discussion Panel from a document in Import Journal, it can only be seen in FactBox to the right marked with creating Users ID, Date and Time.
If a ExFlow User that is a system user is mentioned by using @, notification will show in Business Central when logging in. An email message can also be sent, but not until the document is created due to that ExFlow Web Users cannot see documents or comments in Import Journal.
On ExFlow Web the message will display in Chat on Document after it is created.
Read more about settings and how to use Discussion Panel under section Discussion Panel / Chat and Line Comments
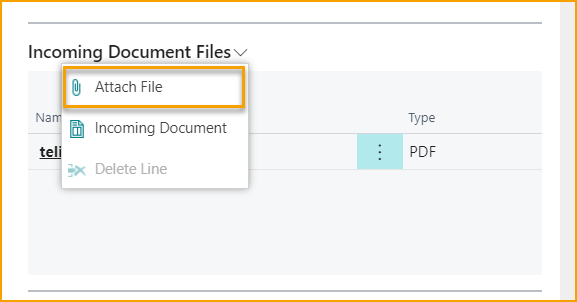
Incoming Document Files
Go to: FactBox --> Incoming Document Files --> Attach File
Add an Attach File.
Click "Choose", browse to the file to attach, and click "Open".
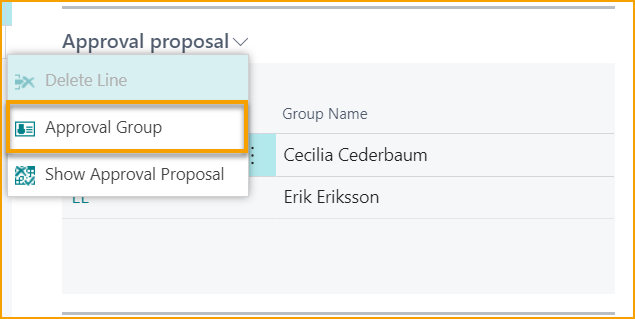
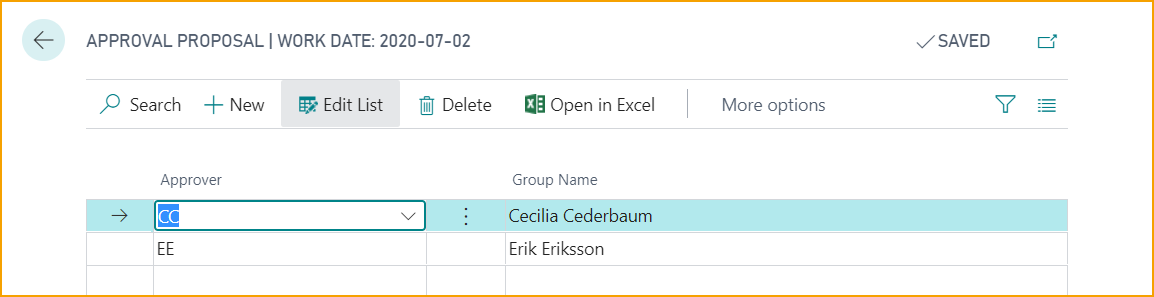
Approval Proposal
View Approvers for current Document Line.
From: Approval Proposal --> Show Approval Proposal
Approvers can be added manually. This is only to be used in special occasions.
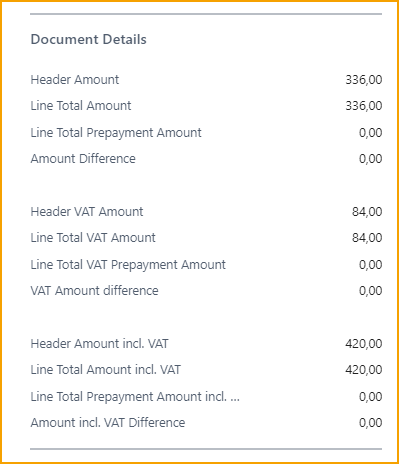
Document Details
If the amount in document header and total amount on document lines do not have the same value, then document Details can help to see difference amount and if it is due to Direct Unit Cost excl VAT, Direct Unit Cost incl VAT, VAT amount or Prepayment.
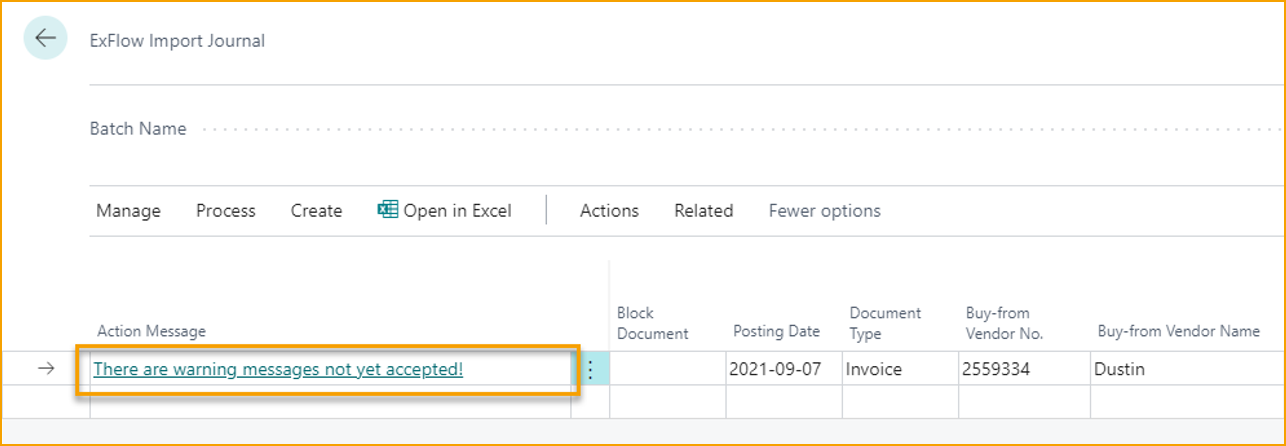
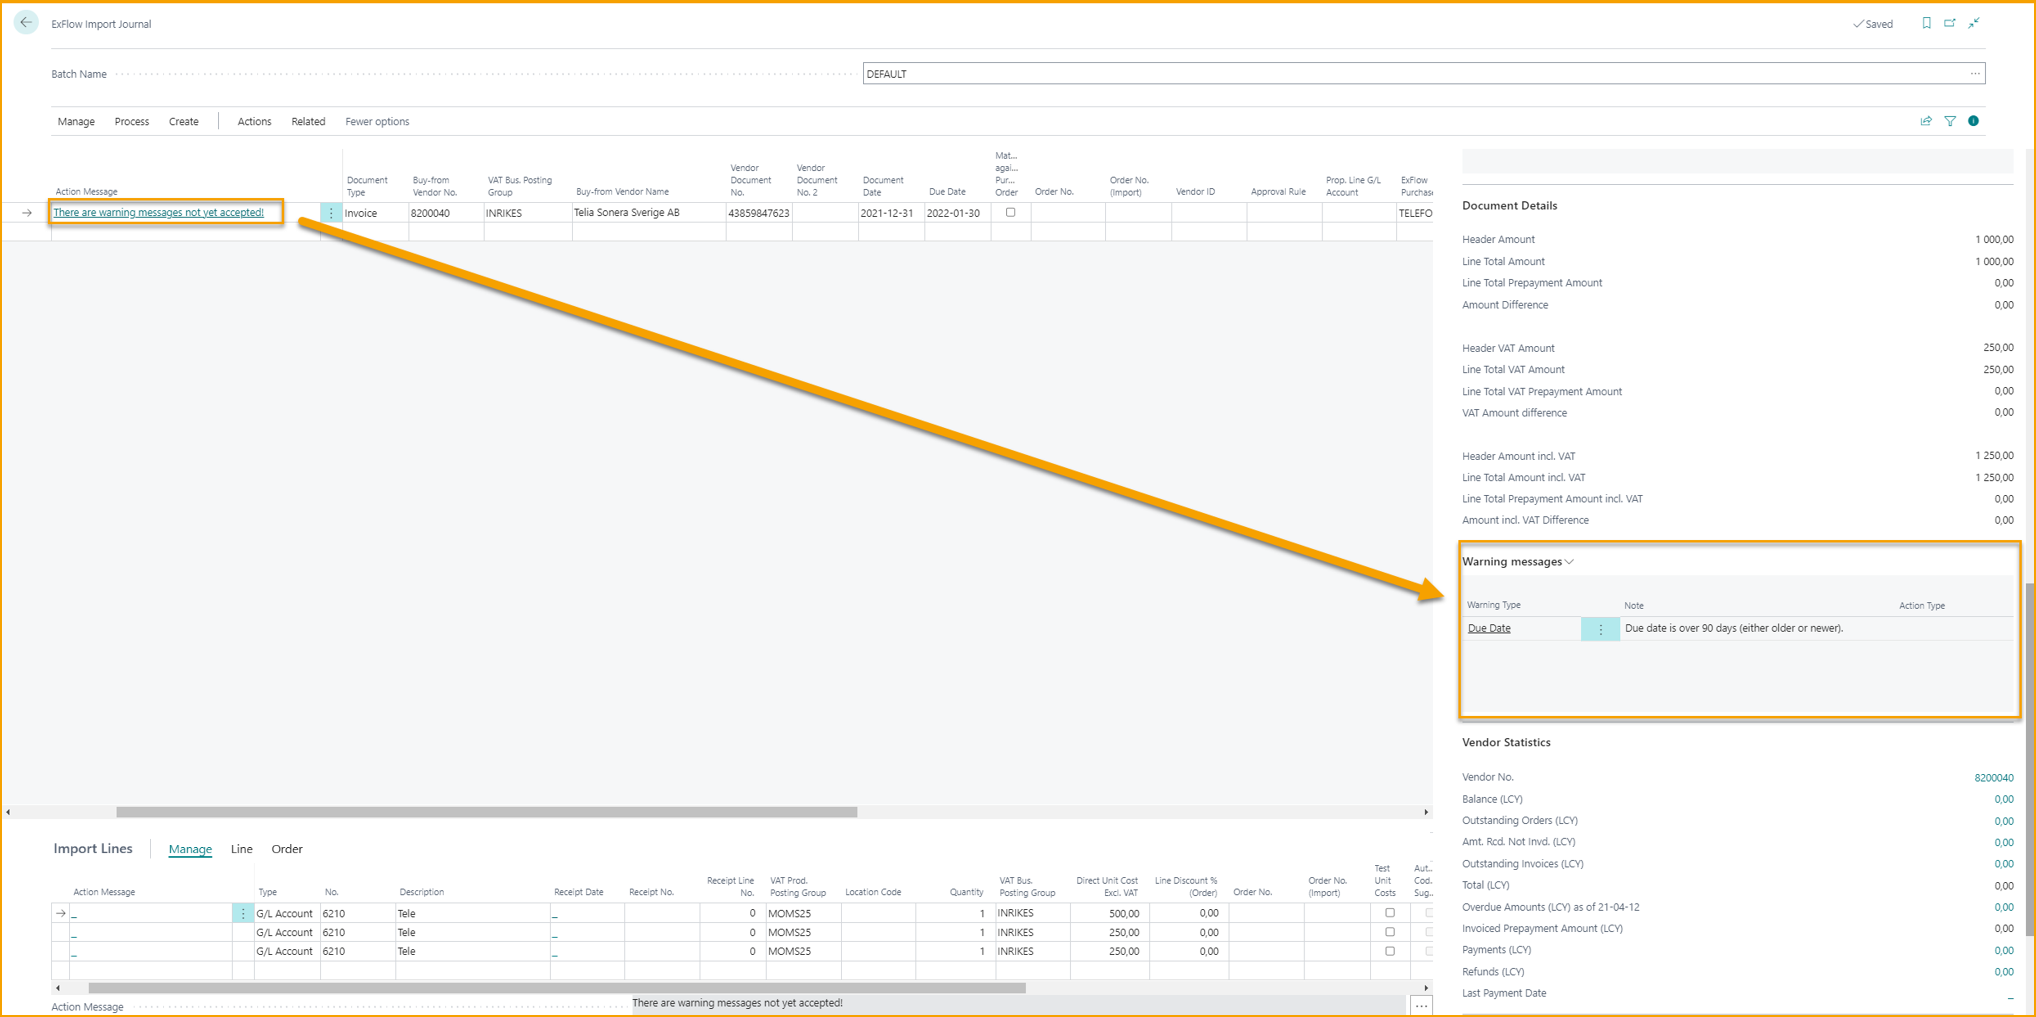
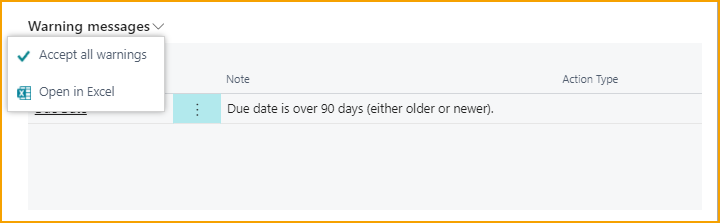
Warning Messages
If Action Message displays "There are warning messages not yet accepted!" the message is viewed in FactBox "Warning messages". Make appropriate changes or "Accept all warnings" as picture below.
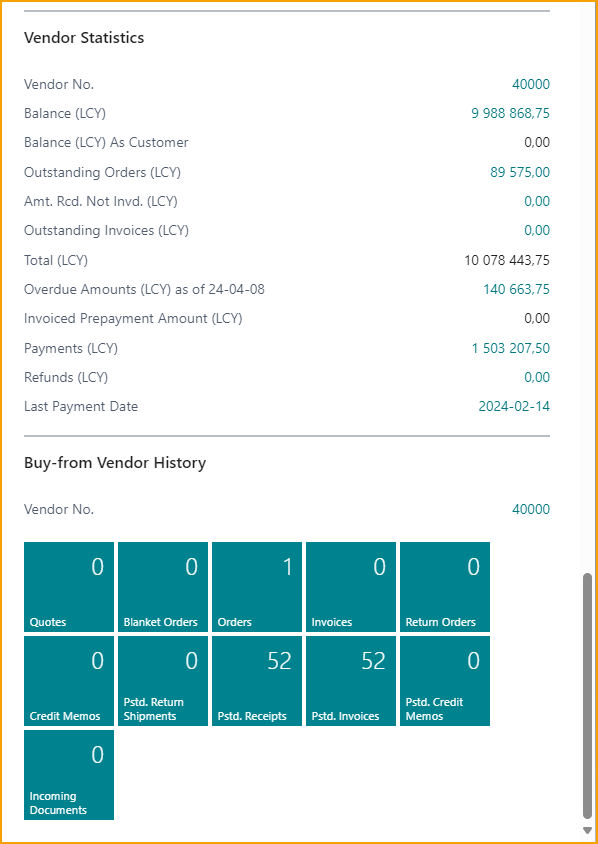
Vendor Statistics and Buy-from Vendor History
Find Vendor information in Vendor Statistic and Buy-from Vendor History FactBoxes.
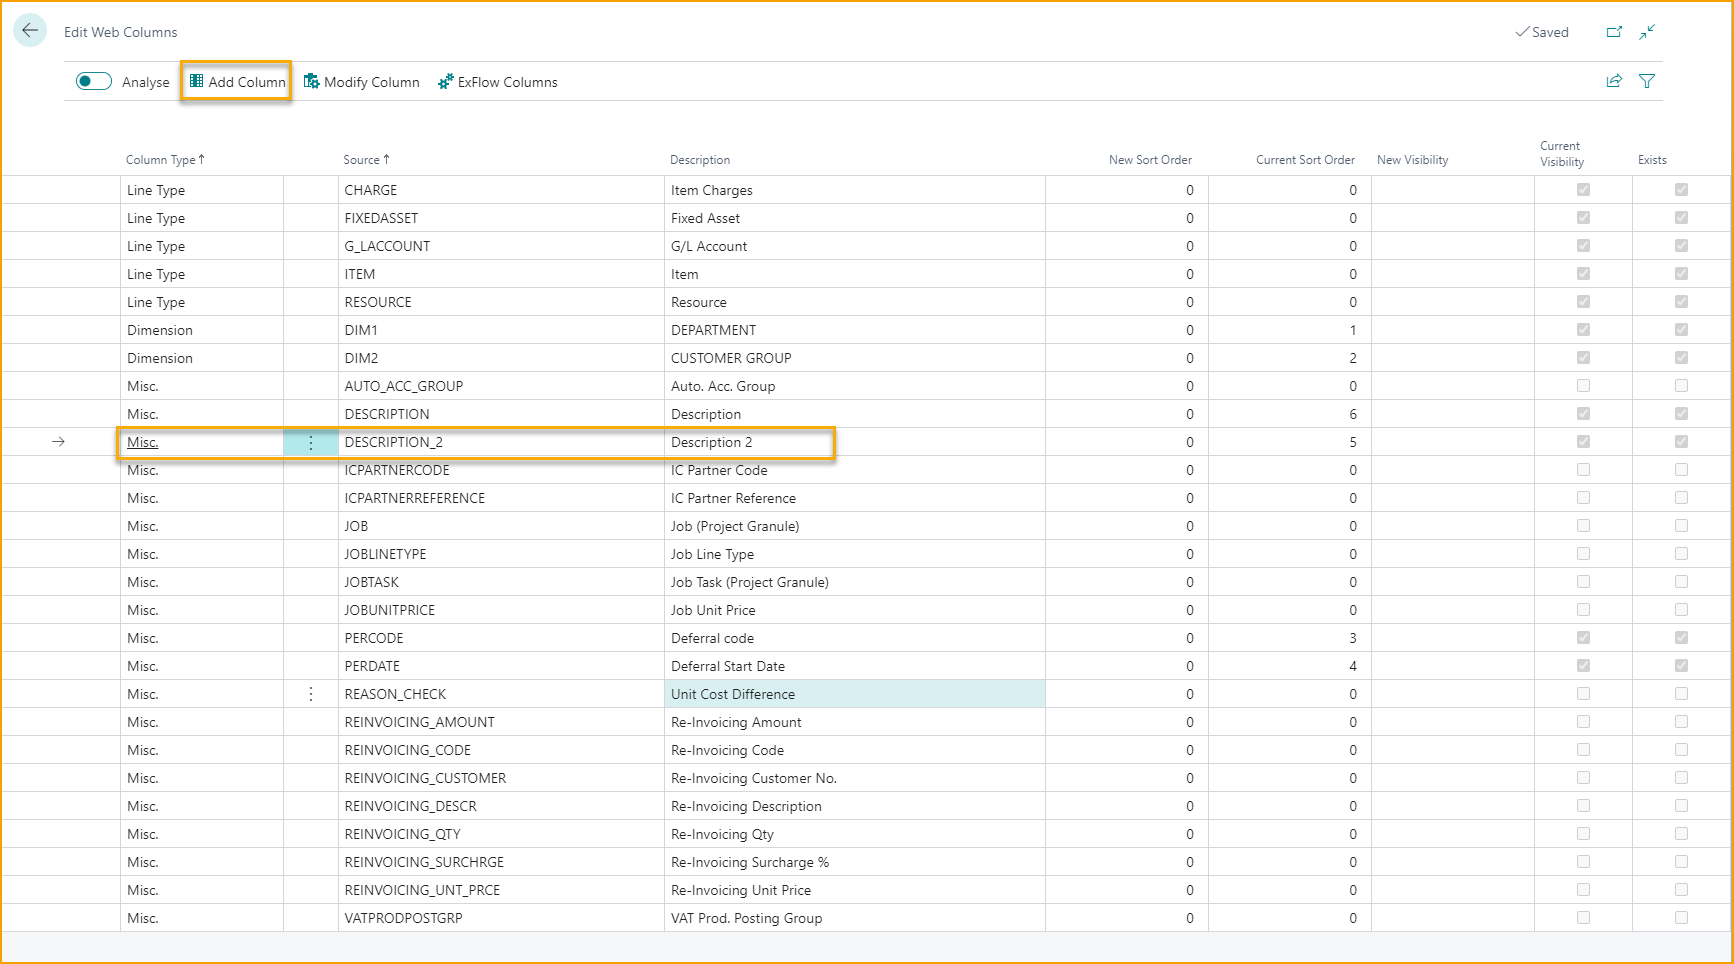
Web columns
Description 2
It is possible to use personalize and add the Description 2- field to the Import Journal lines.
For PO matched invoices, the value in Purchase Line Description 2- field will flow from the PO/Receipt line to the corresponding import journal invoice line.
Same for Cost/Expense invoices, the Description 2- field will be available in the import journal for users to manually enter text.

Any text entered in the Description 2- field will be visible in ExFlow Web.
To add the Description 2 Web Column, go to ExFlow Setup --> Edit Web Columns and then click on ''Add Column''.
Read more about Web Columns under section ExFlow Web.