Purchase Order Matching Process
Run the Order Matching Wizard
This user manual is your go-to guide for setting up ExFlow to effortlessly match invoices to purchase orders. Designed with simplicity in mind, the Order Matching Wizard makes the process straightforward and user-friendly.
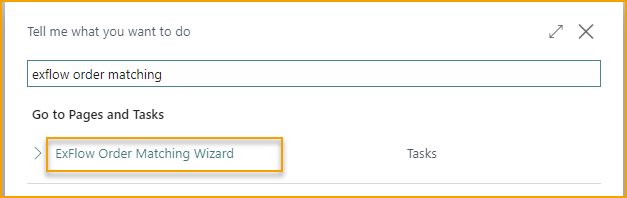
Search for ExFlow Order Matching Wizard.
Header- or Line Matching
The first step in setting up the Order Matching Wizard is to determine whether the matching of invoices to purchase orders should be performed at a header level or line level.
Header Level Matching:
If you choose header level matching, the Order Matching will compare the overall invoice total with the available total value of the purchase order.
This method is suitable when the details of individual items or services on the invoice do not need to be matched with specific items on the purchase order, or if the invoice line information is too poor for accurate matching.
Line Level Matching:
If you choose line level matching, the Order Matching will compare each interpreted invoice line with corresponding line items on the purchase order.
This approach ensures that each individual item or service on the invoice is matched accurately to the corresponding item on the purchase order.
Line matching utilizes interpreted information such as invoice quantity, unit price, line total, and more – to get an accurate match to the corresponding purchase order line and to be able to identify any discrepancies.
Match Documents To
The next step is to determine how invoices should be matched to purchase orders in relation to purchase receipts. There are three options to consider:
Receipt:
Select this option if you want invoices to be matched only to purchase orders that have associated purchase receipts.
Ensuring that the items are received and recorded in the warehouse and align with the invoice, before matching the invoice and sending it for approval and final posting.
Order:
Choose this option if you want invoices to be matched to purchase orders regardless of whether there is an associated purchase receipt.
This allows invoices to be matched even if the receipt of goods or services has not been confirmed, providing flexibility in your matching process.
Useful in scenarios such as drop shipment or when purchase receipts are not available, or required to fully match the invoice and have it sent for approval and posting.
Order and Receipt:
If you prefer a combination of the previous two options, select this option.
In this case, invoices can be matched to purchase orders with or without associated purchase receipts, providing maximum flexibility in matching scenarios.
Possible to match invoice lines to purchase orders with and without received item lines. Also makes it possible to match invoice lines to partially received item lines on the order and have them sent for approval and posting.
Automatically Approve Matched Invoices
Never:
Select this option if you want all matched invoices to go through a manual approval process. In this case, no invoices will be automatically approved, regardless of any differences or thresholds.
If Difference is within Tolerance:
Choose this option if you want matched invoices to be automatically approved only when the difference between the invoice and the purchase order falls within the specified allowed threshold or tolerance for automatic approval.
This option allows for efficient processing of invoices with minor discrepancies, ensuring that only significant differences require manual approval.
If Matched Order is Approved:
This option adds an additional layer of approval by requiring that the matched order has been reviewed and approved through ExFlow, ensuring that invoices are automatically approved only when the necessary authorization is in place.

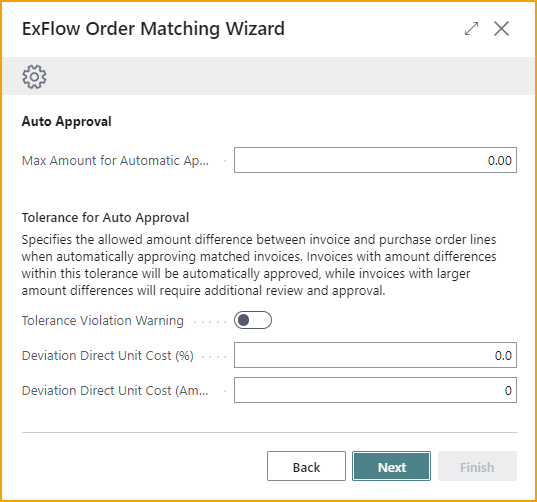
Max Amount for Automatic Approval
If you have allowed for automatic approval of matched invoices, this is where you can specify the maximum amount for automatic approval. This parameter defines the threshold above which invoices will require manual approval, regardless of the matching results.
Tolerance Violation Warning
Enable this setting if you’d like the accountants to receive a warning during the import of purchase matched invoices when there are discrepancies over your allowed tolerance for automatic approval. Either way if this setting is enabled or not, discrepancies higher than your allowed tolerance will always require the invoice line to be manually approved.
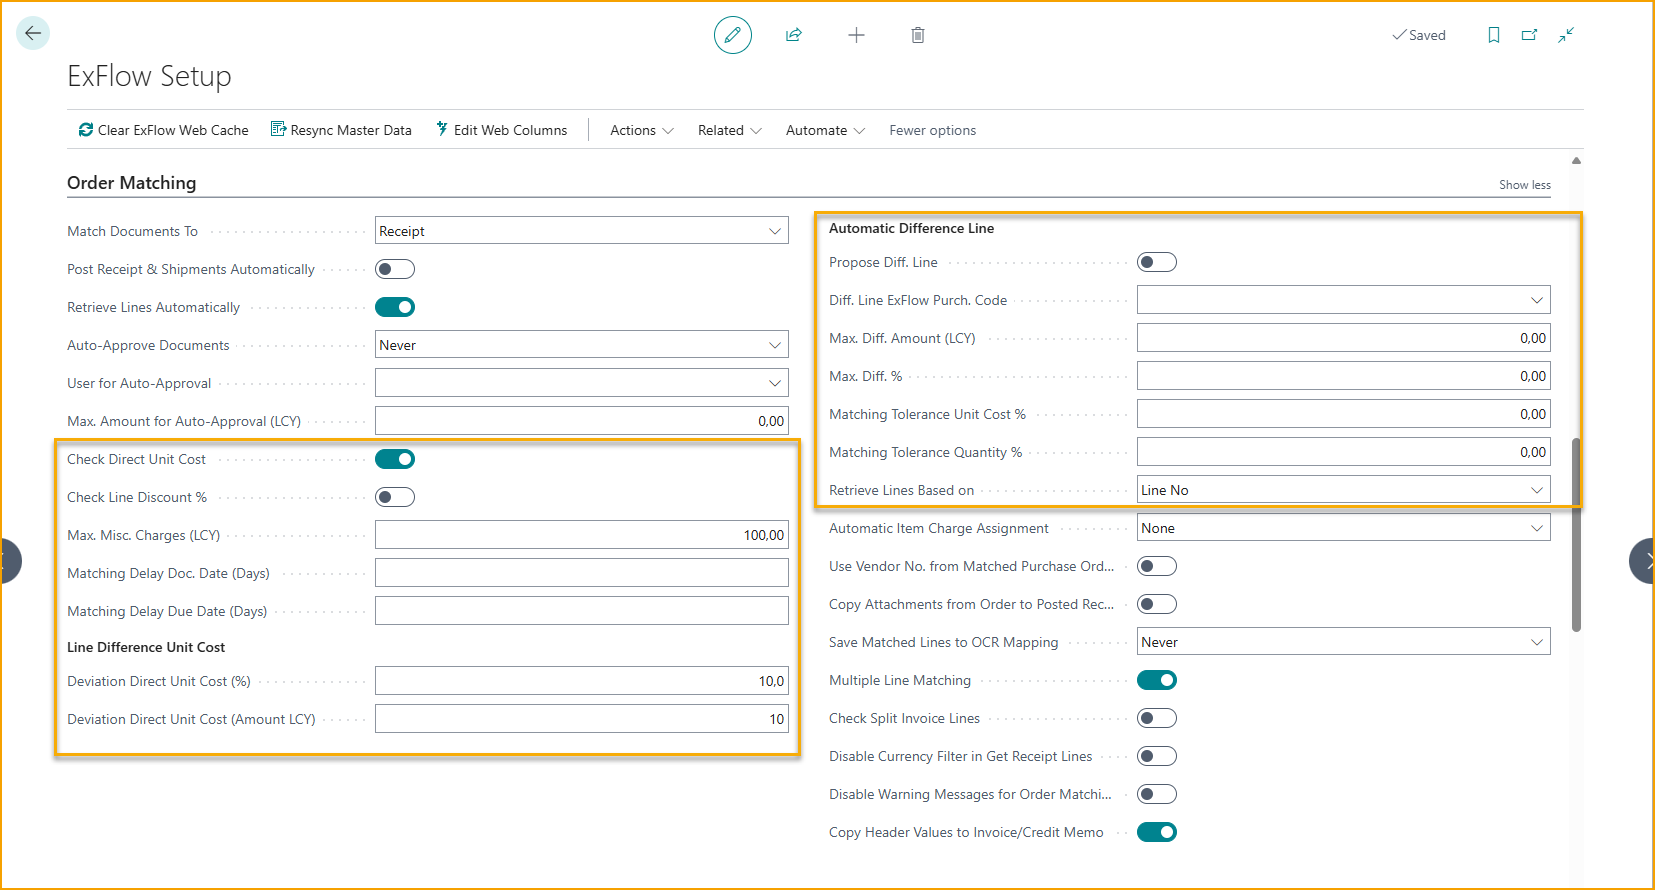
Deviation Direct Unit Cost (%) and Deviation Direct Unit Cost (Amount LCY)
Define the deviation thresholds for the direct unit cost of invoice lines compared to the matched order lines. These thresholds determine the allowable differences between the invoice and the purchase order for automatic approval.
Automatic Difference Handling
The Automatic Difference Handling functionality allows ExFlow to automatically suggest a difference line if any additional or unexpected costs, such as freight or other charges are identified during the order matching. You can choose if ExFlow should suggest an invoice line of the line type Item Charge, or G/L Account. Then specify which G/L Account, or what Item Charge to use for the suggested line.
Max Diff. Amount (LCY) and Max. Diff. %
Is where you can specify an allowed tolerance for the automatically suggested difference line for automatic approval.
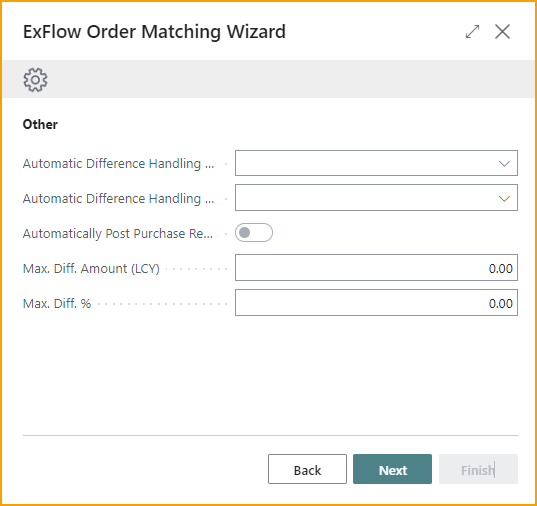
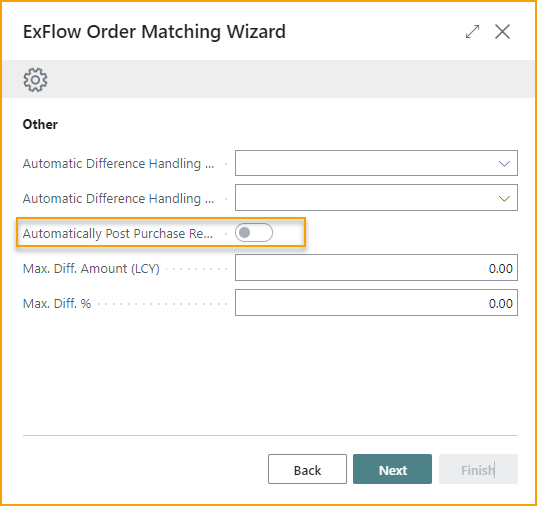
Automatically Post Purchase Receipts
The "Automatically Post Purchase Receipts" feature allows for the automatic posting of purchase receipts in the matching process. However, please note that this feature can only be utilized when matching invoices to “Order” or “Order and Receipt”.
Matching invoices using the logic “Order” or “Order and Receipt”, allows ExFlow to fully match and send an invoice for approval and posting. However, Business Central always requires that Purchase Receipts are posted before the matched invoice can be posted and for the Purchase Order to be invoiced.
This setting allows ExFlow to Post and Invoice the approved quantity of the matched invoice lines automatically. It’s executed once the invoice has the status “Ready for Posting” in Approval Status. With this setting disabled, you’re required to post the purchase receipts manually.
Complete the Wizard
Click "Finish" to close the Wizard and apply the settings.
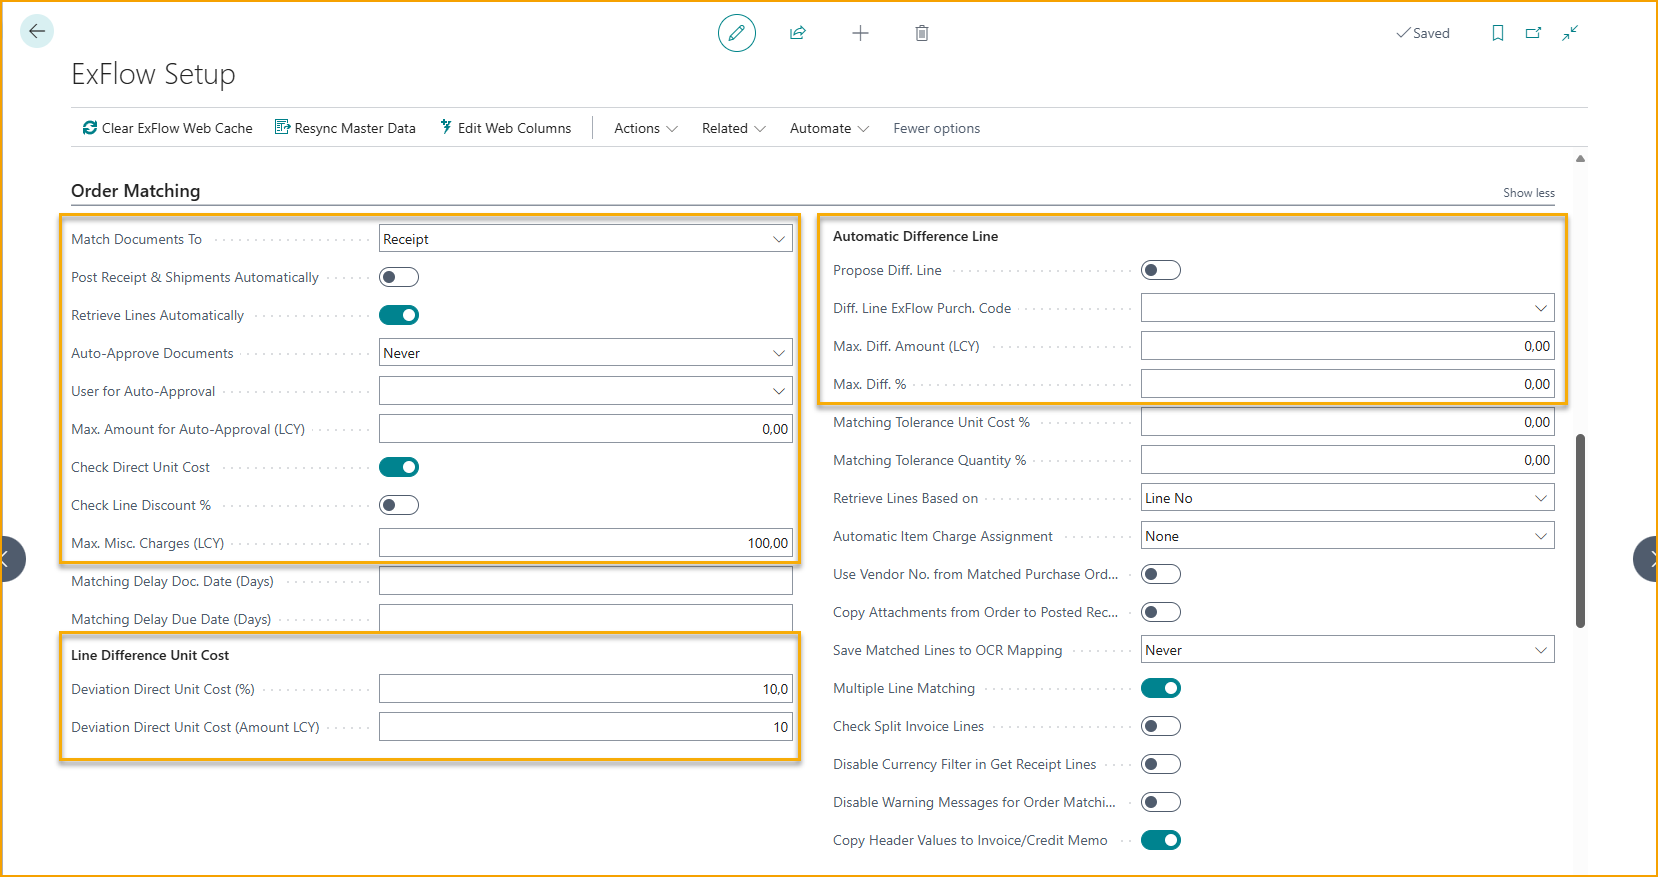
ExFlow Setup
Fields in ExFlow Setup that are affected by the Order Matching Wizard are selected in the image below:
Import Purchase Invoice with Order Matching
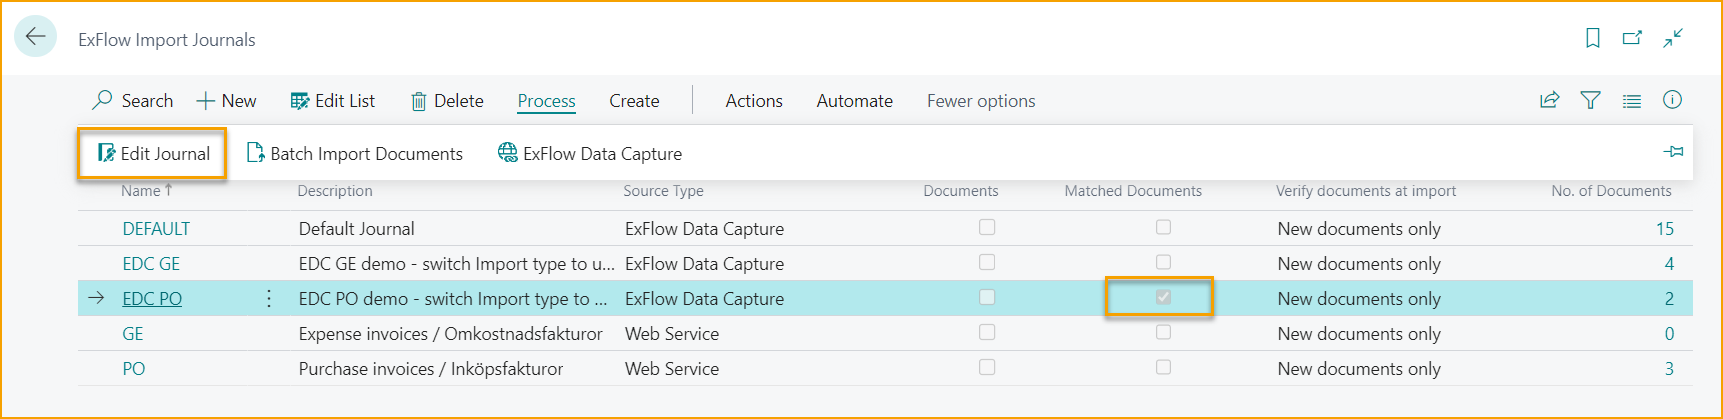
Import invoices is done from "ExFlow Import Journals". Use function "Batch Import Documents" to import invoices for all Journals or enter/edit an Import Journal to import documents in one specific journal.
Order matching on Header-level
If a Purchase Order number has been interpreted on the invoice, it will be visible in the column "Order No. (Import)". ExFlow will automatically search through the list of available Purchase Orders in Business Central based on the vendor and imported Purchase Order number.
ExFlow can match both on the internal Purchase Order number, and the Vendors Purchase Order number, but the latter requires that it is set up on the actual Purchase Order itself.
The column "Order No." will show the matched Purchase Order if it is found.
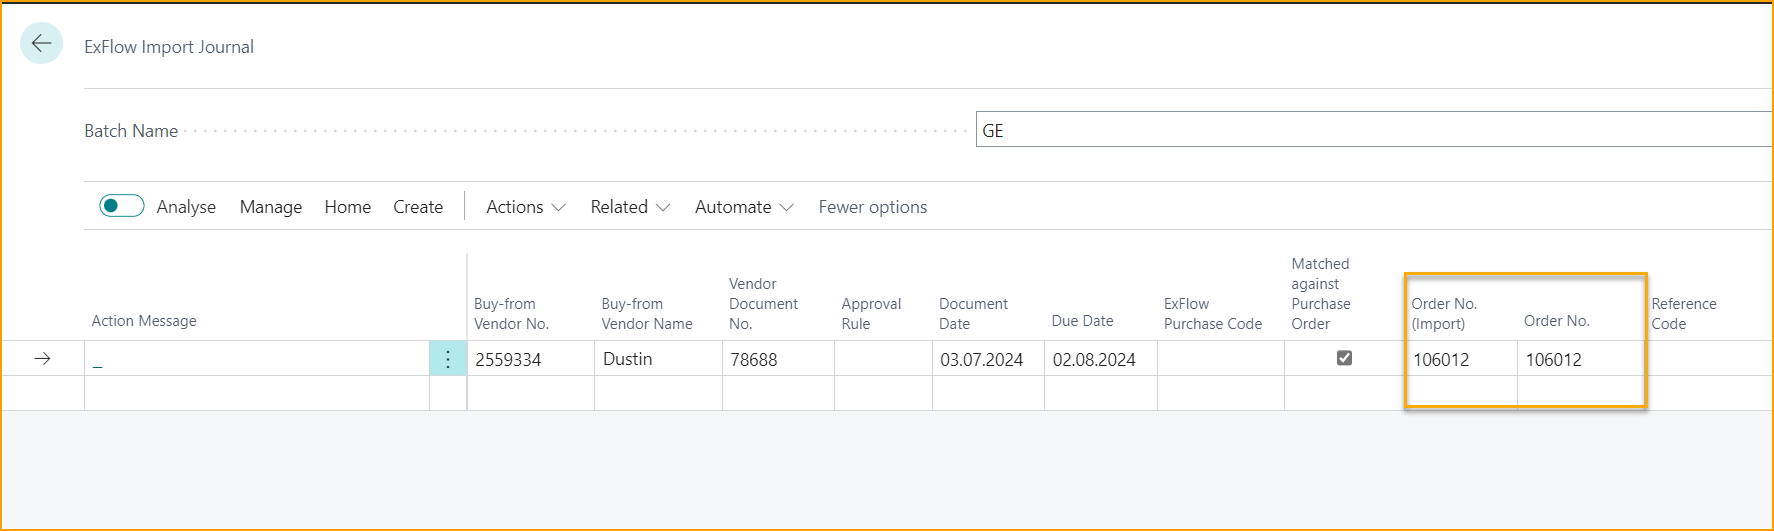
This procedure can also be triggered manually if the invoice is lacking an importer Purchase Order number. Manually enter the Purchase Order number in the column "Order No.".
Depending on if ExFlow is configured for two-way-matching or three-way-matching the next steps of the process will be slightly different.
Three-way-matching
Means that ExFlow will match invoice with the Purchase Order and associated Posted Purchase Receipt(s).
This is done automatically by default, but can also be triggered manually by using the function "Get Receipt/Return Shpmt./Order Lines".
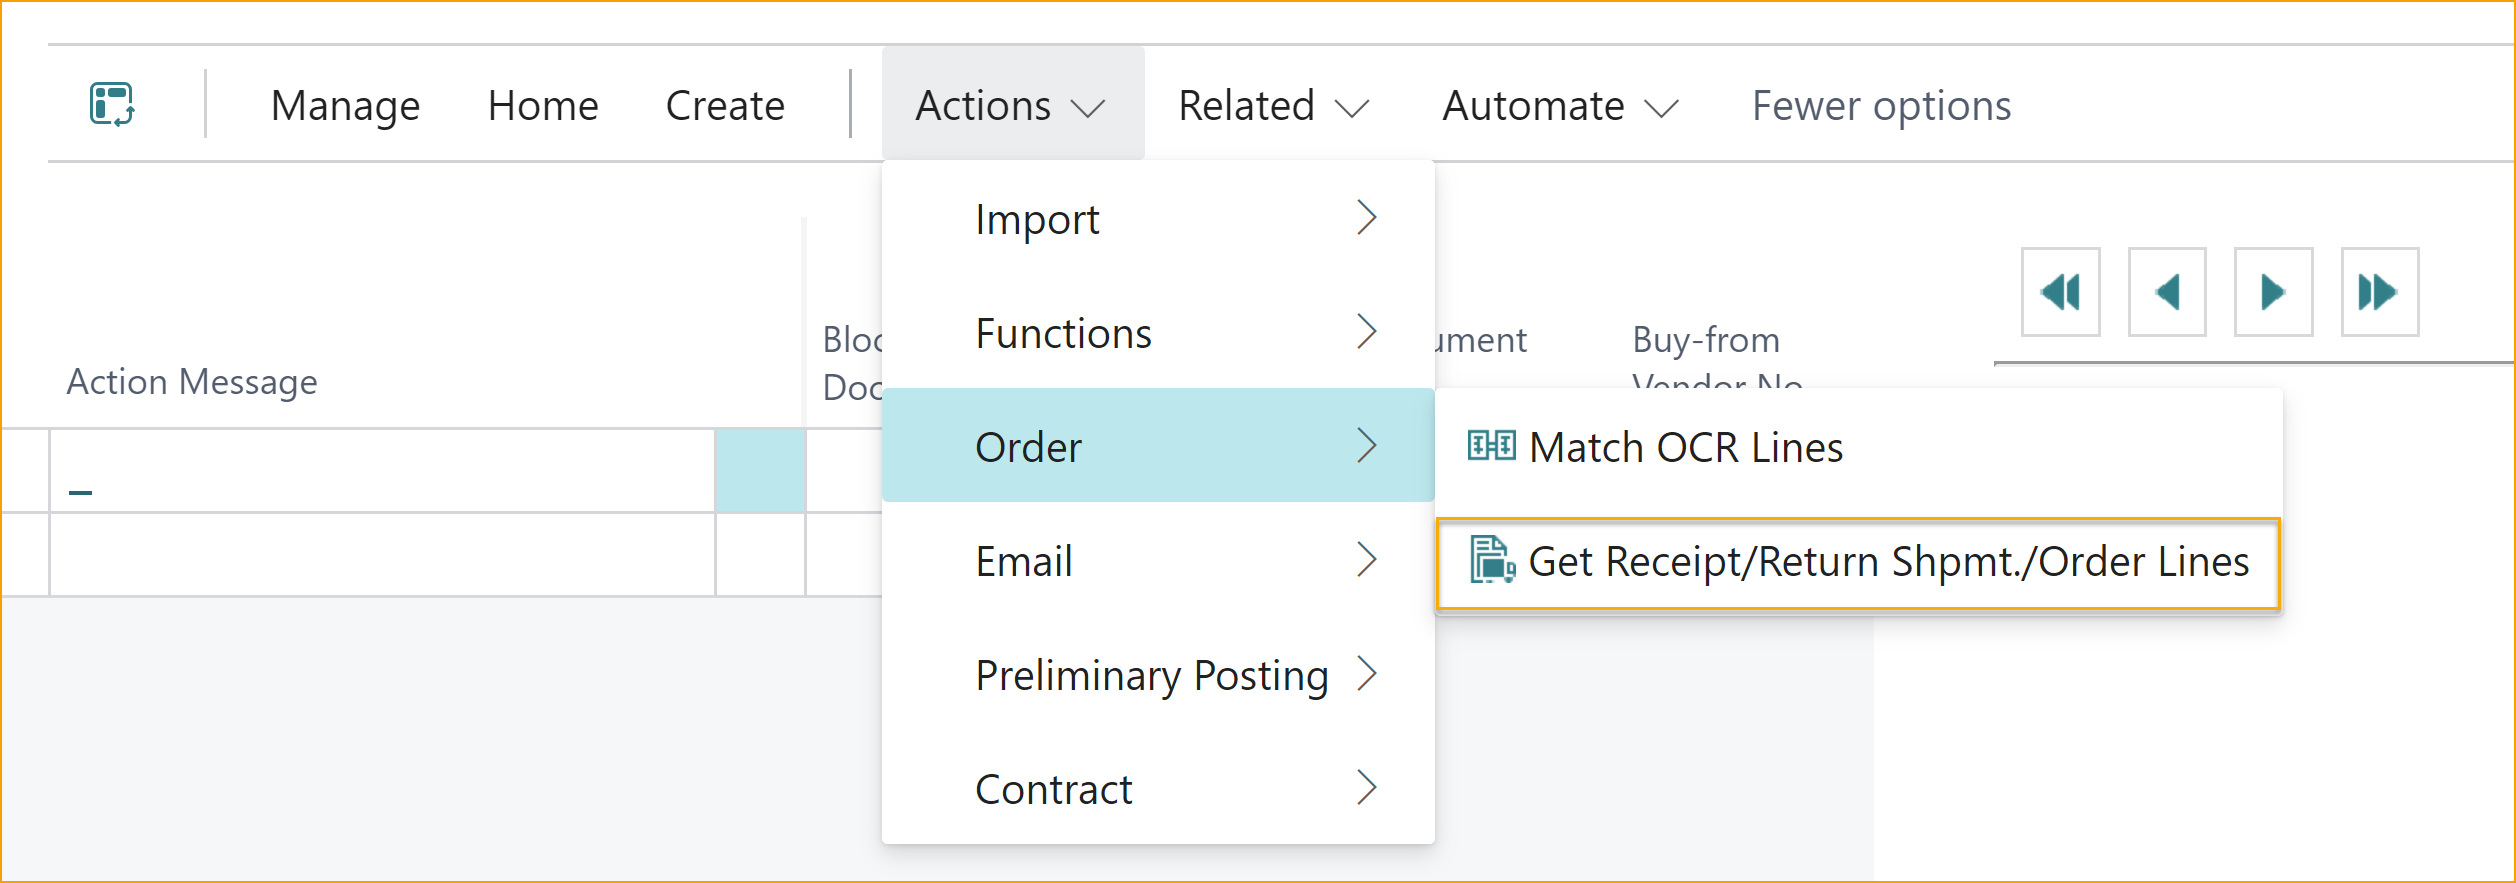
Three-way-matching requires that the Purchase Invoice has associated Posted Purchase Orders. ExFlow will fetch all available Posted Receipt lines and add them as Invoice Lines.

This function can also be useful when an invoice should be matched to multiple Purchase Order on Header-level.
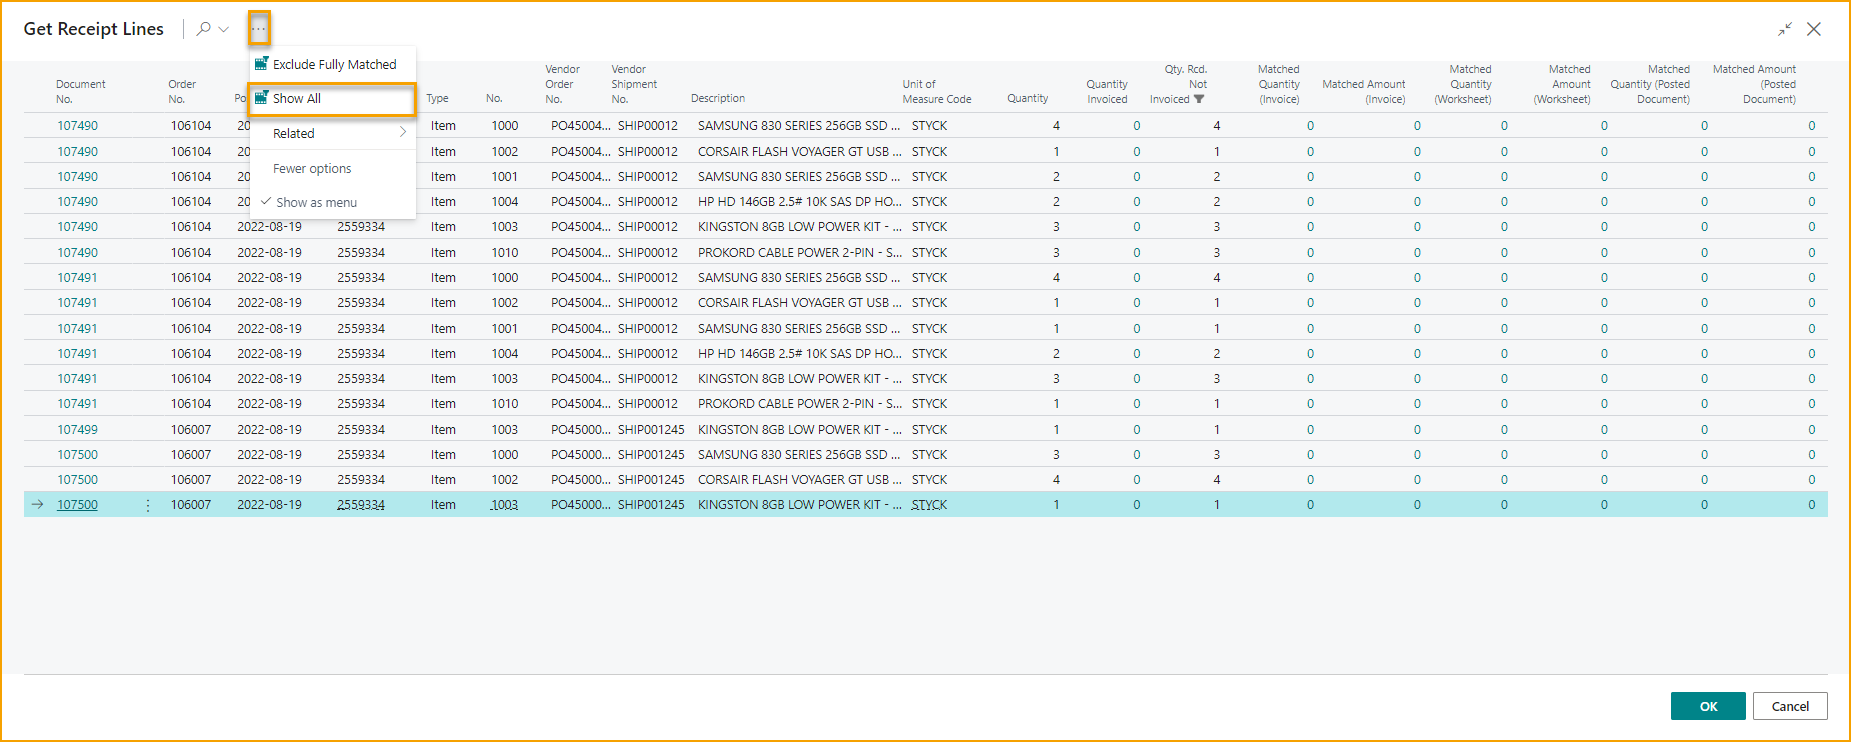
When selecting Receipt Lines in the page "Get Receipt Lines" there is a possibility to exclude the lines that are already fully matched to another invoice in Import Journal or not yet posted in Approval Status. Click on "Exclude fully matched" to hide such receipt lines:
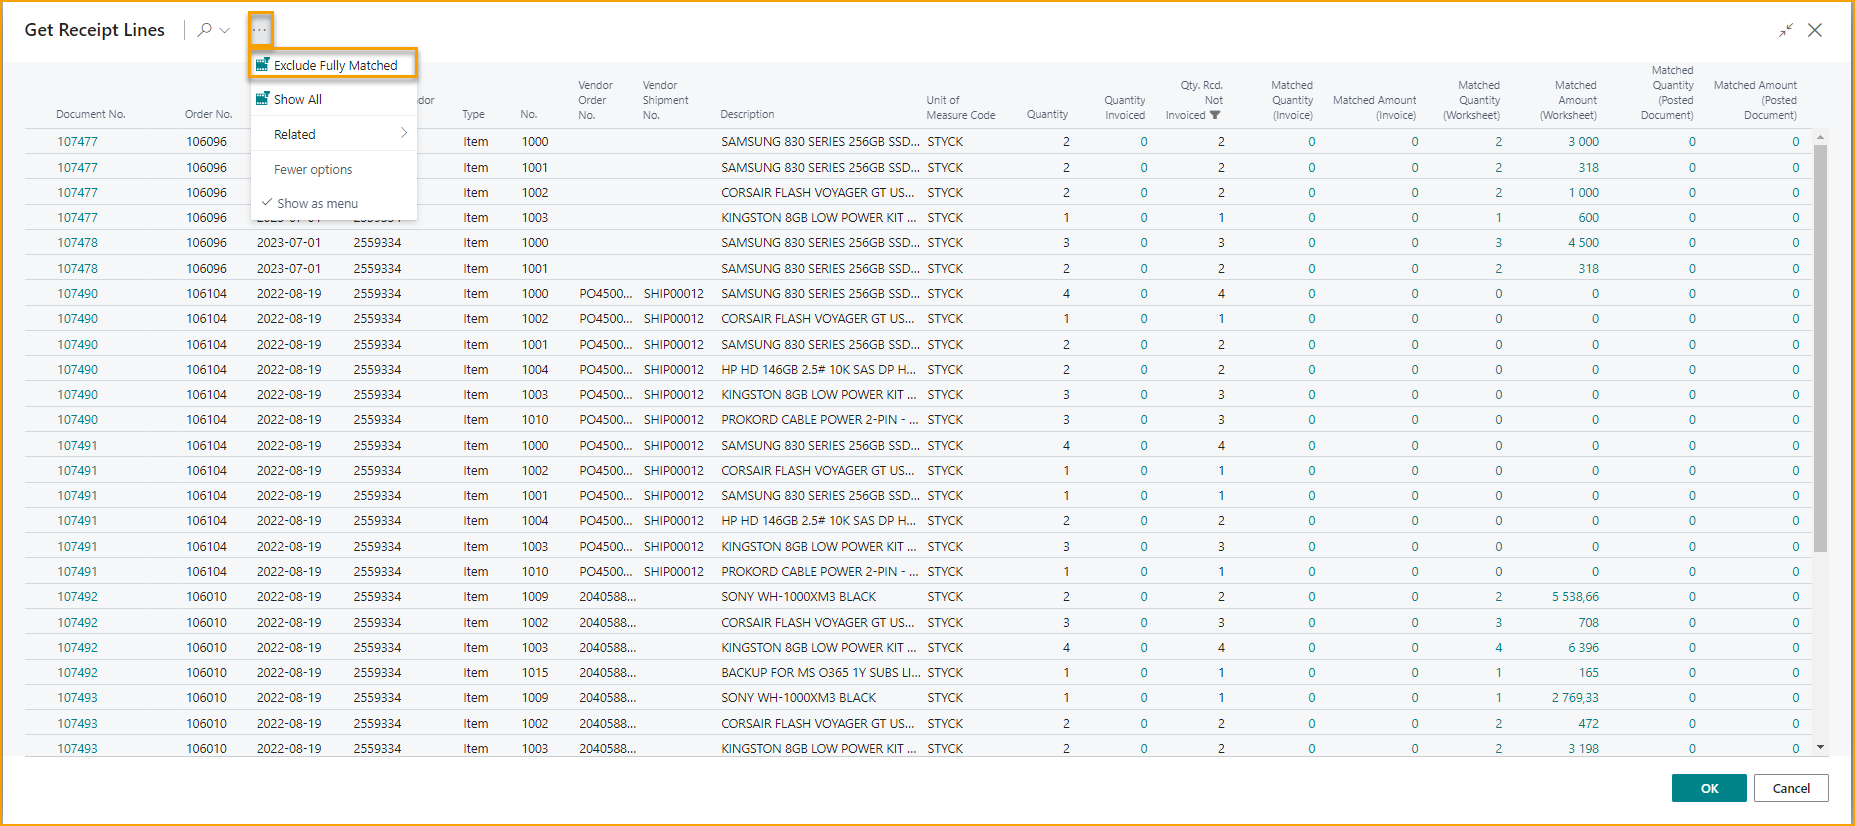
In below picture, the matched lines are hidden. Click on "Show All" to reset the page to view all receipt lines again. Both actions in "Get Receipt Lines" exist for Credit Memos and Purchase Return Orders as well.
It is possible to tick the setting "Disable Currency Filter in Get Receipt Lines" under the Order Matching-section in ExFlow Setup to improve performance when using Get Receipt Lines in Import Journal. No filter will then be set on Currency Code when opening the selection page.
Two-way-matching
Means that ExFlow will match the invoice directly to the Purchase Order. Without the requirement of having associated Posted Purchase Receipt(s).

Any conflicts, cost, or quantity discrepancies will display themselves in form of an Action Message and need to be corrected before the invoice can be created and sent for approval.
Order matching on Line-level
This requires that the invoice has been interpreted on header- and line-level in ExFlow Data Capture or any other OCR-solution that is used.
Order matching done on line level gives more accurate result when it comes to identifying discrepancies. Line level matching also provides a lot more configuration when it comes to setting up validations and allowed thresholds.
A prerequisite to get accurate line matching results is that it's possible to extract essential information from the vendor invoices, so that ExFlow will be able to understand what order lines to match with.
Item number, quantity, unit price, and line total amount are some of the more important values to extract from the invoice to help ExFlow match the correct Invoice lines to Order lines.
ExFlow is also able to match the vendors item number, if it's set up in Business Central as "Vendor Item No." or "Cross references". There is also an option to set up specific ExFlow OCR Import mappings, where imported values can be translated and mapped to specific G/L Accounts or Items.
Both two-way-matching and three-way-matching is supported with Line-level Order matching in ExFlow.
One of the biggest advantages with Line matching compared to Header matching is that ExFlow will be able to execute validations on each interpreted invoice line and tell exactly what need to be corrected and what type of issue it is. While Header matching will only give information that there is a conflict or price difference between the total of the Order lines and the total Invoice amount.
Configuration of Line matching can be found in ExFlow Setup.
The example below describes how to import from a journal created to use only for "Purchase Order Matched Invoices".
Select the journal and open by click "Edit Journal" or click on Name.
Step 1 -- Import document
Go to: Home -- > Import Documents ...
When the import is done a new line is created.
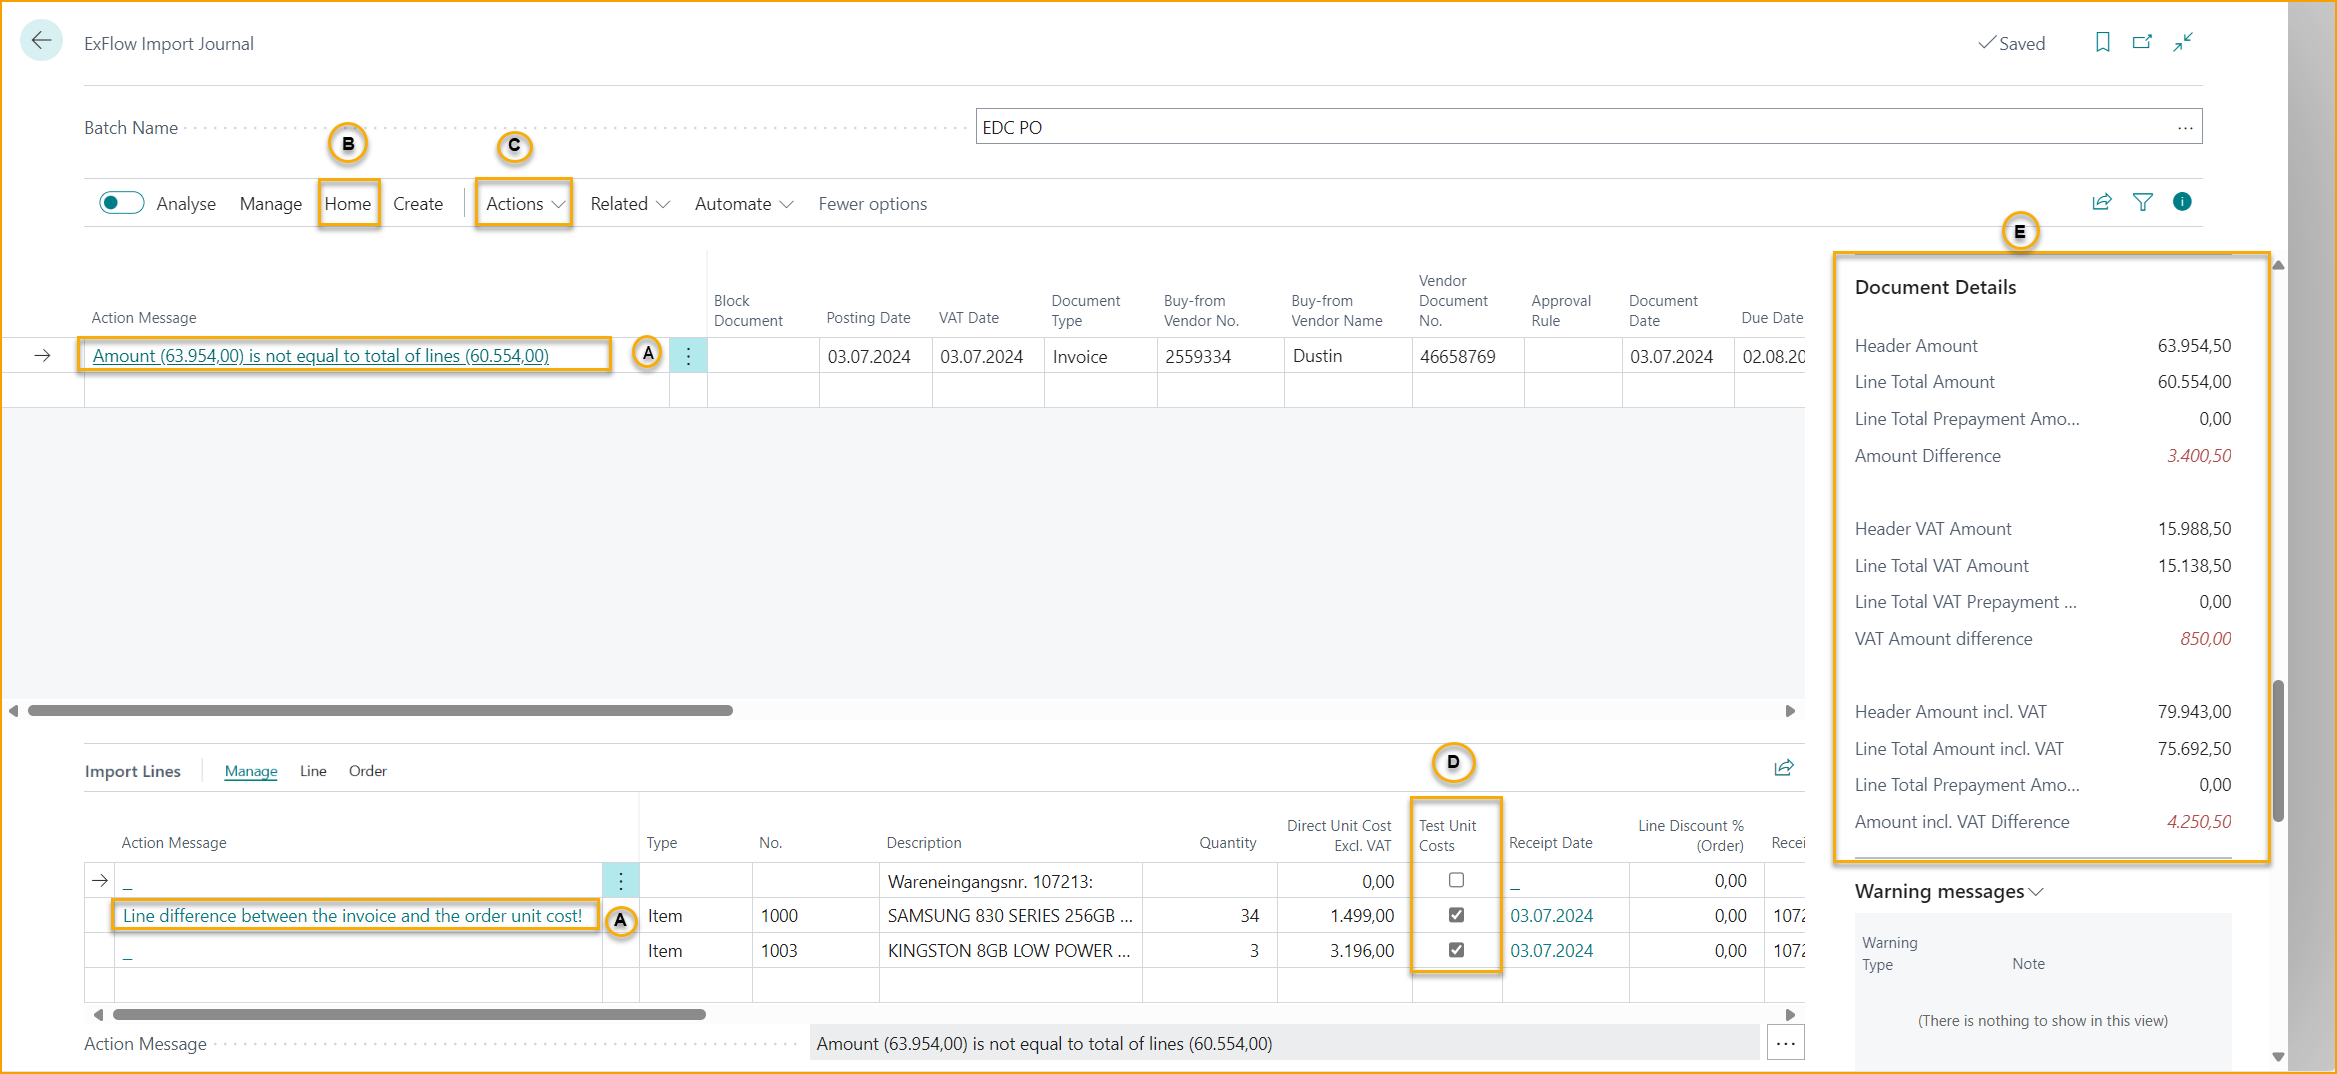
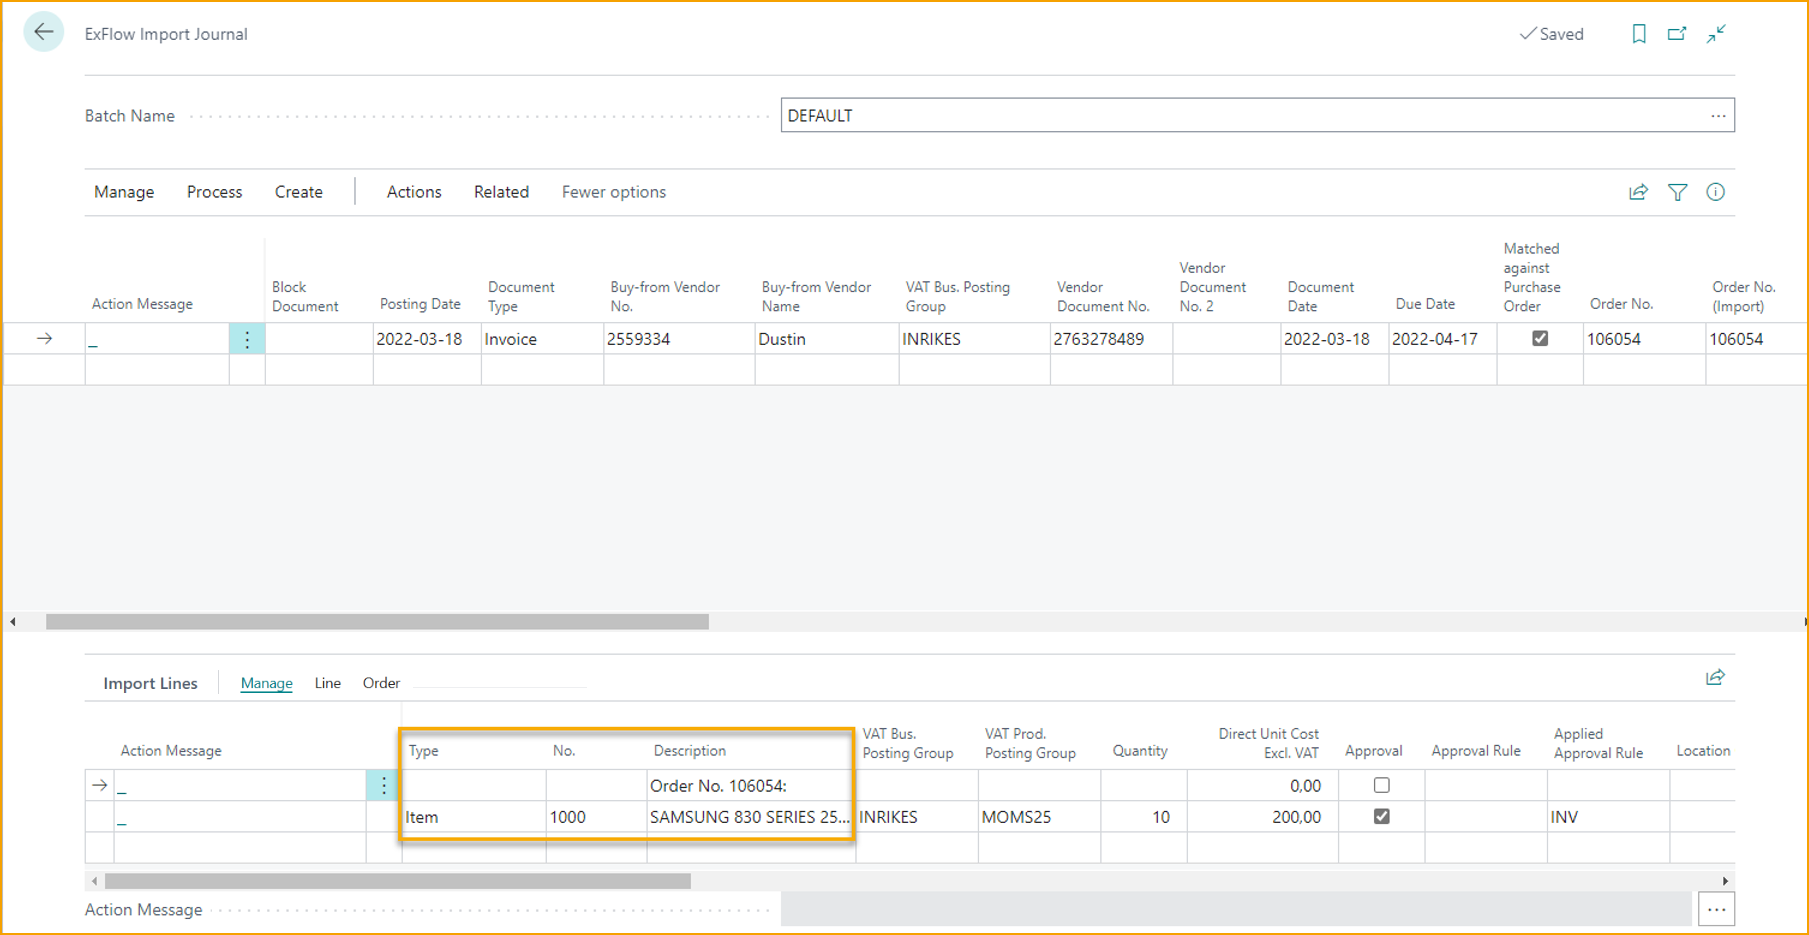
Step 2 -- Check and handle "Action Messages" (A in picture below).
Common action messages and solutions:
-
There are lines matched against order but where receipt is missing!
Delivery has not been posted. Go to Purchase Order and post -- Receive.
Run verify after receiving delivery and ExFlow will match invoice against posted delivery.
Home -- > Verify Document (B in picture below) -
Amount (XX,XX) is not equal to total of on lines (XX,XX)
Change the prices and lines so it matches the invoice. Use "Line Details" in FactBox for totals and differences. (E in picture below). -
If the invoice includes more than one order
Use "Get Receipt/Return Shpmt." Actions -- > Order -- > Get Receipt/Return Shpmt./Order Lines (C in picture below).

-
See line for specific action message - Line difference between the invoice and the order unit cost!
Correct Direct Unit Cost Excl. VAT. or correct order price to match order against invoice. Or untick "Test Unit Cost" on Import Lines and send invoice for approval. (D in picture below).
Step 3 -- Verify All Documents...
Go To: Home -- > Verify All Documents
When all action messages have been handled, "Verify Document" to see if action message is empty and therefore ready to be created.
Step 4 -- Create Invoice/CR.Memo
Go to: Create -- > "Batch Create I..s/Cr.Memos" ... / "Create Invoice/Cr.Memo"
Create invoice or credit memo by clicking "Create Invoice/Credit Memo".
Order matching - Drop Shipment
ExFlow supports drop shipment orders. For assistance with drop shipment standard function, please contact trusted partner or Microsoft support.
The most common setup for drop shipment is probably to work with matching invoices towards orders using the setup: "Match Documents To: Order" and "Automatically Receive Purchase Order Lines".
The following example shows an example of how to work with drop shipments together with ExFlow Order matching:
Create a Sales Order, mark the sales lines for Drop Shipment by ticking the "Drop Shipment" checkbox. Then release the Sales Order.
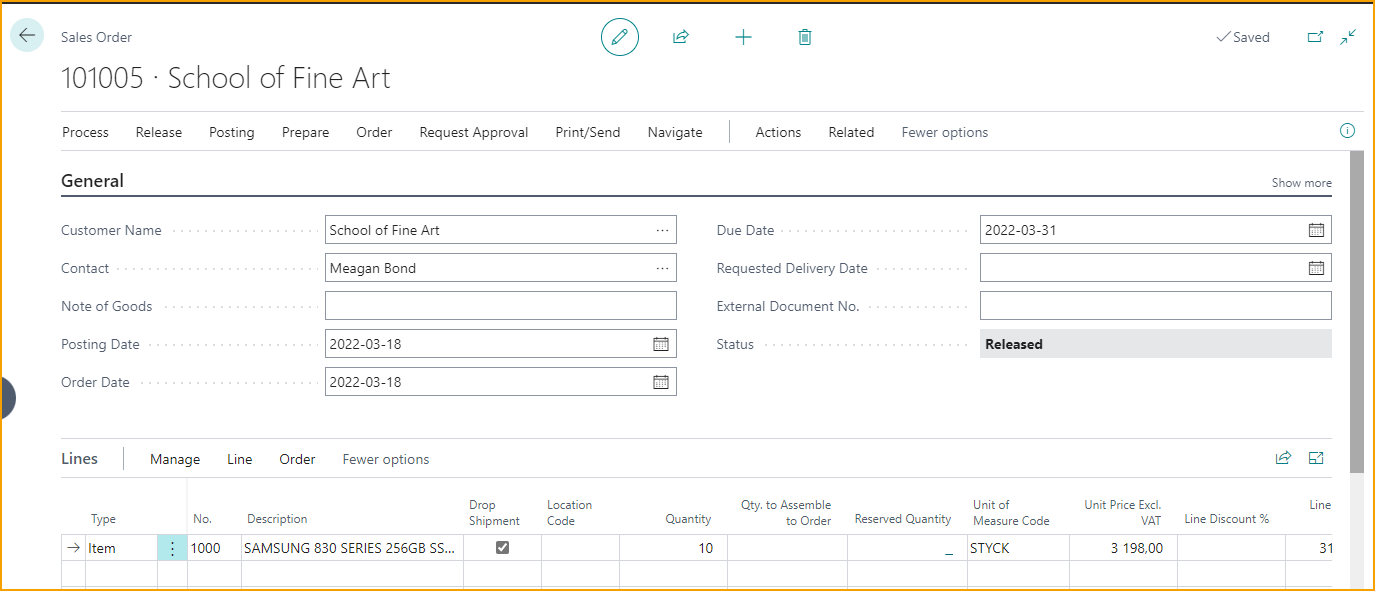
Create a Purchase Order. Choose the ''Ship-To'' Customer (among with other needed information), in this example the customer ''School of Fine Art'' is selected.
From the header use Actions -- > Functions -- > Drop Shipment -- > Get Sales Order. Then release the Purchase Order.
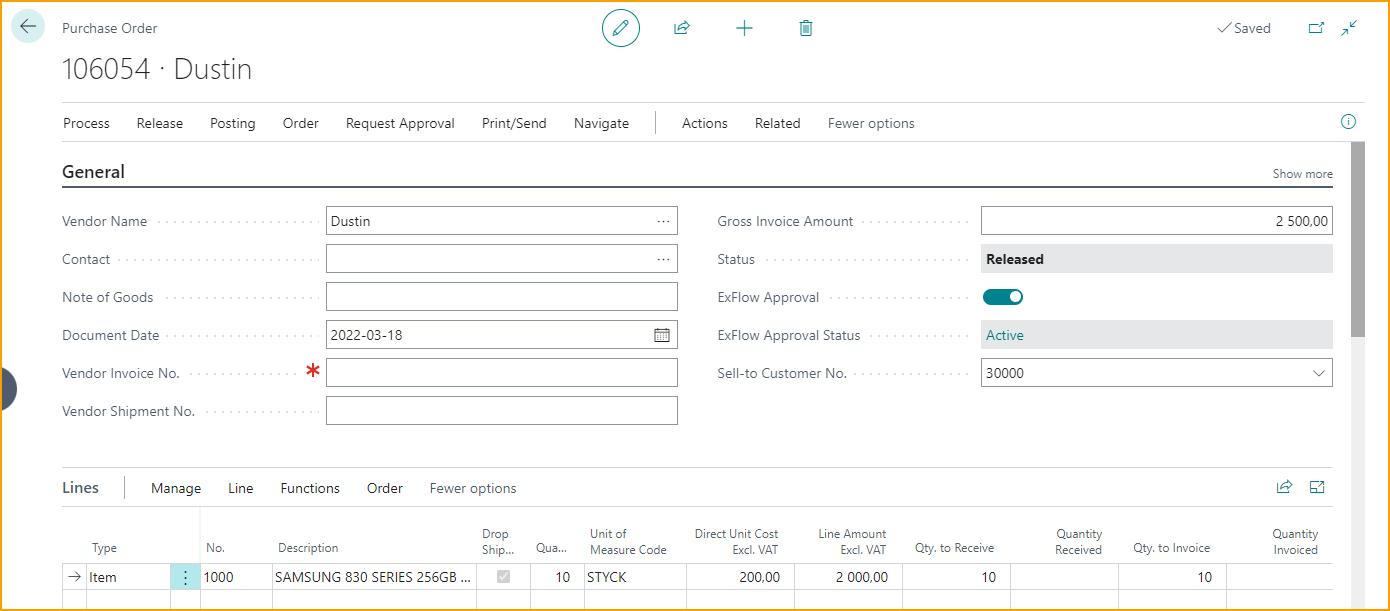
Import an invoice to ExFlow Import Journal from the vendor (Dustin) concerning the drop shipment. Use Actions -- > Order -- > Get Receipt/Return Shpmt./Order Lines to retrieve the lines.
Create and send the invoice out for approval, then approve and verify the invoice. When "Verify Changes" has been run in Approval Status, the items in Purchase Order will automatically be received and the items in the Sales Order will automatically be shipped.
Go back to the Sales Order to invoice the sales order. If this is not made before posting the invoice from ExFlow Approval Status, following message will occur:

When the Sales Order is invoiced, it will be possible to post the invoice in Approval Status as usual.
Match Invoice with Receipt-, Order- or both Receipt and Order lines
Go to: ExFlow Setup -- > Order Matching -- > Match Documents To
The setting "Match Documents To" specifies if ExFlow should match imported Purchase Invoices with Purchase Orders, Purchase Receipts or both Receipt and Order lines.
Receipt: ExFlow will automatically find the Purchase Order based on the imported Order no. ExFlow will automatically retrieve the available Posted Receipts associated with the Purchase Order if the setting "Automatically Retrieve Lines" is enabled.
Order: This enables matching a Purchase Invoice directly with a Purchase Order that lacks Posted Receipts.
The Purchase Receipt must be posted before the final posting of the invoice. This can either be done manually from the Purchase Order, or automatically by activating the setting "Automatically Receive Purchase Orders Lines".
ExFlow will automatically retrieve the available Order Lines associated with the Purchase Order if the setting "Automatically Retrieve Lines" is enabled.
Order and Receipt: With this setting it is possible to match a Purchase Invoice with both posted Receipt and Order lines. This means that ExFlow will retrieve receipts on a matched line and not yet received order lines. Furthermore, it is possible to let ExFlow automatically receive order lines by enabling "Automatically Receive Purchase Orders Lines", if needed.
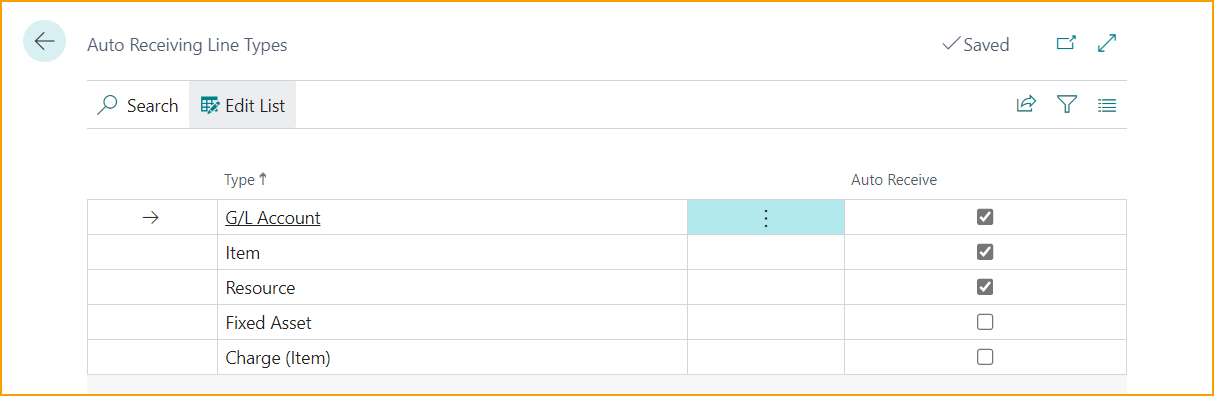
By enabling “Automatically Receive Purchase Orders Lines” ExFlow will receive all lines that are matched to a Purchase Order. What ExFlow receives is based on allowed line types from "Auto Receiving Line Types Setup" (Setup automatically opens after setting “Automatically Receive Purchase Orders lines” set as TRUE).
If changes is needed go to: ExFlow Setup --> Related --> Advanced --> Auto Receiving Line Types Setup
The same feature can also be found in "ExFlow Vendor Setup" page.
Auto Approve Purchase Order Matching Invoices
ExFlow Setup - Order Matching
ExFlow Setup -- > Order Matching -- > Auto Approve Invoices
To Auto Approve order matched invoices there are three options.
Never: With this setting auto-approval is inactivated. All Purchase Order matched Invoices require manual approval.
If the difference is within tolerance: If the imported invoice matches with a purchase order without quantity or price discrepancies it will automatically be approved. This also applies if there are discrepancies within the allowed threshold.
If matched order is approved: Same requirements as previous option, with addition that the matched Purchase Order must have been approved through ExFlow.
User for automatic approval: Specify an ExFlow User that will be used as a stamp in the transaction and history for Invoices that have been automatically matched with a Purchase Order and approved. By leaving this setting blank, the user that created the Purchase Invoice from ExFlow Import Journal will be used.
Batch Import Documents from Interpretation
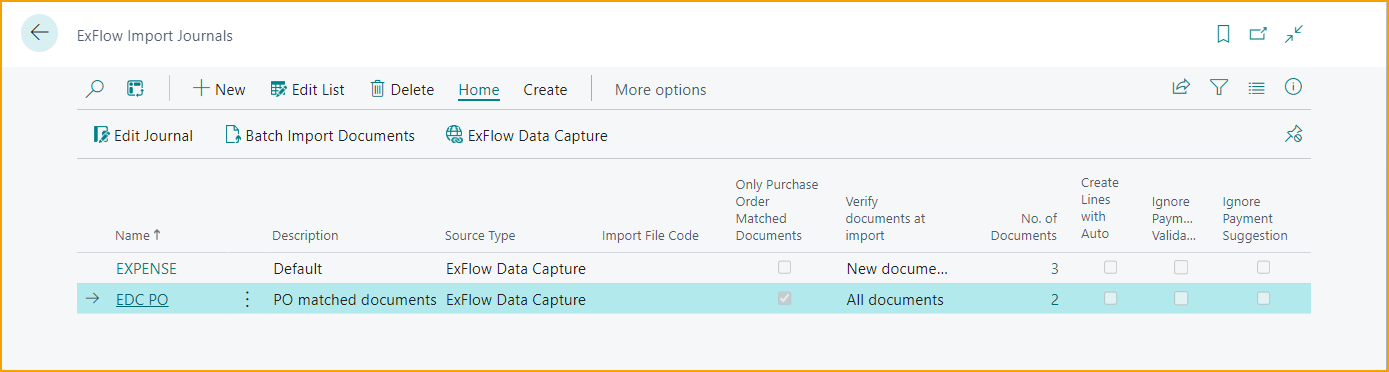
To import order matched documents in a separate Import Journal, add a new Import Journal and use "Only Purchase Order Matched Documents".
Automatic Difference Line
In ExFlow Import Journal when matching Purchase Order, it is possible to detect and create Diff. Line to G/L Account, Item or Charge (Item) automatically.
Add "ExFlow Purchase Code" in field ''Diff.Line Purch. Code" under Order Matching in ExFlow Setup.
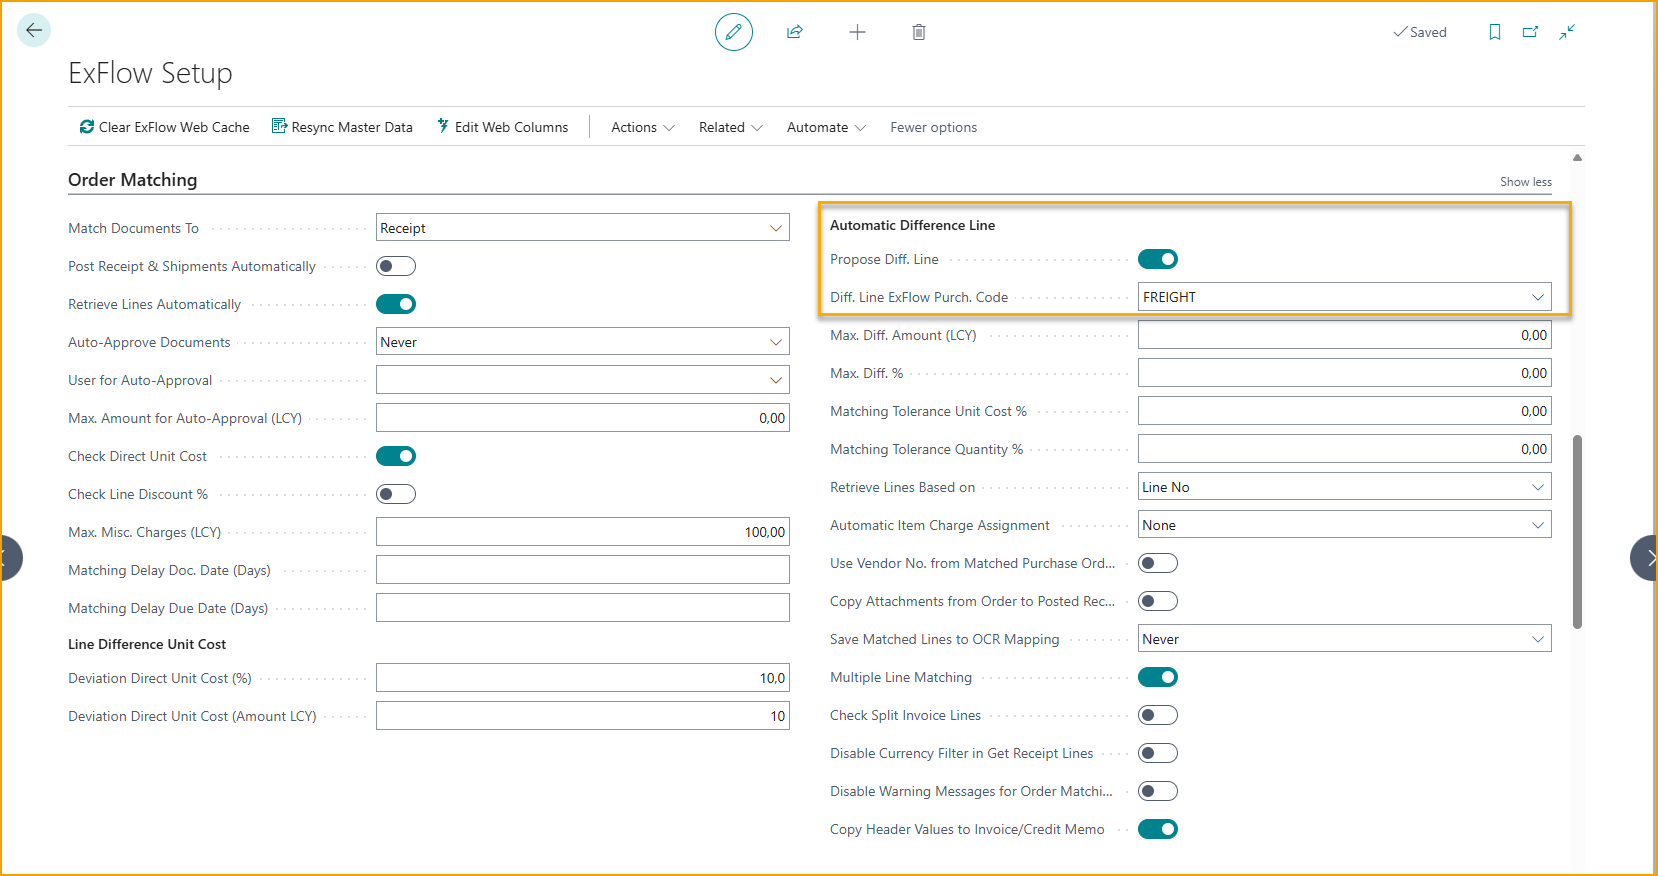
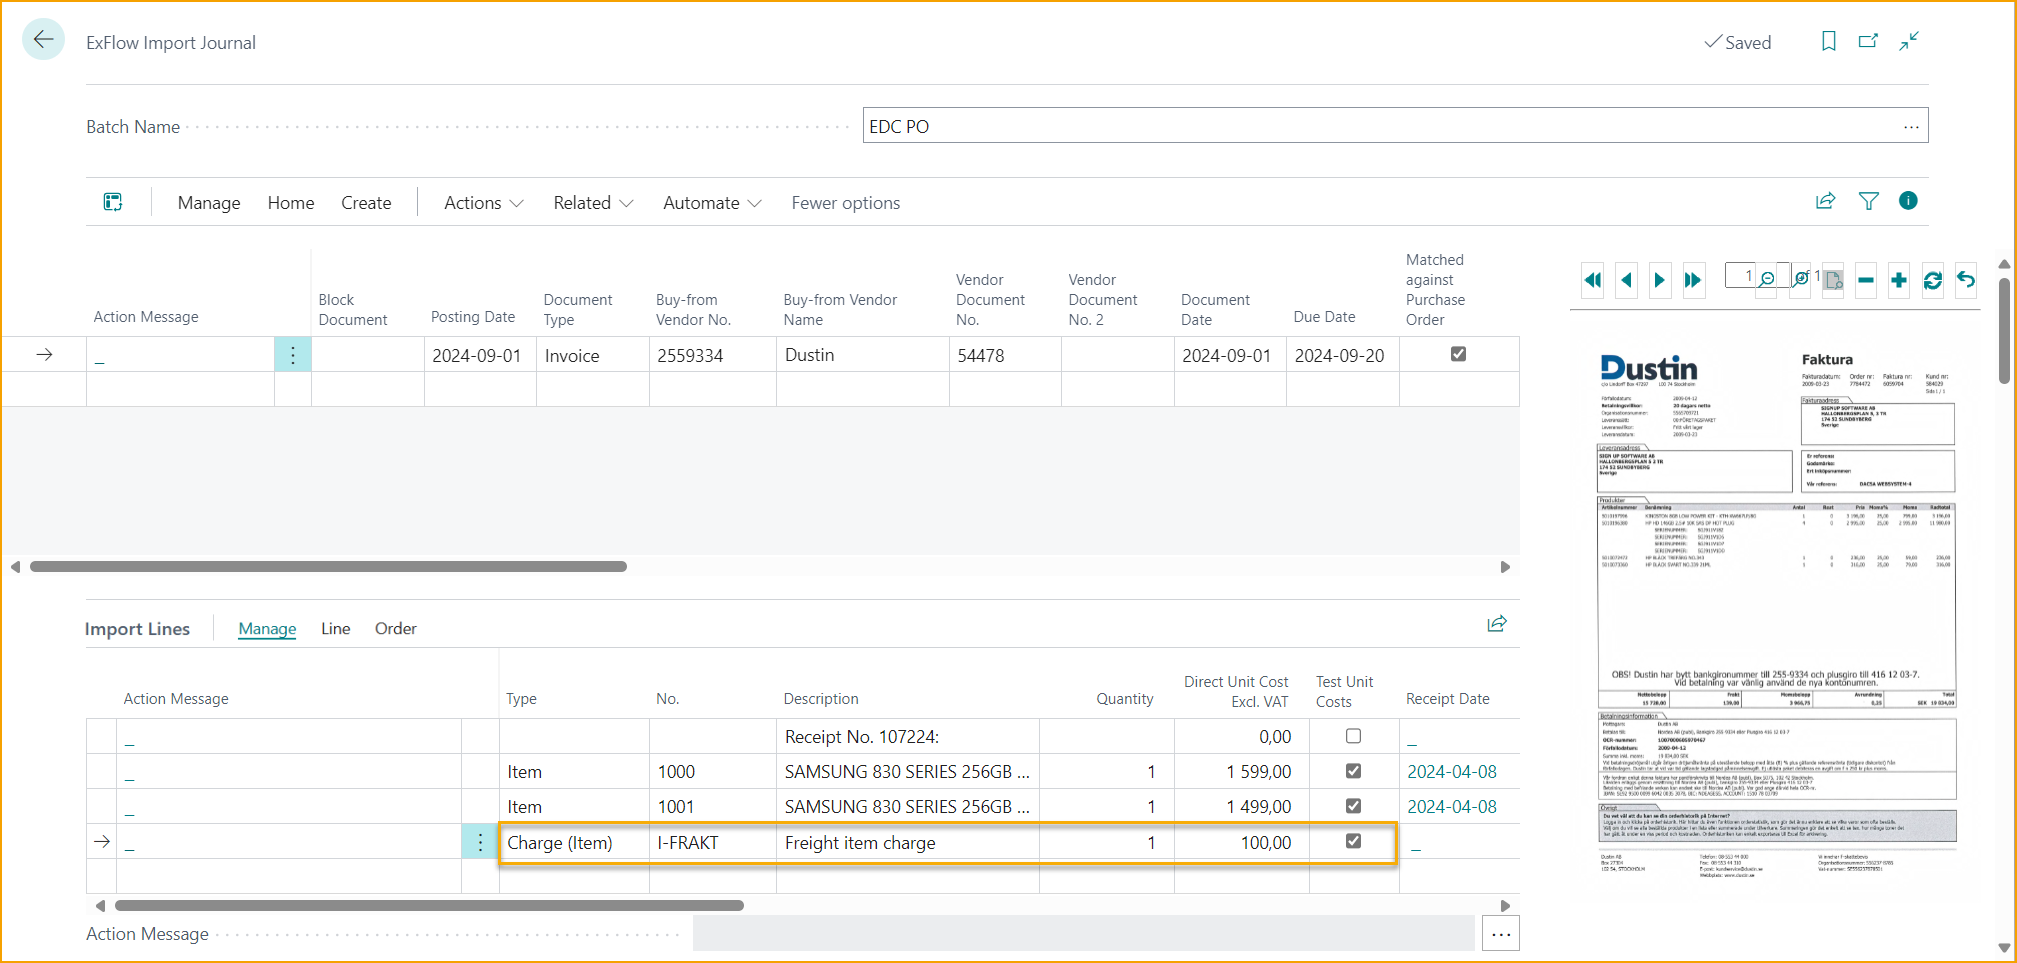
Misc. Charge and Difference Lines can be matched to a Purchase order, if its is within tolerance. If the "Order No." field is populated and the line is a perfect match to the Purchase order line, it will match. If not a perfect match, any matching discrepancies (qty or price) will be reflected as an Action Message.
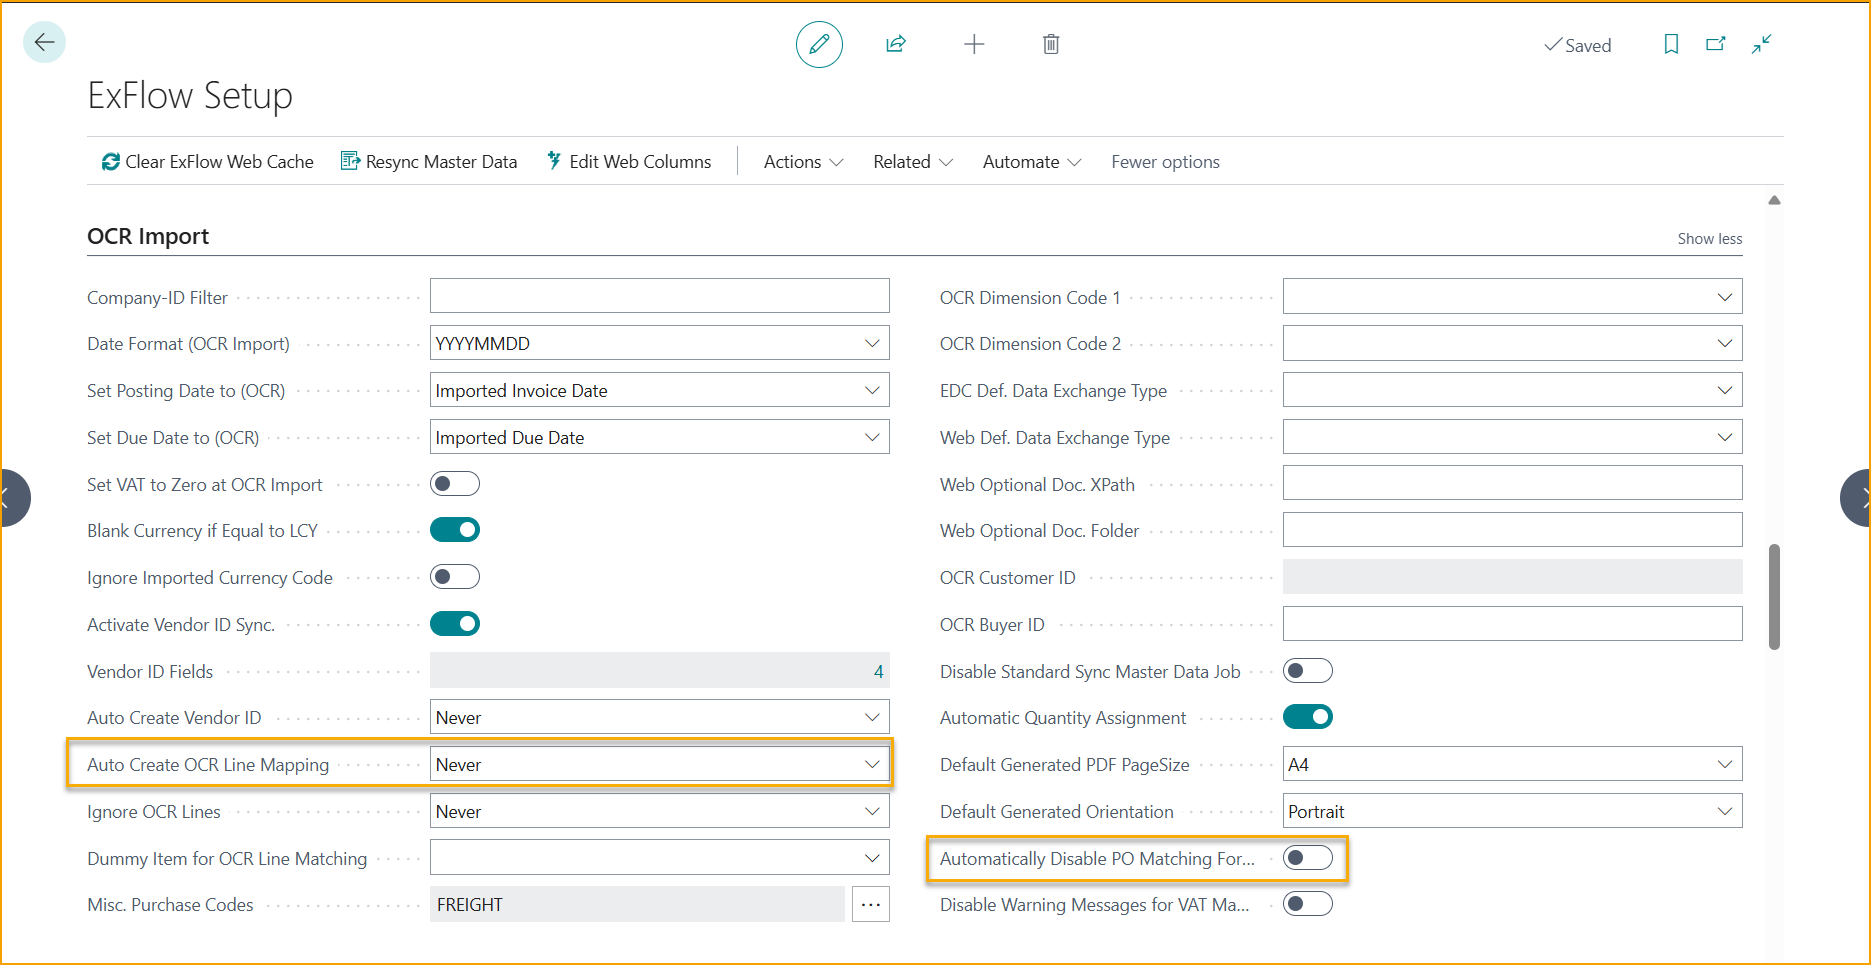
Automatically Disable PO Matching For Misc. Charges
Go to ExFlow Setup --> OCR Import --> Automatically Disable PO Matching For Misc. Charges
When working with interpreted charges on a line level there is a possibility to map these charges towards any line type with ExFlow OCR Import Mapping.
Find the setting "Automatically Disable PO Matching for Misc. Charges" in ExFlow Setup. When this setting is enabled then these newly mapped charges will not be order matched towards the Purchase Order. This setting can be used for the cases when the freight or service charge is not created as a line on the Purchase Order".
This setting can only be enabled if ''Auto Create OCR Line Mapping'' is set to ''Ask'' or ''Always''.
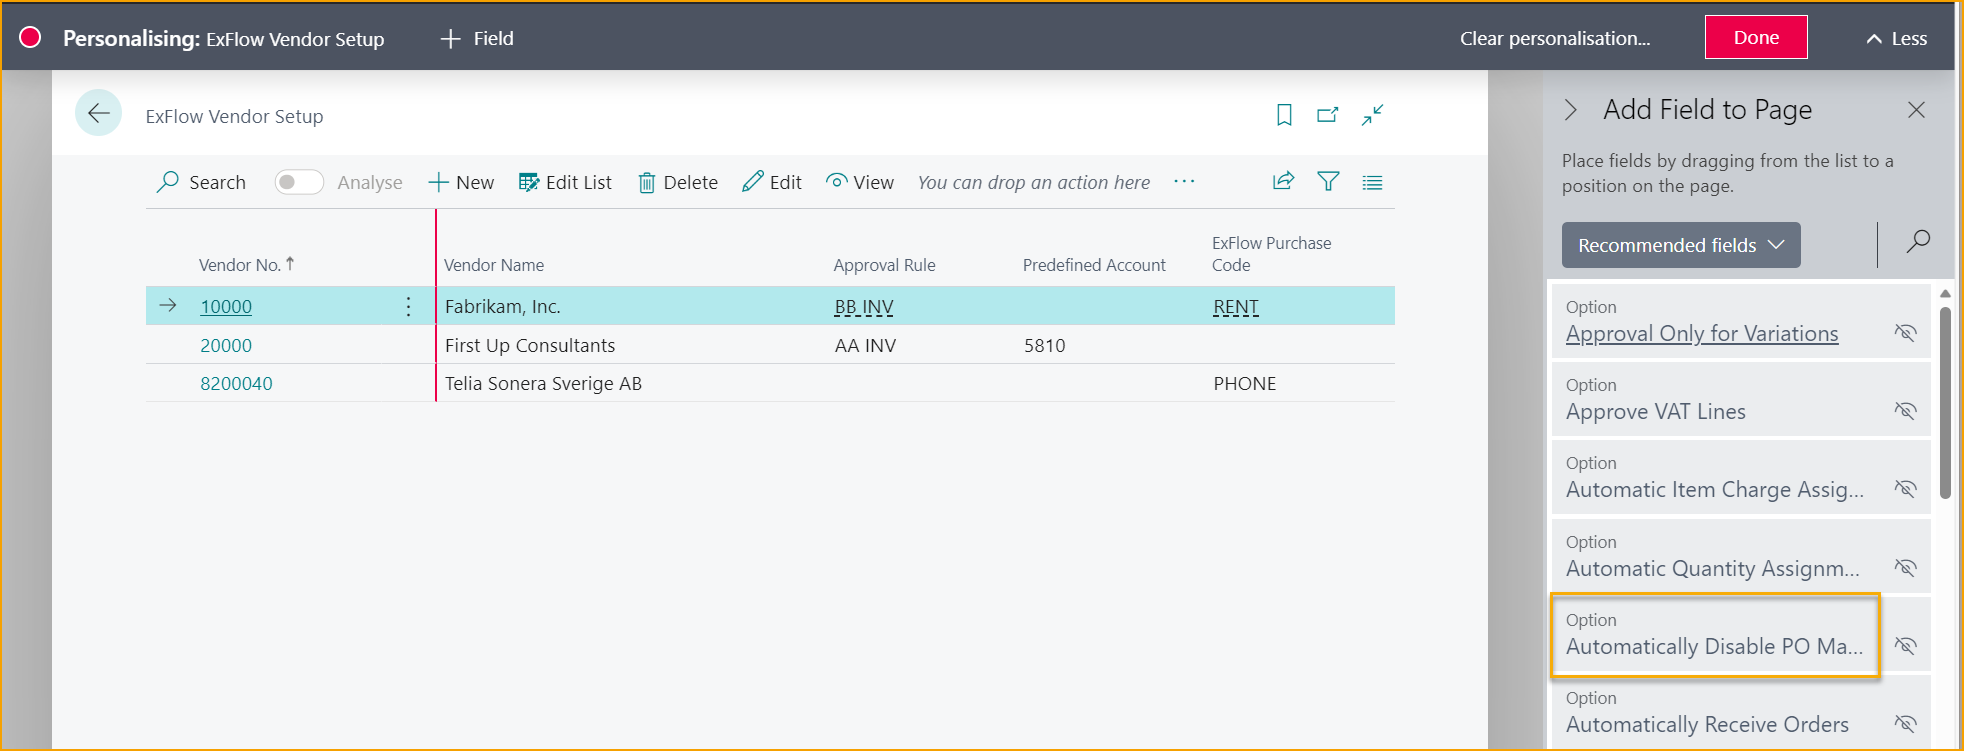
"Automatically Disable PO Matching for Misc. Charges" can also be found in ExFlow Vendor Setup list. This function is hidden per default, personalize to add this setting to the list if needed.
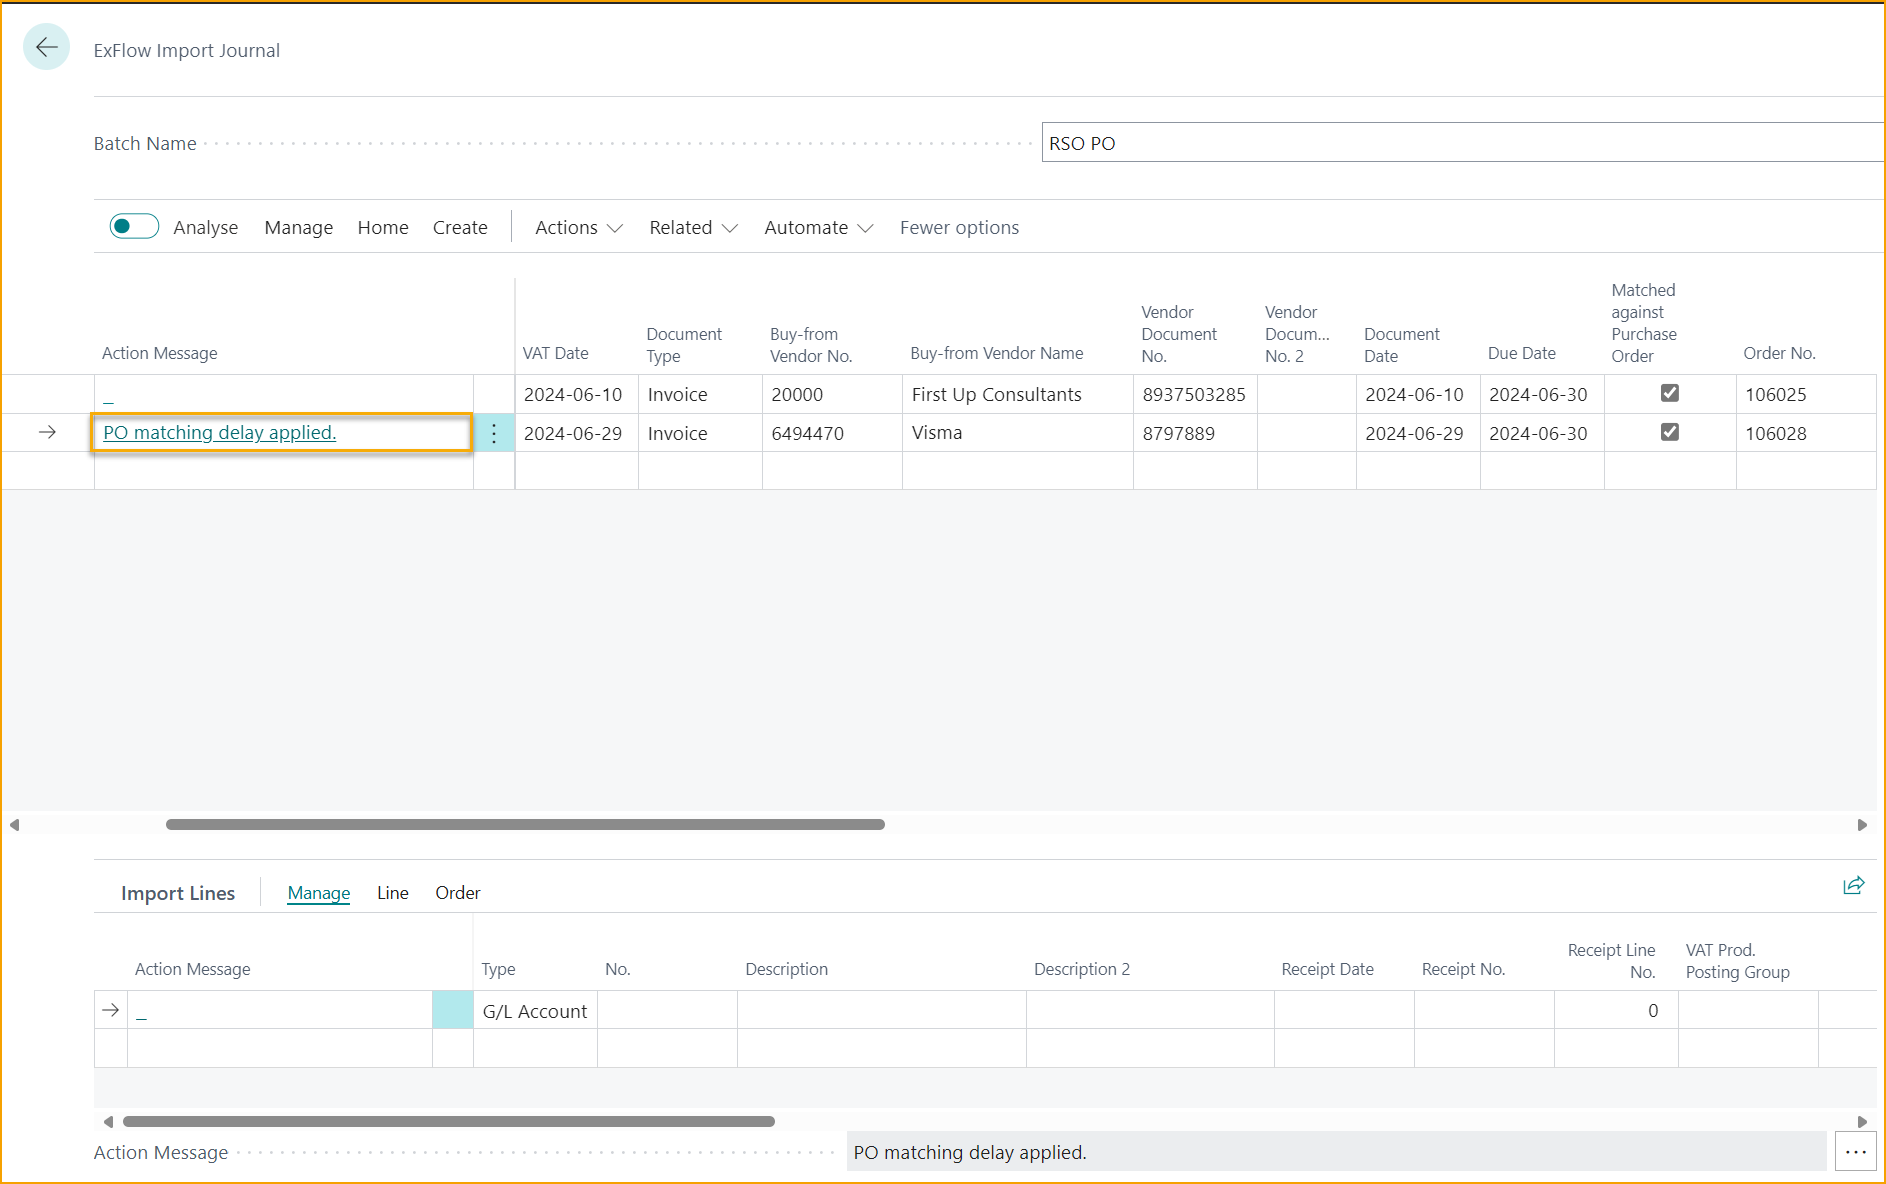
PO Matching Delay Doc. Date and Due Date
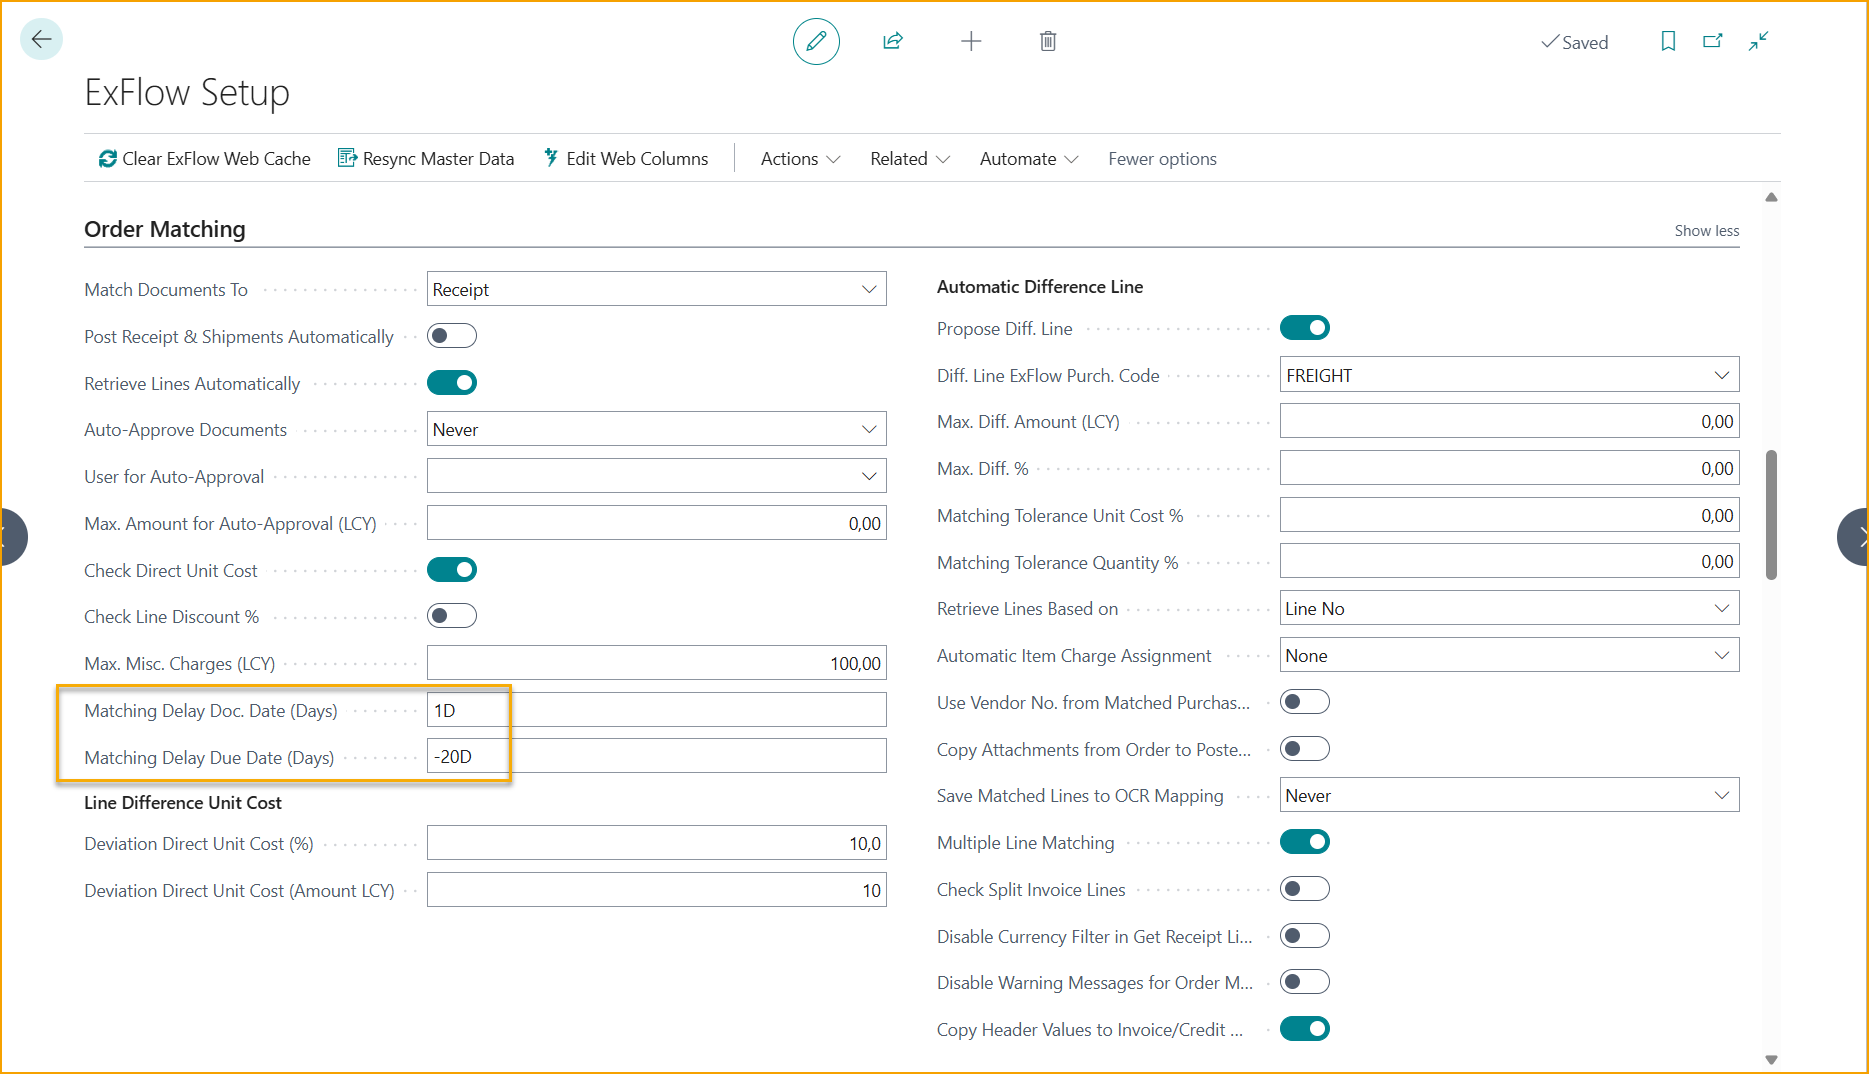
Go to ExFlow Setup --> Order Matching --> Matching Delay Doc. Date (Days) / Matching Delay Due. Date (Days)
It is possible to let ExFlow delay the purchase order matching process, with both imported invoice date and/or due date.
If an interpreted invoice gets imported to the Import Journal, ExFlow will delay the purchase matching process according to the settings in ExFlow Setup, and provide an action message in Import Journal.
Let's take an example: ''Matching Delay Doc Date'' is set to ''1D''. Then ExFlow will wait one day to fetch the receipt lines and match the purchase order with the invoice in Import Journal.
Same procedure for ''Matching Delay Due Date''. If ''-20D'' is set in this field, then ExFlow will fetch the receipt lines and match 20 days before the invoice due date. This function has a higher prioritization than the above function, with the purpose of never let an invoice get due.
An action message will also be shown for the specific document line under the applied delayed purchase order matching period. When it is time to proceed with the purchase order matching process (according to the date formula in the settings), the action message will disappear, and the document will be ready for creation.
Item No. Matching Priority
Go to: Item No. Matching Priority or via ExFlow Setup --> Related --> Advanced --> Item No. Matching Priority
This feature helps to determine the order in which the system attempts to match imported invoices against items and order lines.
This can be useful when, for instance, same item no exist in the standard item list as on the vendor item no. Or if importing invoice lines where most are vendor item references, consider giving higher priority to "Item Reference". Disable matching types that give false positive matches or are not used by unchecking them.
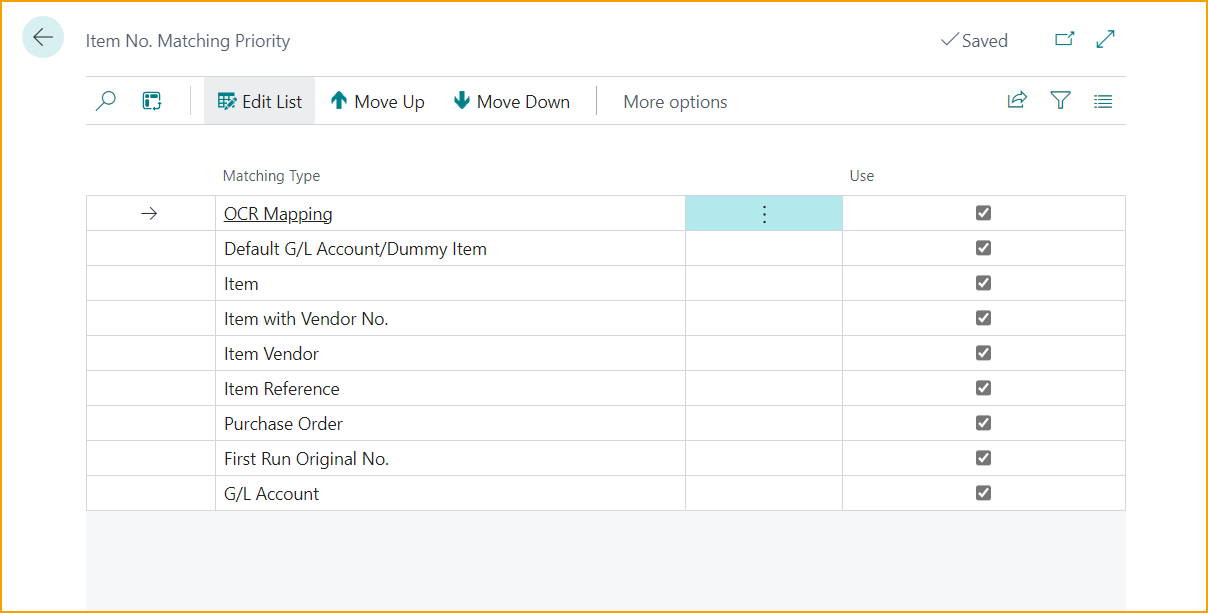
| Item No. Matching Priority | |
|---|---|
| OCR Mapping | Match Item No. after what is specified in OCR Import Mapping |
| Default G/L Account/Dummy Item | Match Item No. after the Predefined Account (ExFlow Setup --> General) or Dummy Item for OCR Line Mapping (ExFlow Setup --> OCR Import). This will only be done if the imported Item No. is blank. If there is no imported number and order no. (imported) is blank then it will automatically take dummy G/L Account. If there is Order No. (imported) then it will take dummy item. |
| Item | Match Item No. after the actual Item No. in Business Central |
| Item with Vendor No. | Match Item No. after what is added under Replenishment--> Purchase. If a Vendor No. is specified on the Item card, together with a specific Vendor Item No., then this will be prioritized. |
| Item Vendor | Match Item No. after the Vendor Item No. set on the Item Card in Business Central |
| Item Reference | Match Item No. after the Vendor Reference set on the Item Card in Business Central |
| Purchase Order | Match Item No. after the purchase order lines where Purchase Line Vendor Item No. is equal to imported No. |
| First Run Original No. | ExFlow removes junk characters on interpreted Item No. (all characters which are not A...Z and 0..9) and tries again. |
| G/L Account | First check is to see if the interpreted order no. has a value. If it is blank, then ExFlow look for G/L Account with imported no. If that is found ExFlow will take that G/L account, otherwise ExFlow take Predefined G/L Account (if account exist under ExFlow Setup --> General). If the imported Order No. is not blank, ExFlow will provide the Dummy Item No. (if any exist in ExFlow setup --> OCR Import) The difference in this option (vs above option ''Default G/L Account/Dummy Item'') is that ExFlow check if G/L Account exists before providing the Predefined G/L Account. |
Set up an Item No. Matching Priority to choose in what order to match. These settings allows ExFlow to perform more advanced matching of items and order lines based on priority and matching type.
Use the "Move Up" and "Move Down" buttons to move matching types up or down the list. The higher a matching type is placed, the higher priority it has in the matching process.
This function can also be made per vendor under ExFLow Vendor Setup
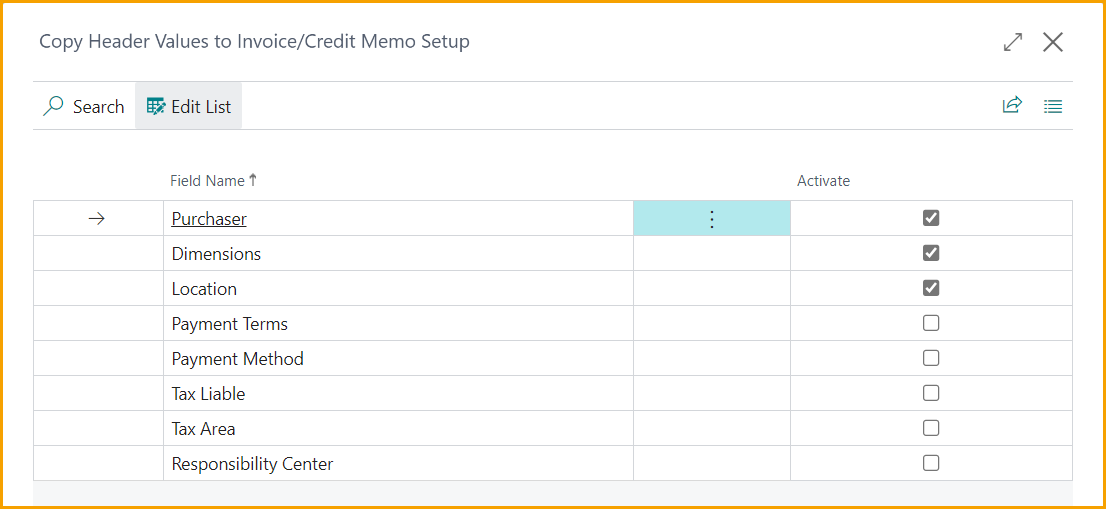
Copy Purchase Order Header Values
Go to: ExFlow Setup –-> Order Matching --> Copy Header Values to Invoice/Credit Memo
For customers that interpret and order match on header level, some values on the order can now be copied from the order header to the document header.
Start by activating "Copy Header Values to Invoice/Credit Memo" and then choose fields to be copied.
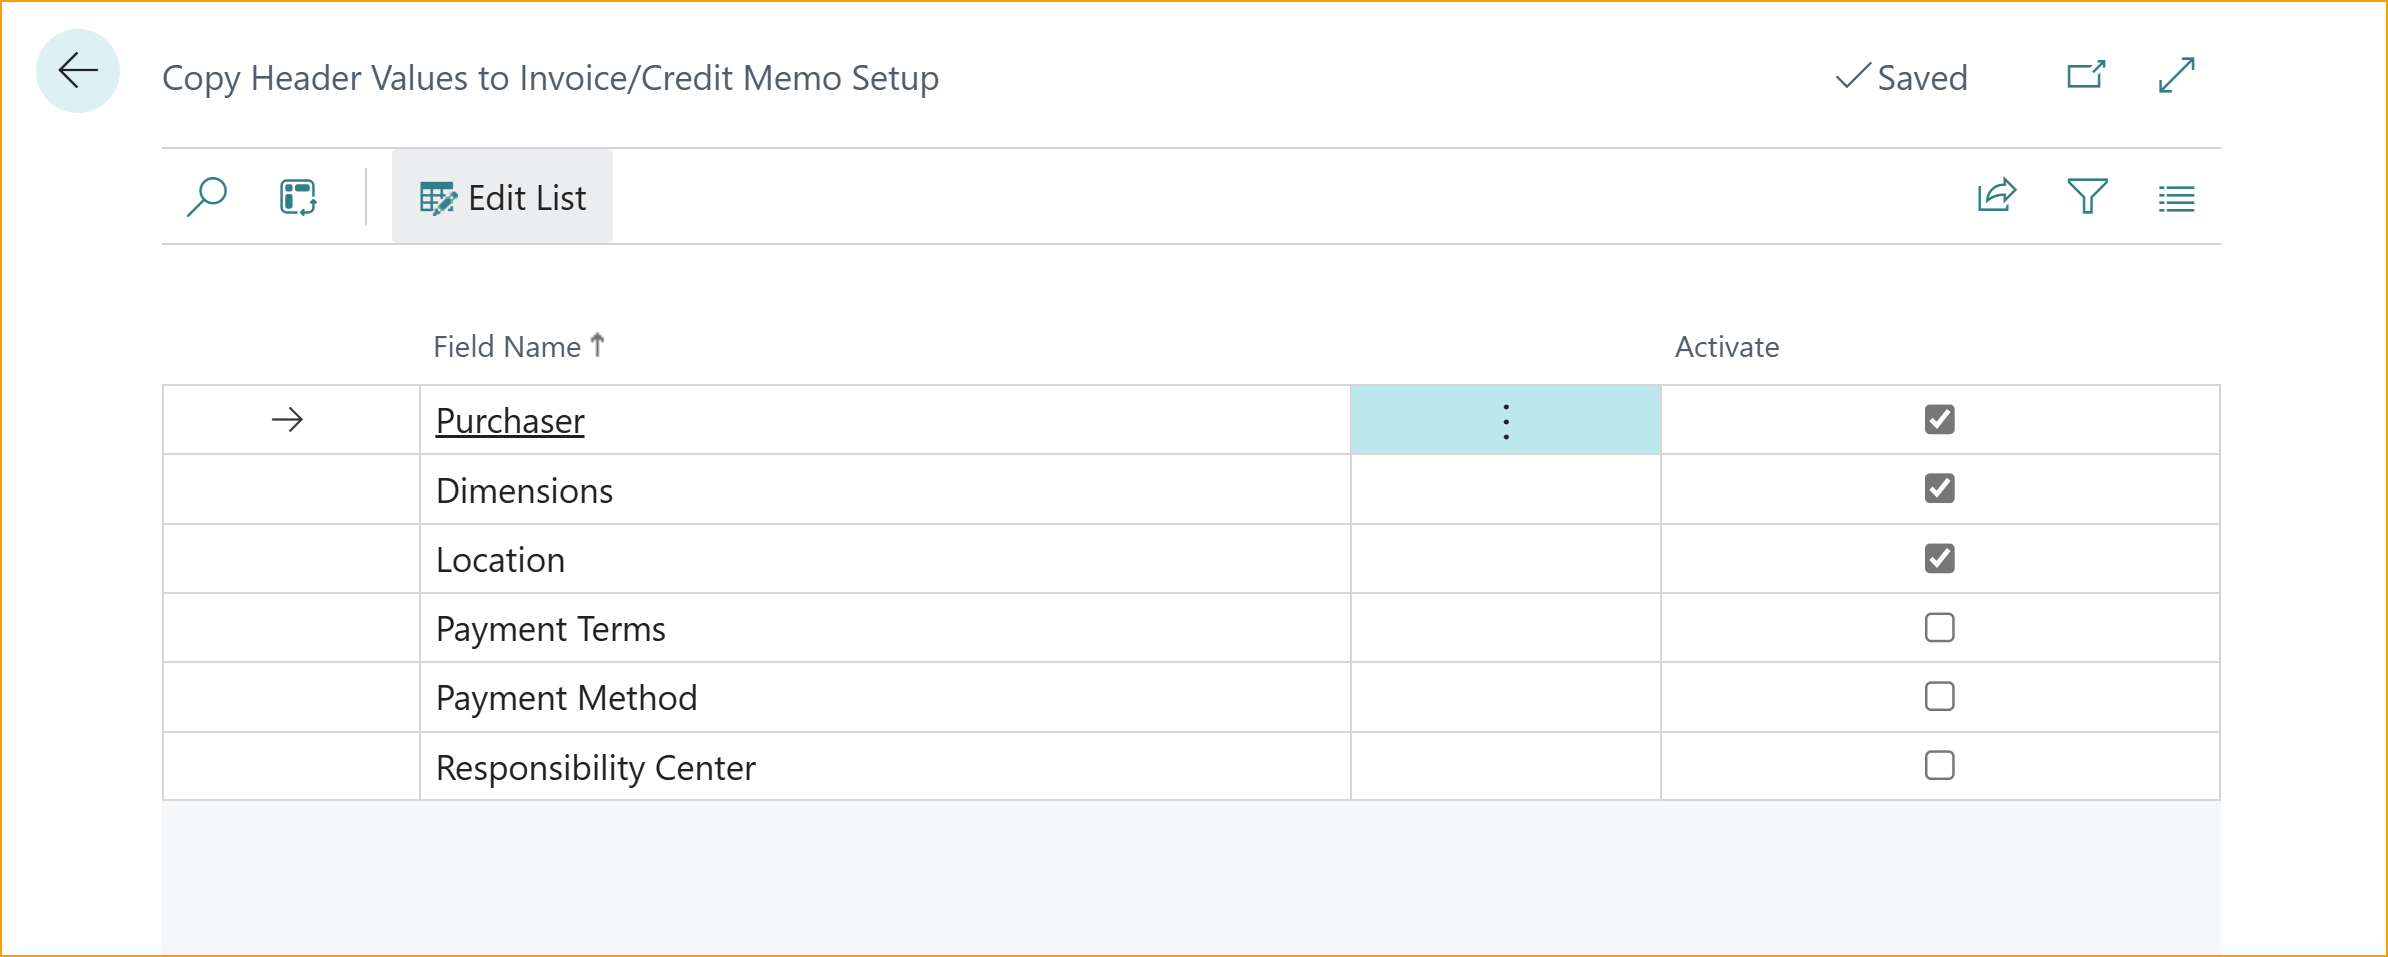
For US and CA localization Tax Liable and Tax Area can also be copied from the Purchase Order /Return Order to Purchase Invoice/ Credit.
This function can be used on a vendor level via ExFlow Vendor Setup
Go to: ExFlow Vendor Setup --> ExFlow Vendor Setup Card --> Press “Show more” on Order Matching fast tab.
The fields to be copied will always use settings from ExFlow Setup.
Invoice Discount Functionality
Line Discount
In ExFlow Import Journal, we have a couple of ways to establish line discounts that are imported.
Option 1 - EDC Interpretation
When EDC interprets the line unit price (LIT_UnitPriceAmount) and the total line amount (LIT_VatExcludedAmount), ExFlow calculates the difference between unit price, quantity and line amount and applies the discount %.
If unit price or line amount is zero, no discount calculation will take place.
Option 2 - Dedicated Discount Fields in EDC
We also support dedicated discount fields in EDC:
LIT_DiscountPercent - Maps to "Line Discount %" in the XML2EXF data exchange definition file. LIT_DiscountAmount - Maps to "Line Discount Amount" XML2EXF data exchange definition file.
Header Discount
ExFlow handles invoice discounts at the line level, not the header level. The fields Invoice Discount Calculation and Invoice Discount Value on the document header are read-only and display only the aggregated sum of all line discounts.
Important: The "Allow Invoice Disc." field at line level controls which lines are included in the discount calculation. Lines with this field set to false are excluded from validation.
Limitation: EDC and PEPPOL formats do not support import of document-level discounts. Only line-level discounts (LIT_DiscountAmount, LIT_DiscountPercent) can be imported.
Recalculate Invoice Disc. Amount on Verify Document
In ExFlow Setup, the setting Recalculate Invoice Disc. Amount on Verify Document controls whether the discount should be recalculated automatically during document verification.
ExFlow Web
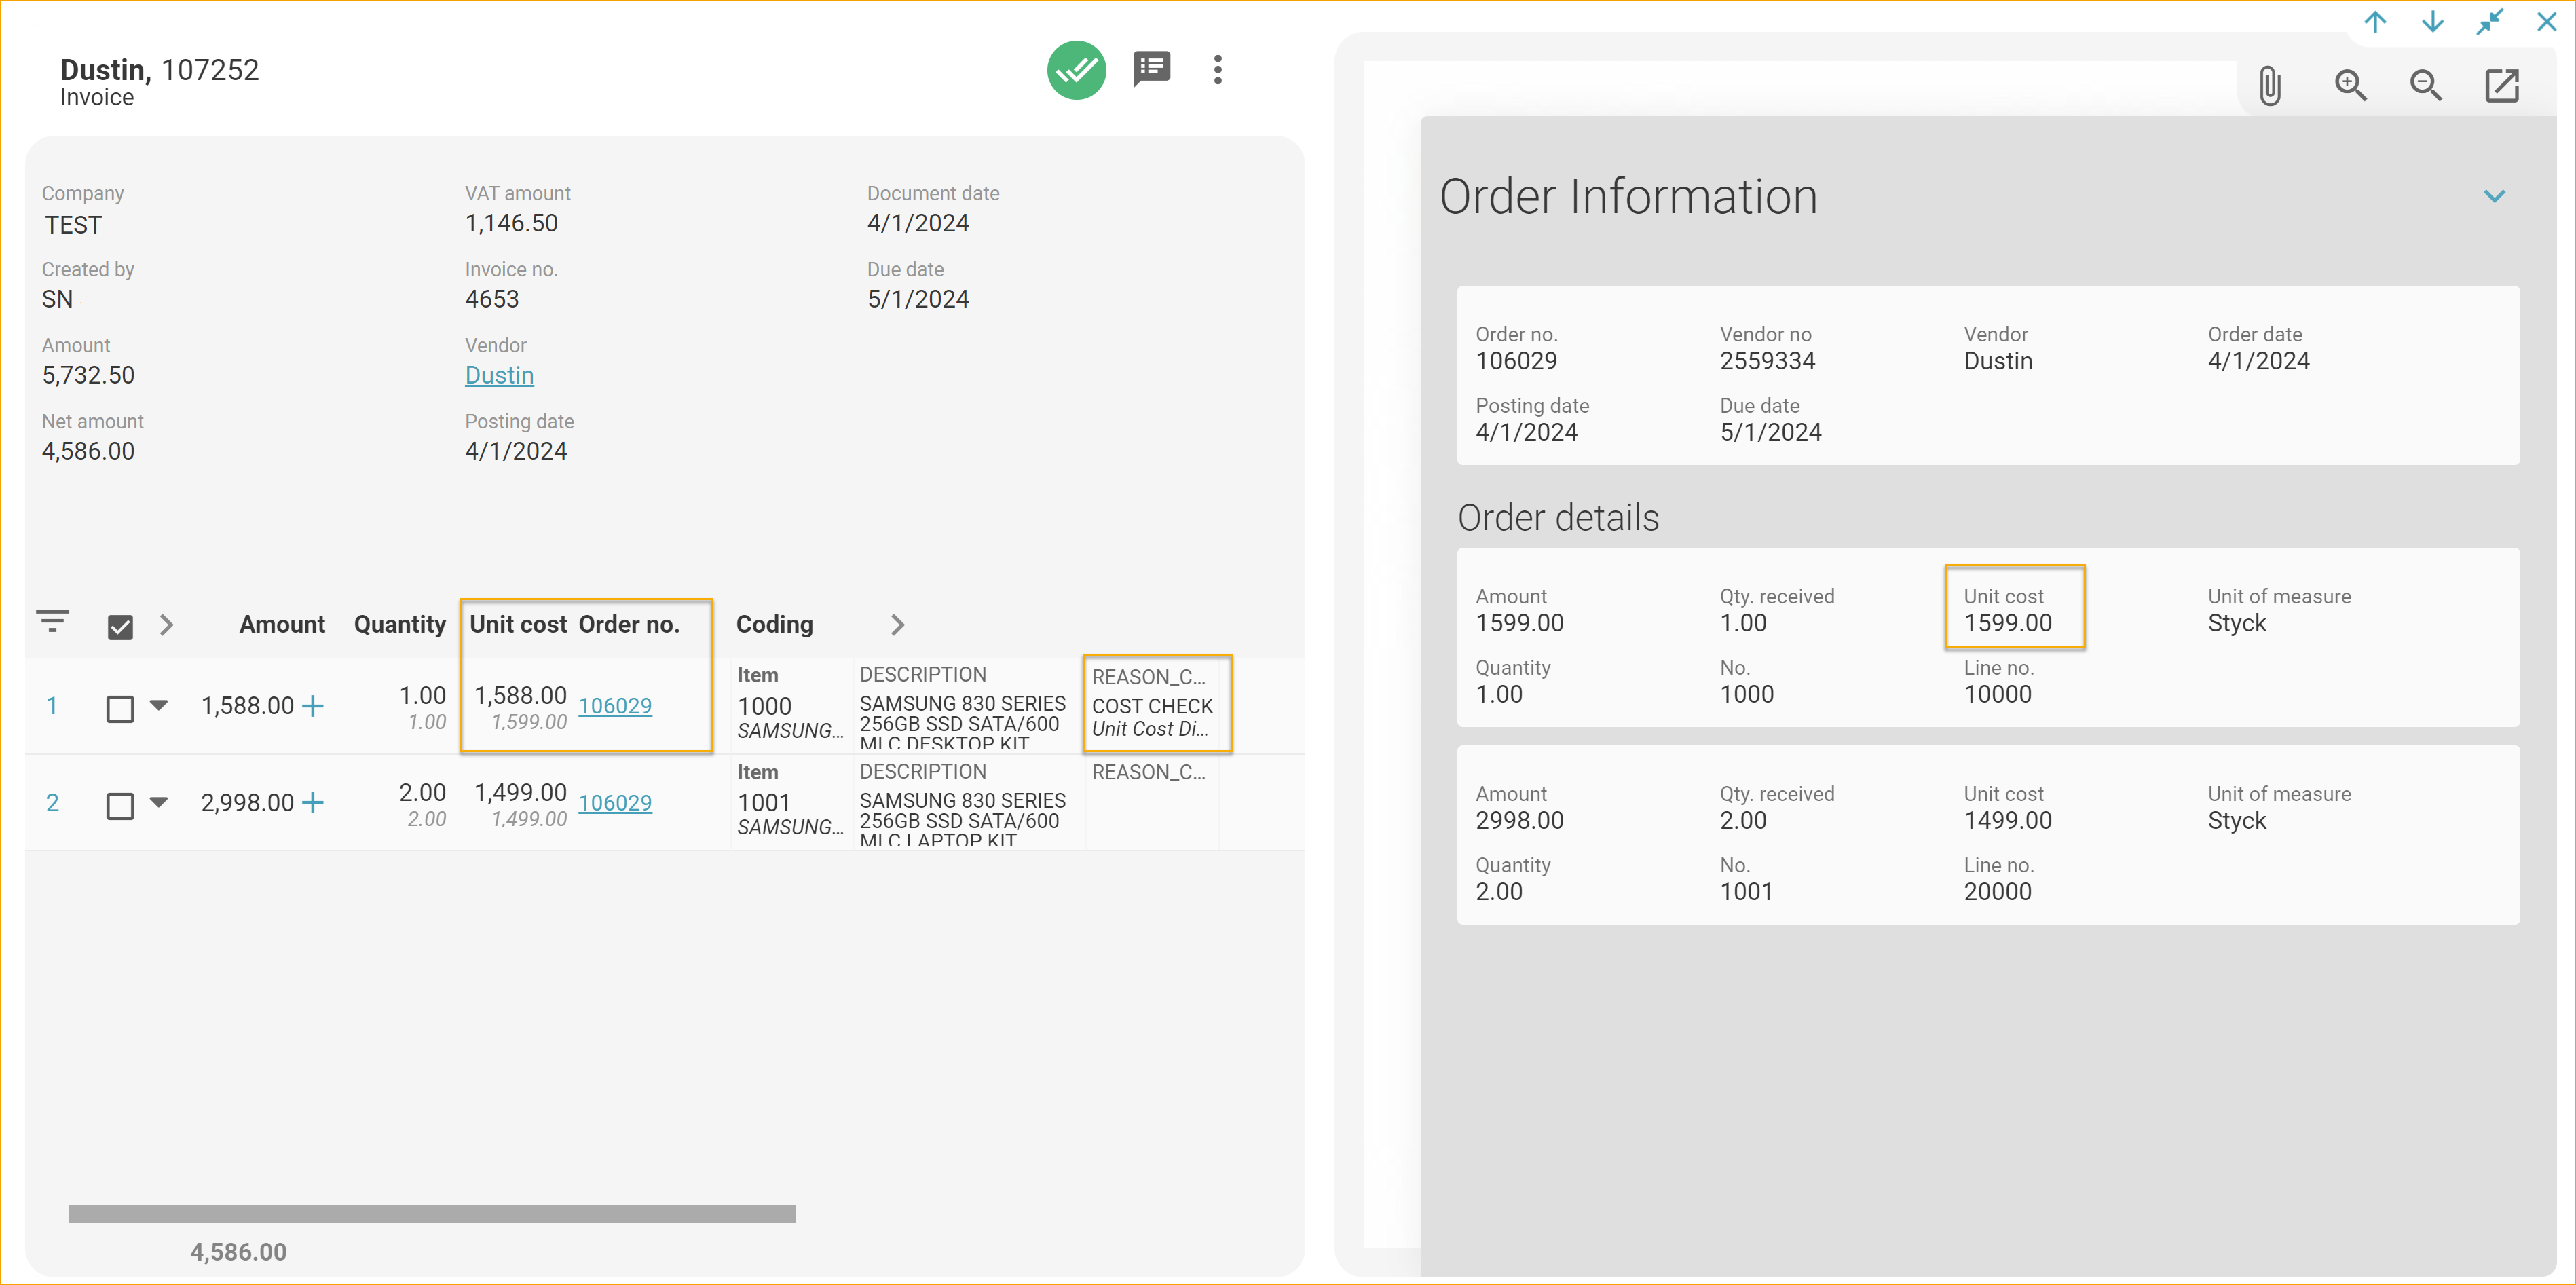
PO matched lines with unit cost differences in ExFlow Web
If a document is created in Import Journal, with a Unit price variance between the purchase order and the interpreted invoice, users can untick the ''Test Unit Cost'' checkbox on the Import Lines and create the document as usual.
Later on, in the Approval Status, users can personalize the page and enter the ''Unit Cost Mismatched'' column on the Document Lines to view if the specific invoice has a unit cost difference between the purchase order and the invoice line.
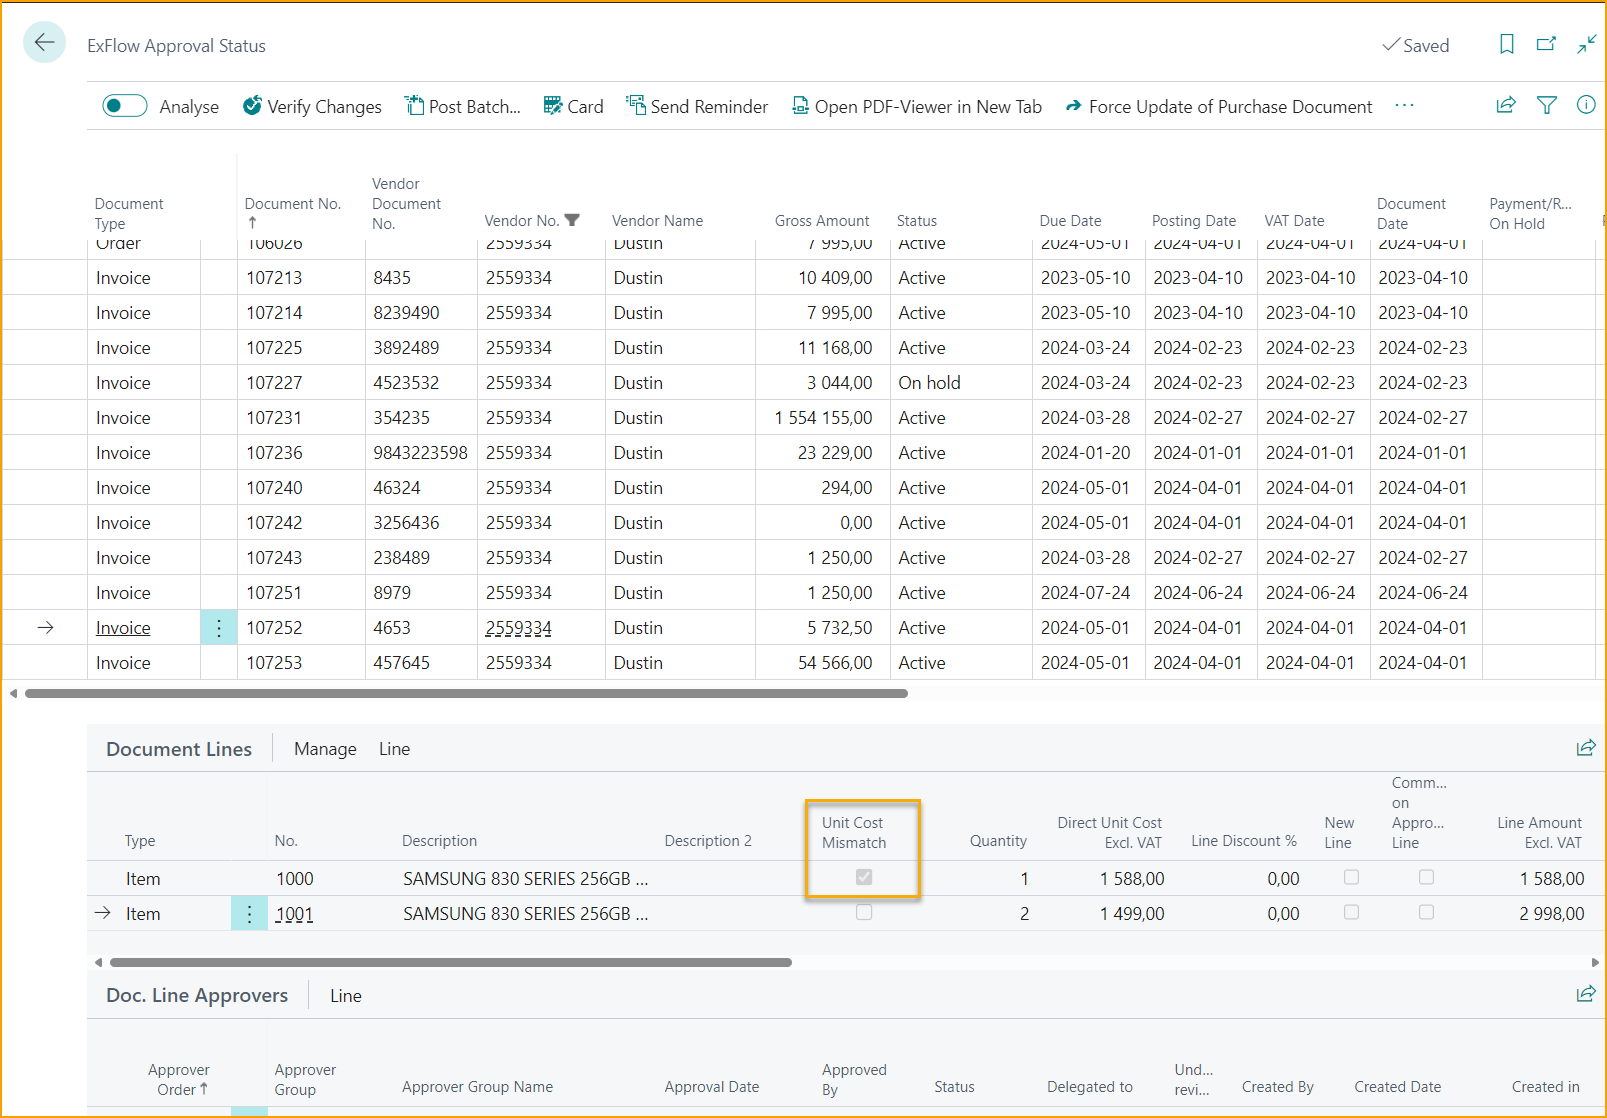
When ExFlow Users receive this PO Matched invoice for approval in ExFlow Web, they can also be informed about difference, on a line level through web column ''Reason Check''.
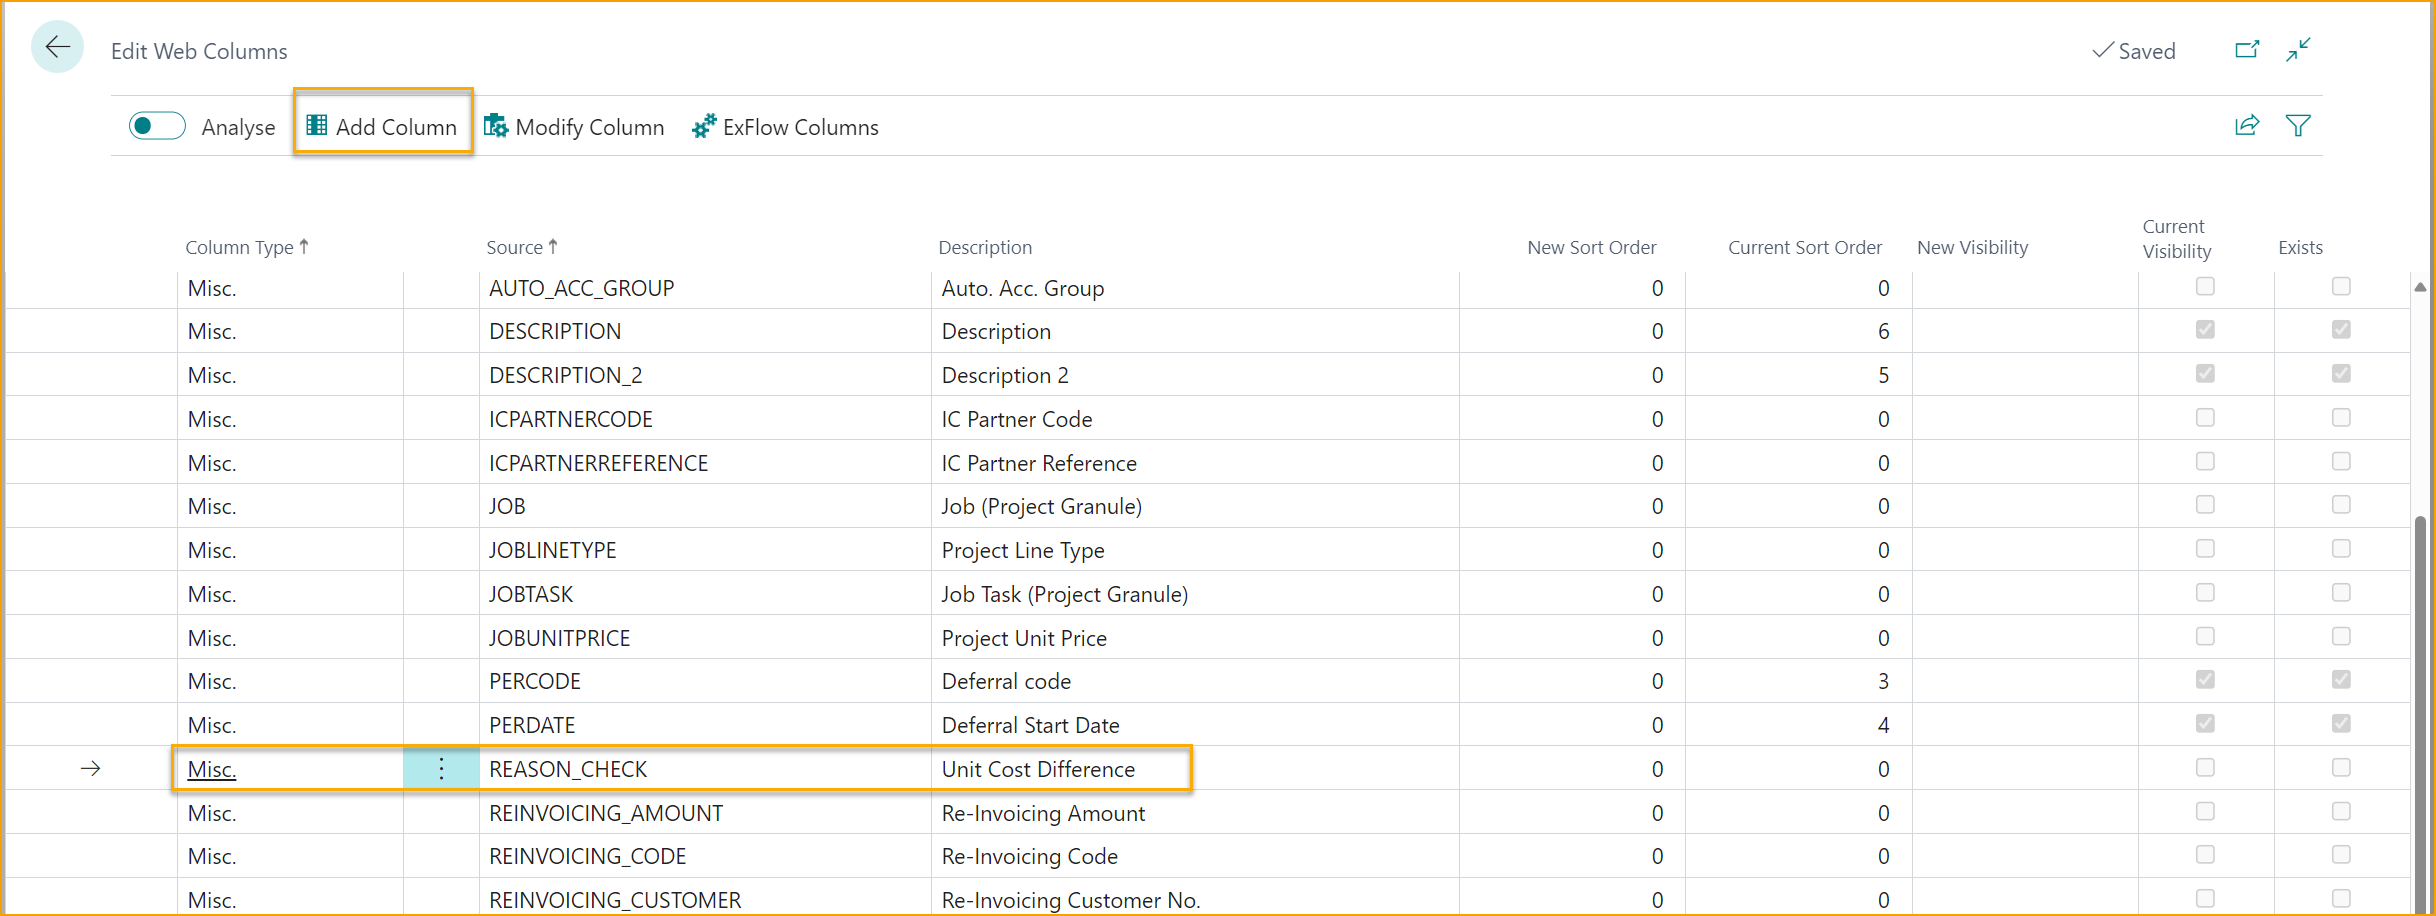
To add this column to ExFlow Web, simply head over to ExFlow Setup and click on ''Edit Web Columns'' to add the web column Reason Check.
This would make it easier for the approver to understand where the variance is and can thereafter handle the document in ExFlow web.