OAuth 2.0 Applications and Storage Setup
For support regarding below, please contact your internal IT department or trusted Business Central partner.
Create Application or Service Principal in MS Entra (or Azure)
Set a Name of choice. Choose: ‘’Accounts in any organizational directory” and then click on ‘’Register’’.
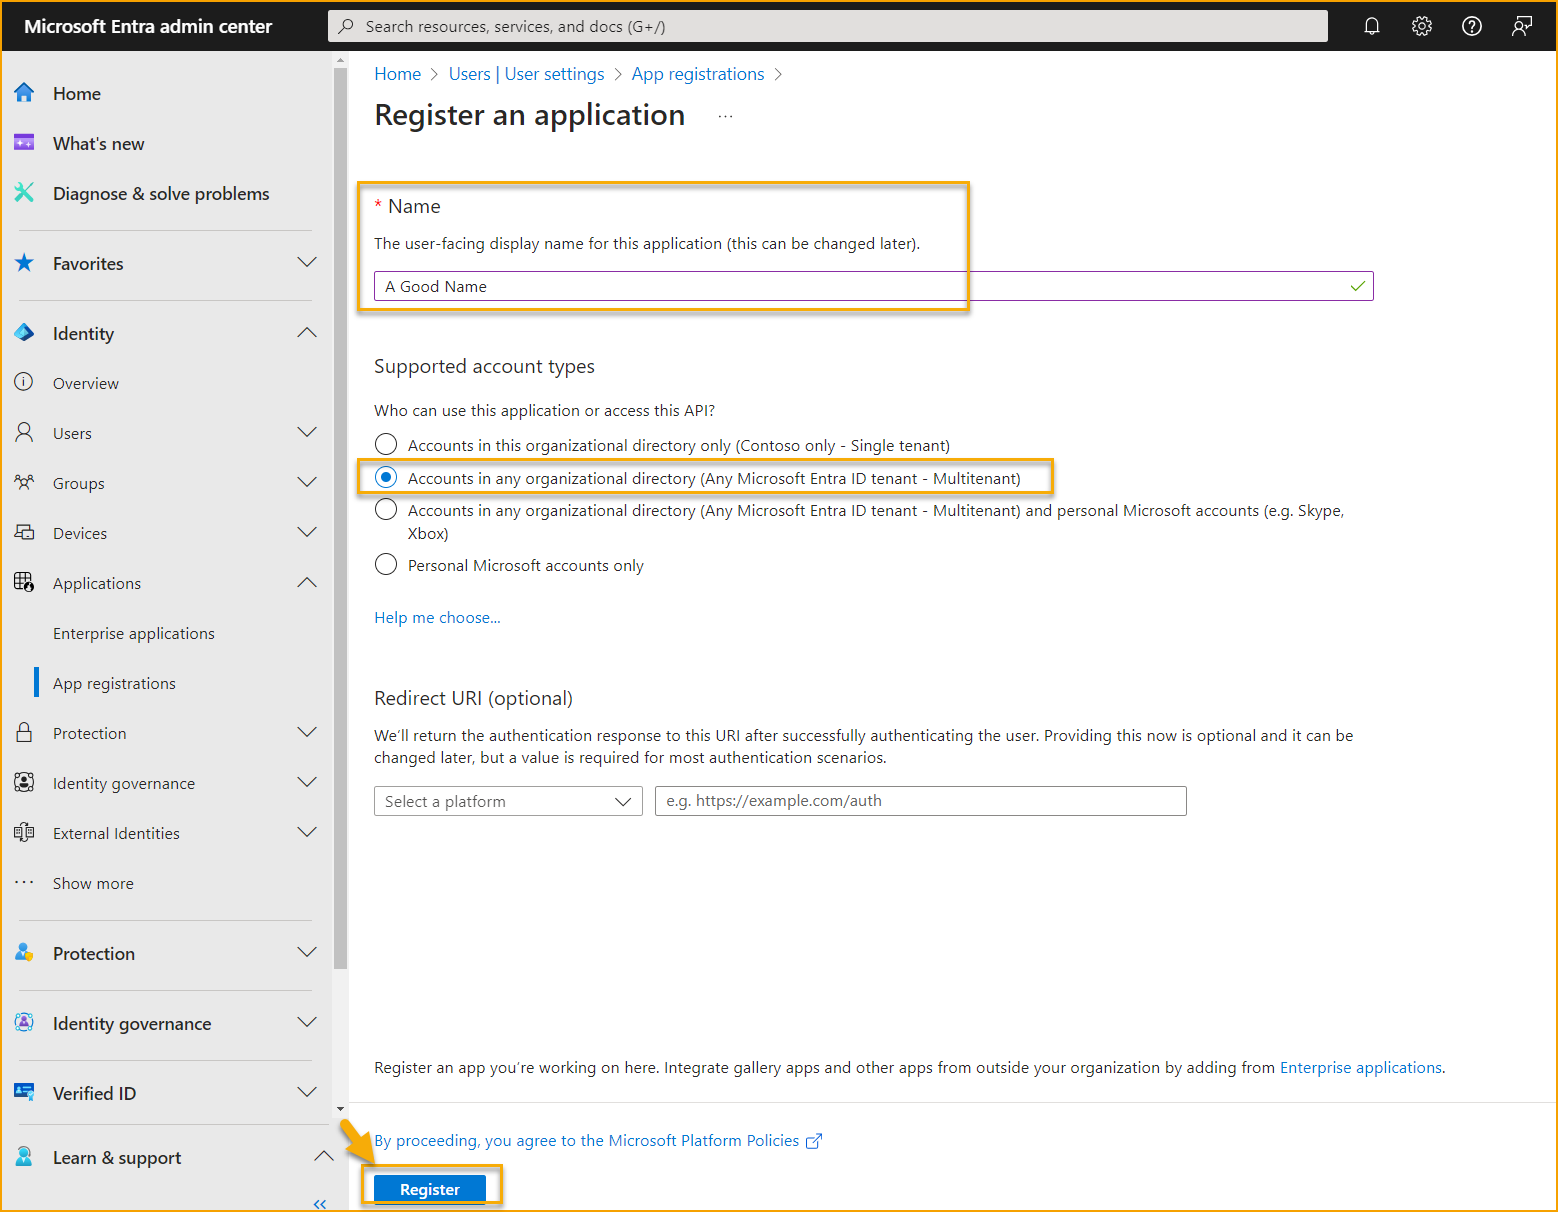
After registration, take notes of the “Application (client) ID”.
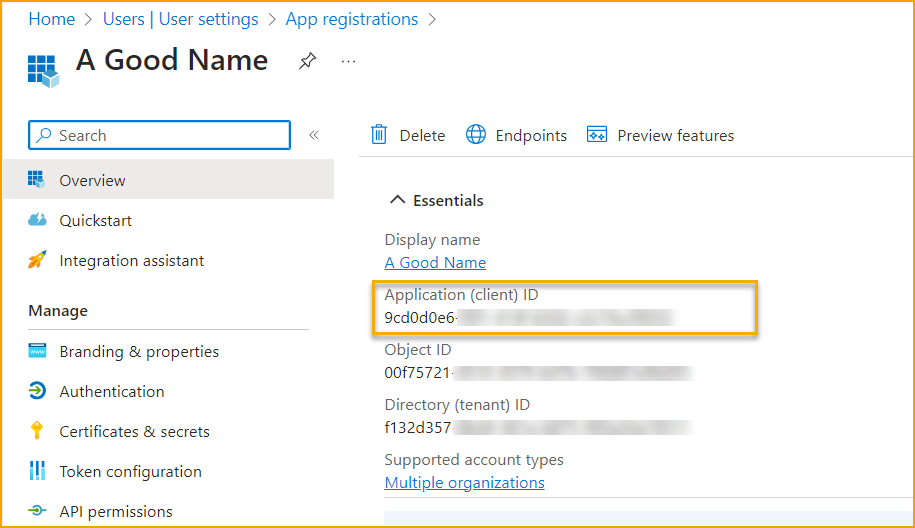
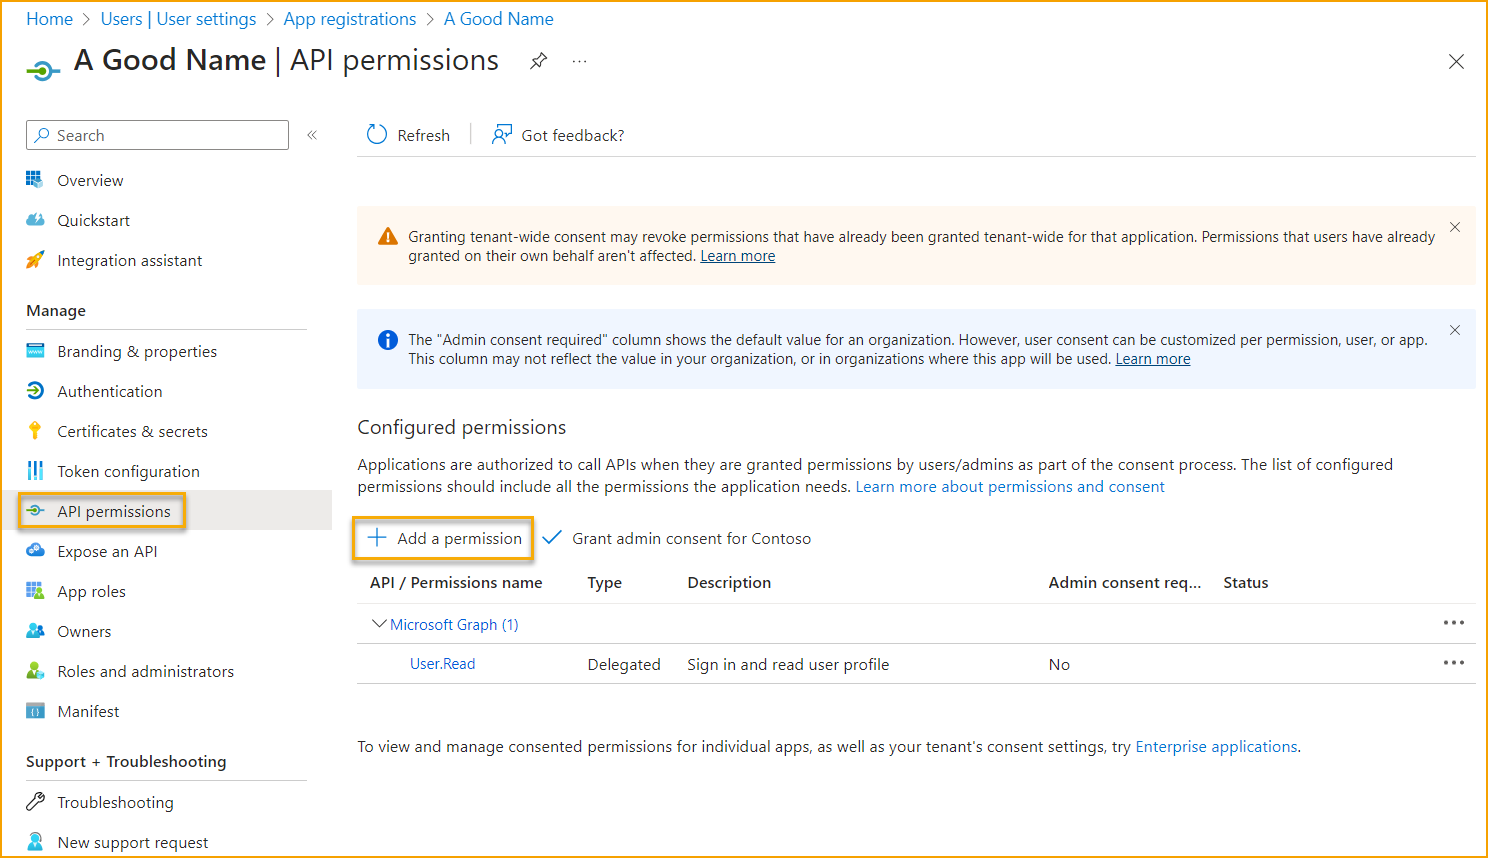
Go under API permissions to add a permission.
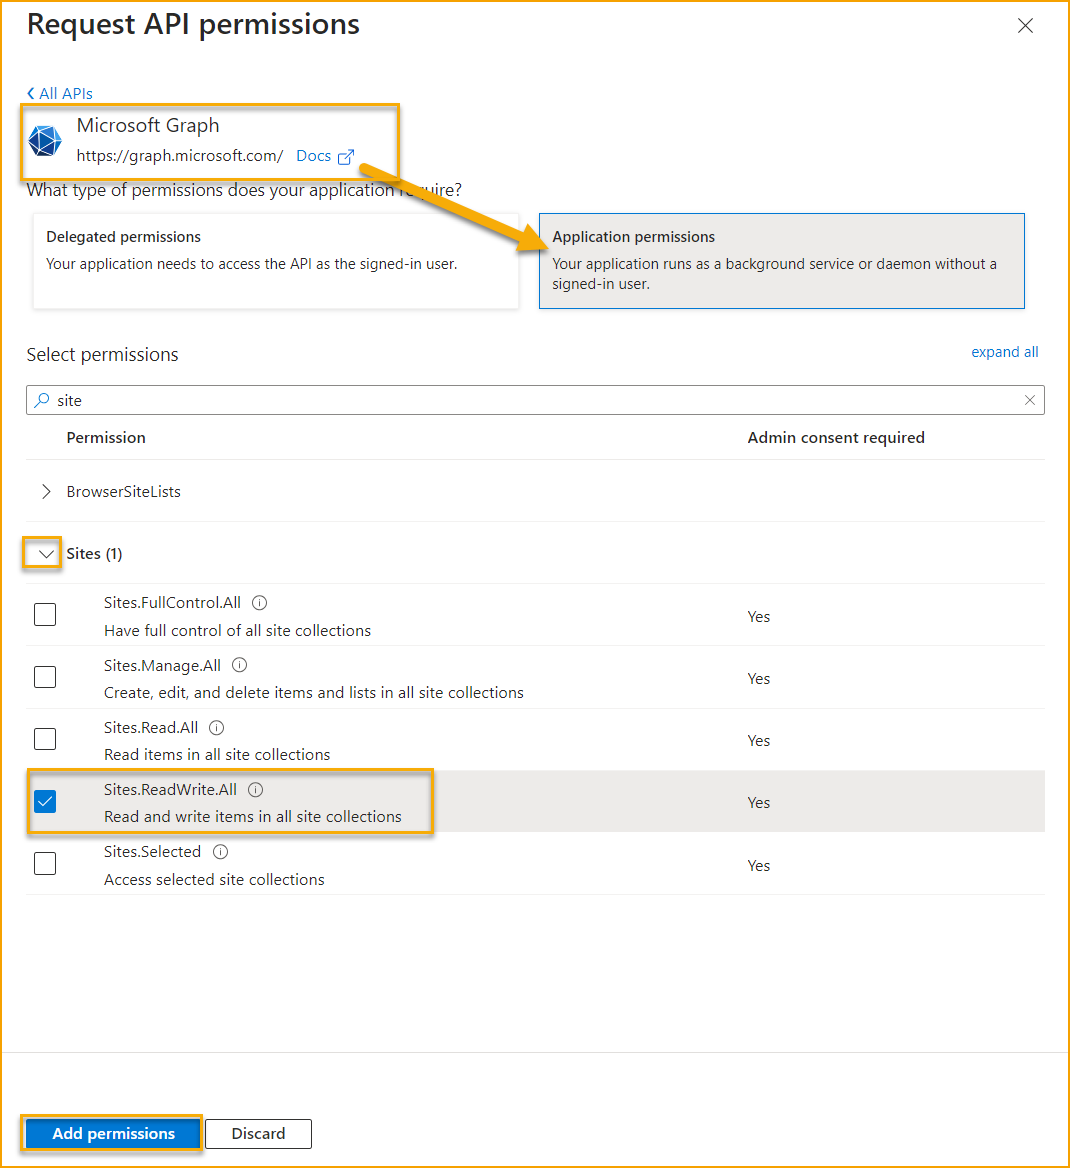
Click on ‘’Microsoft Graph’’ and ‘’Application Permissions’’.
Search for ‘’site’’ and add permission: Sites.ReadWrite.All
Click on ‘’SharePoint’’ and ‘’Application Permissions’’ again.
Select and add both permissions: Sites.ReadWrite.All and Sites.Manage.All.
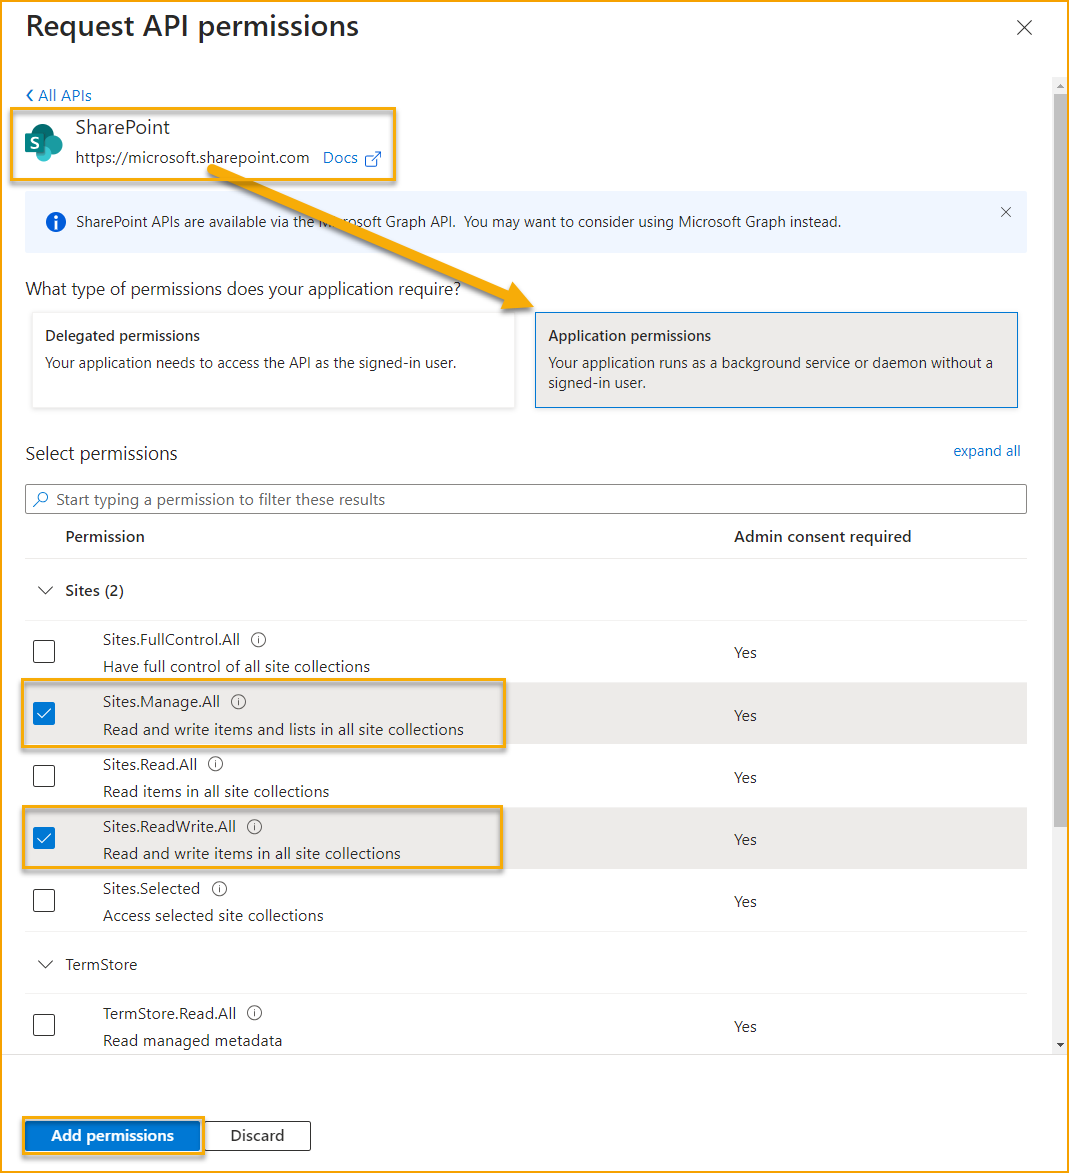
Grant admin consent for these permissions:
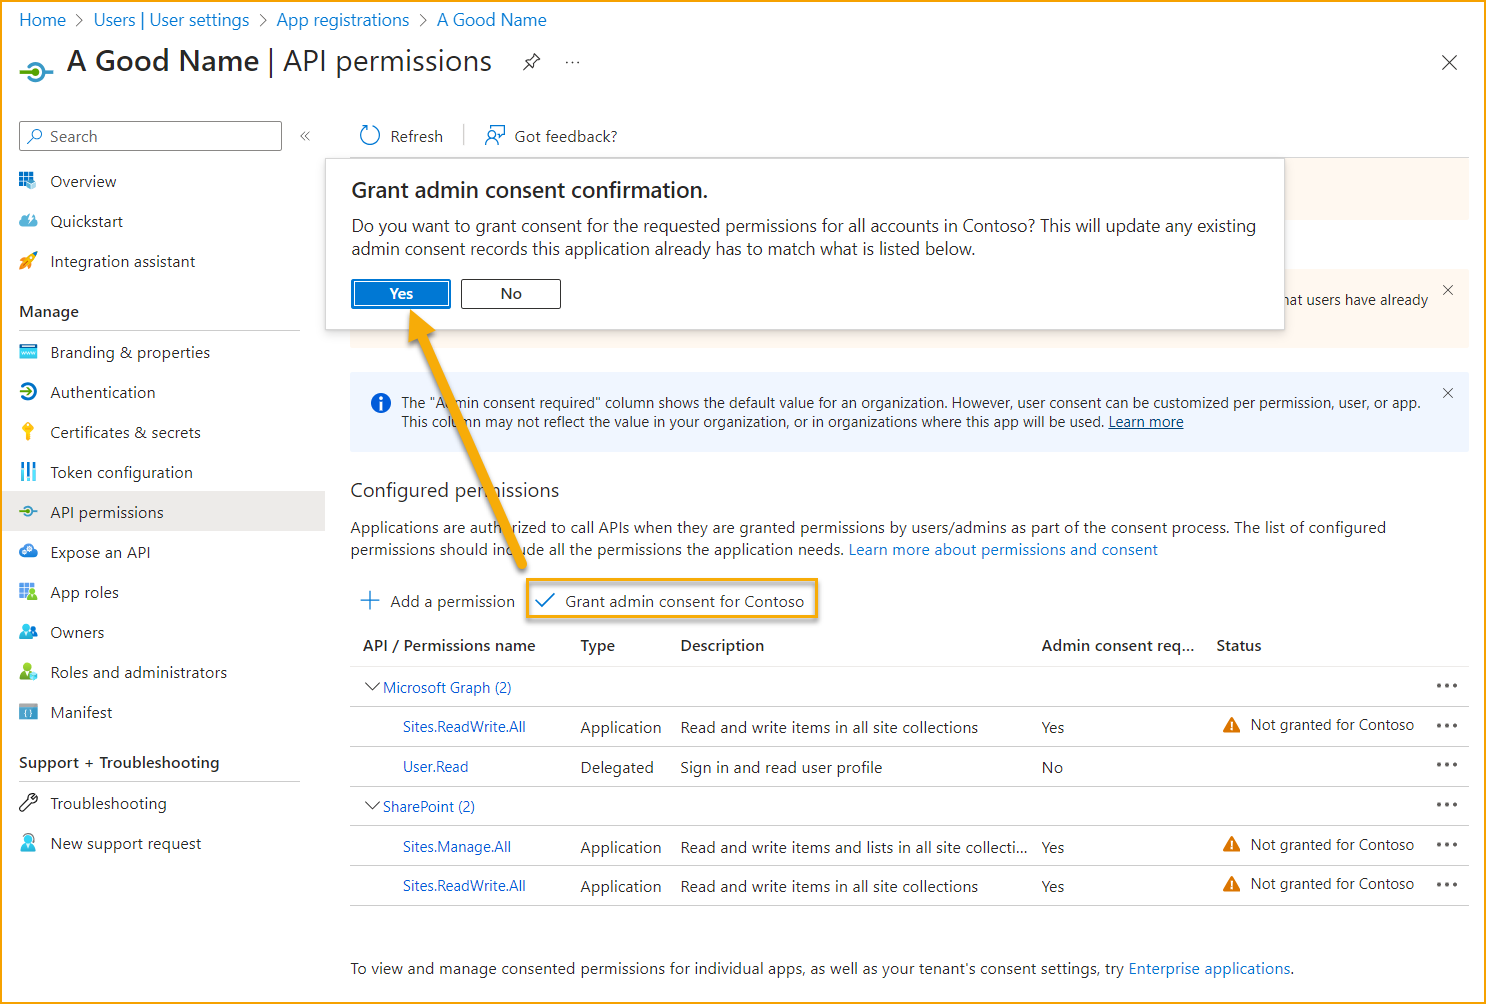
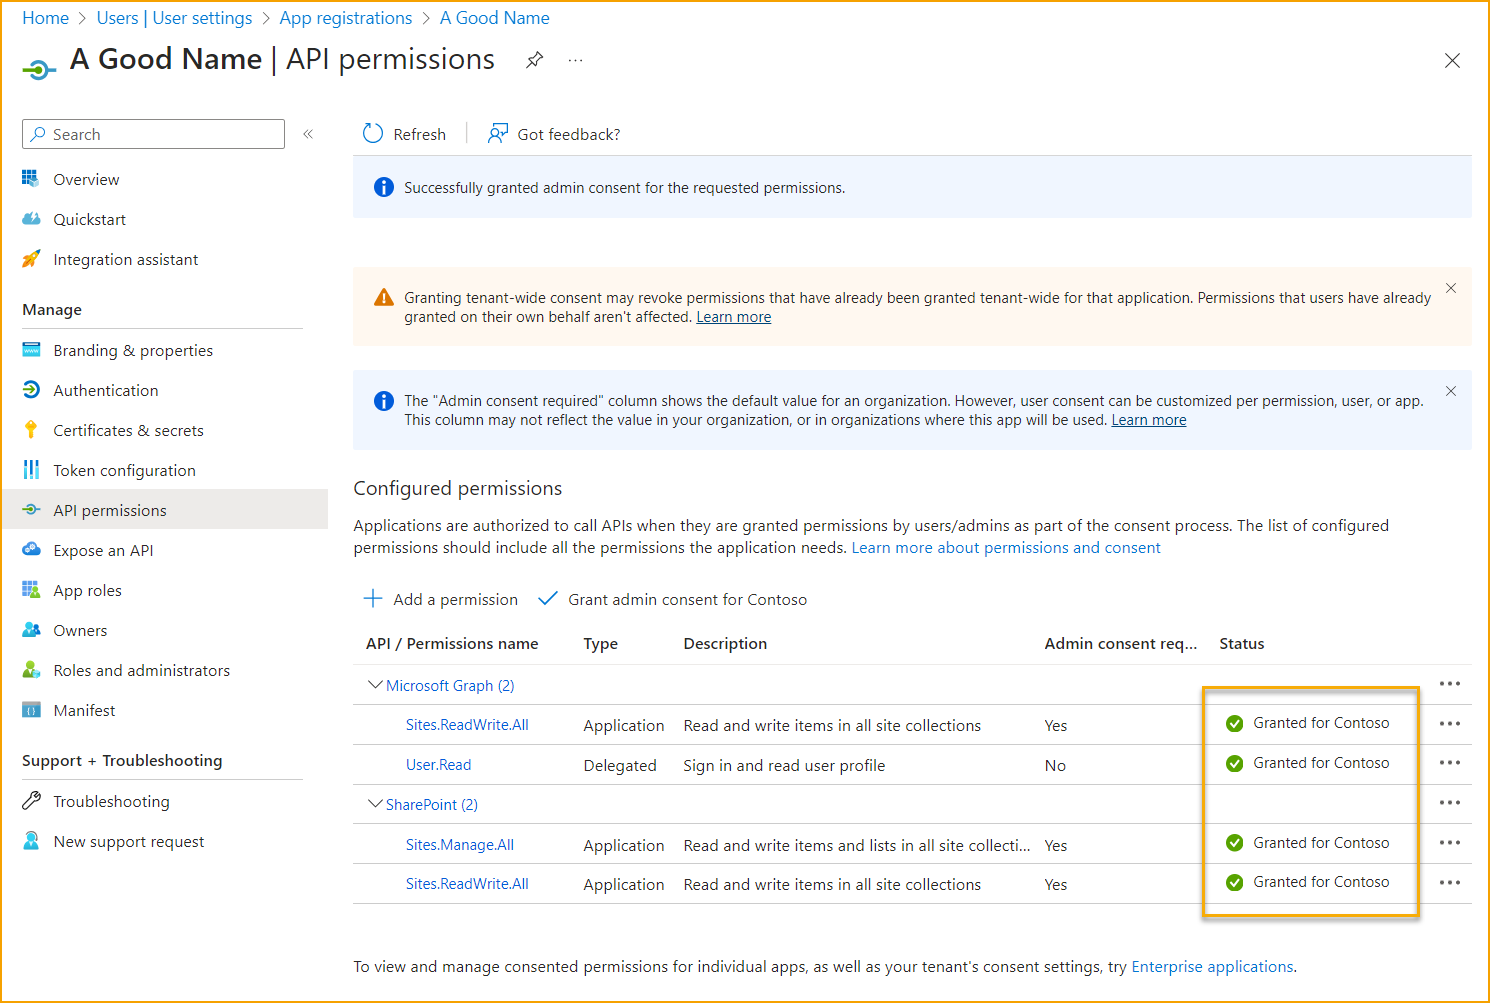
Permissions should look like this:
Go to ‘’Certificates & secrets’’.
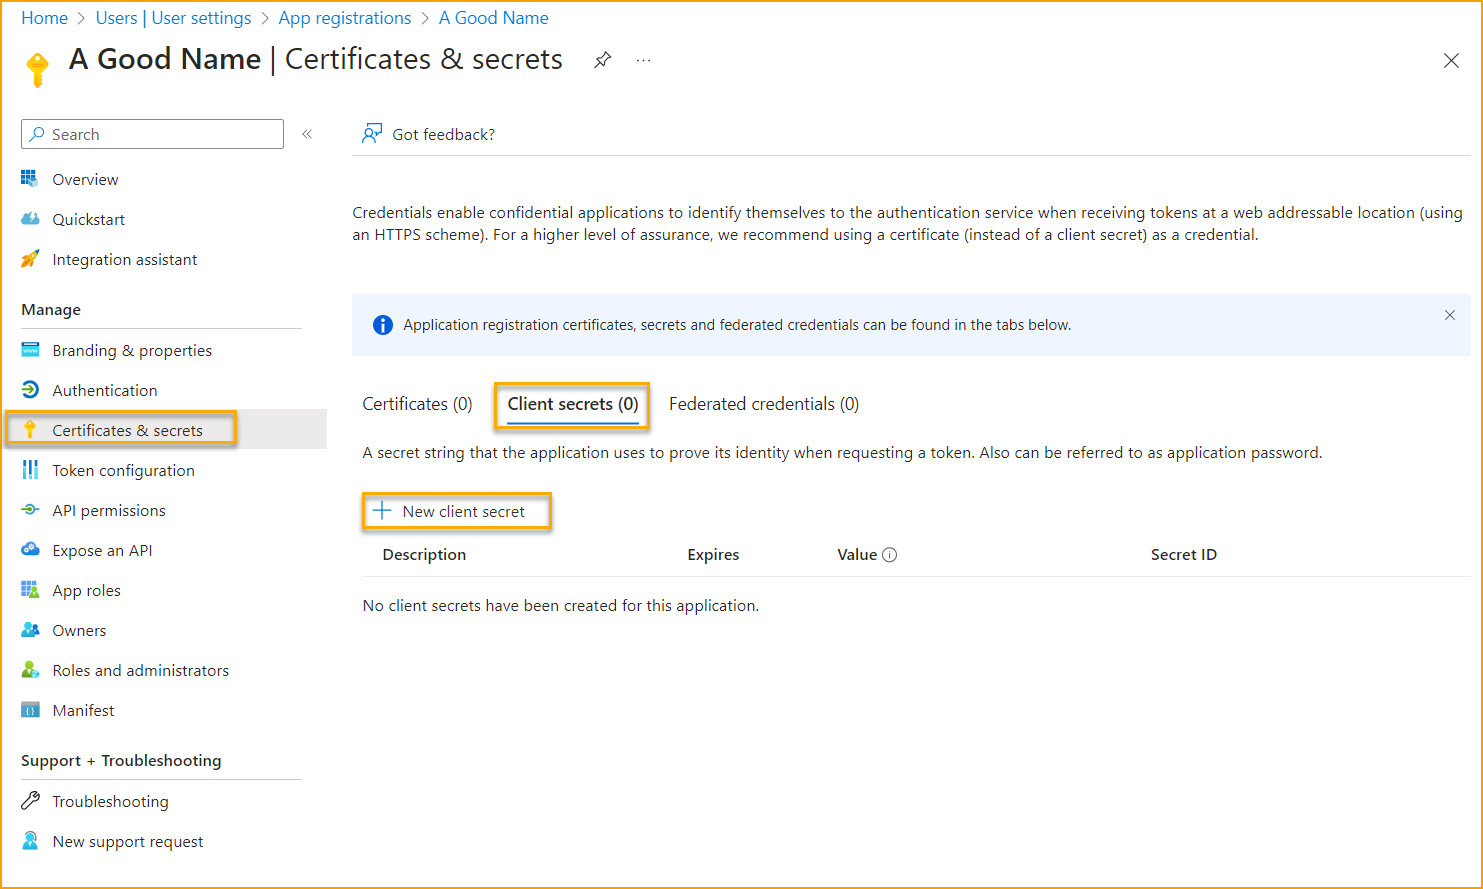
Create a client secret:
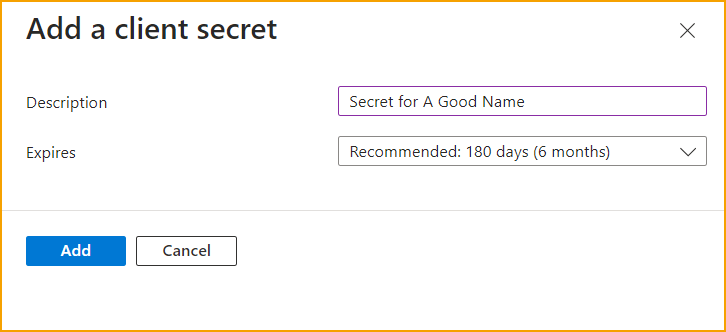
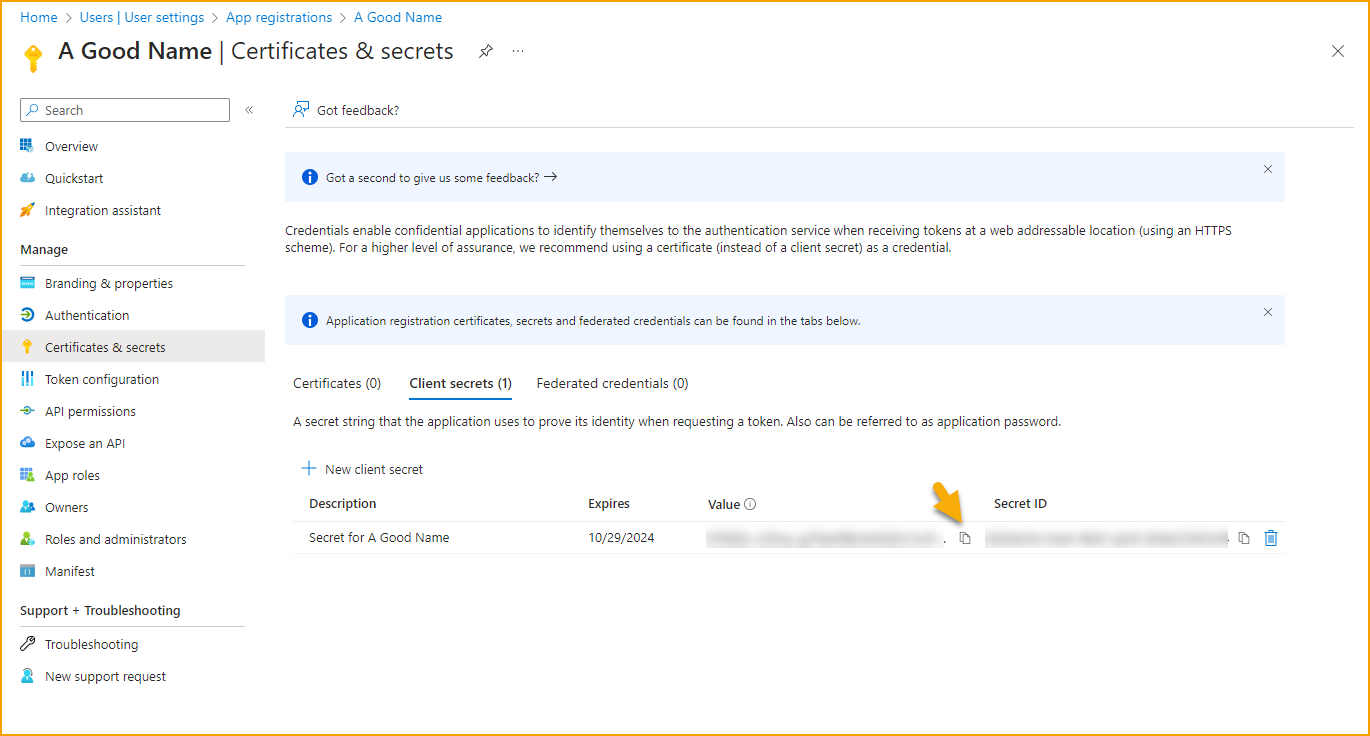
Copy the secret and/or save it. The secret will not be visible anymore. If the secret gets forgotten or misplaced, create a new secret and reconfigure the OAuth2 Application.
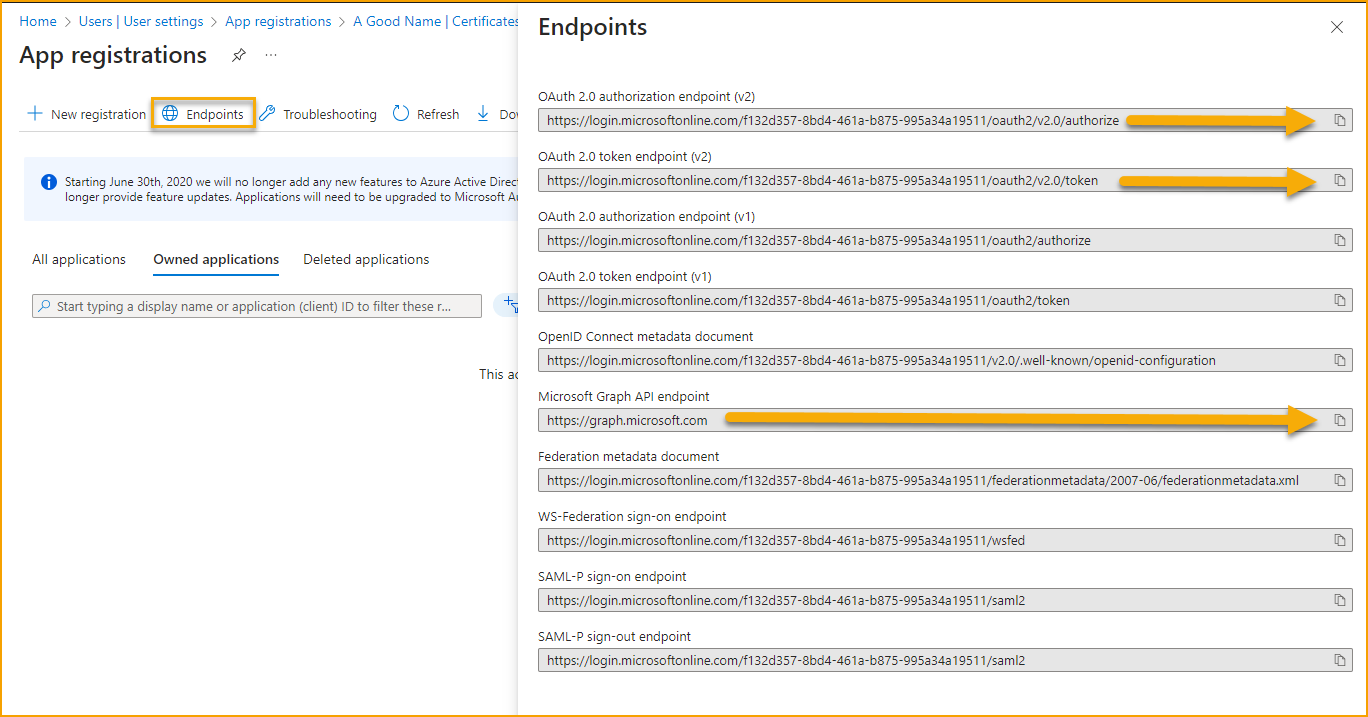
Go back to the list of App registrations and click on Endpoints. Copy both OAuth2.0 v2 Endpoints; Authorization and Token. Also copy Microsoft Graph API endpoint.
Completed with Entra or Azure AD or AAD.
Configure an OAuth2 Application in ExFlow
Go to: ExFlow Setup --> Actions --> Functions --> OAuth2 Applications
Start the configuration by clicking on ''New'' to create a new OAuth 2.0 Application.
| OAuth 2.0 Applications |  |
|---|---|
| Request Access Token | Open the service authorization web page. Login credentials will be prompted. The authorization code must be copied into the Enter Authorization Code field. |
| Refresh Access Token | Refresh the access and refresh tokens. |
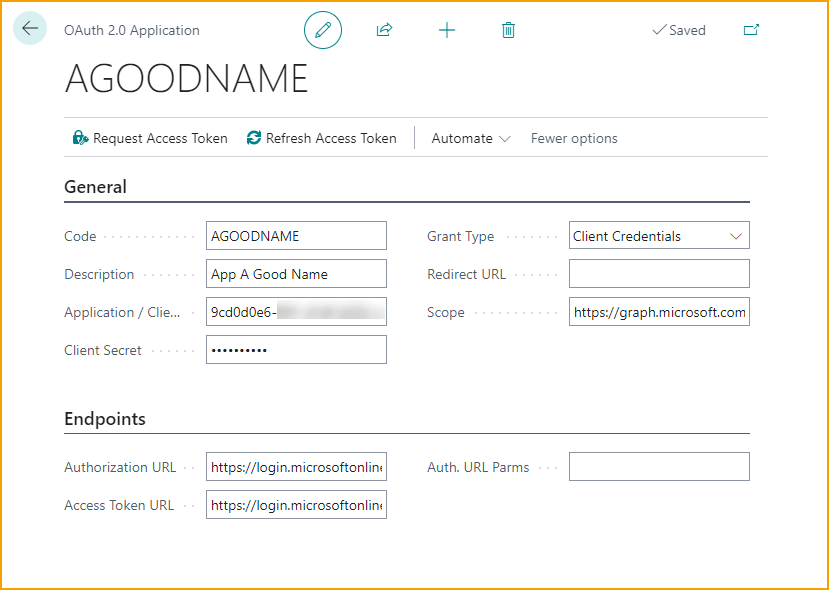
| General | |
|---|---|
| Code | Specifies the name of the Code |
| Description | Specifies the Code description |
| Application / Client ID | Specifies the Application ID from the Enterprise Application Overview. |
| Client Secret | Specifies the client secret |
| Grant Type | Specifies the grant type to use. It is possible to use Authorization Code, Password Credentials or Client Credentials. Currently only ‘’Client Credentials’’ is supported. |
| Redirect URL | Specifies the redirect URL, not in use for now. |
| Scope | Specifies the scope. Enter the Graph Endpoint and add ‘’.default.’’ Make sure the endpoint looks like the following at the end: ‘’…soft.com/.default’’ |
| Endpoints | |
|---|---|
| Authorization URL | Specifies the authorization URL |
| Access Token URL | Specifies the access token URL |
| Auth. URL Parms | Specifies the resource URL, not in use for now. |
Enter all needed setup information. Enter a code and code description. Paste the Application/ Client ID and the Client Secret from MS Entra Admin Center.
Set Grant Type to ''Client Credentials'' and the MS graph scope url (Microsoft Graph API).
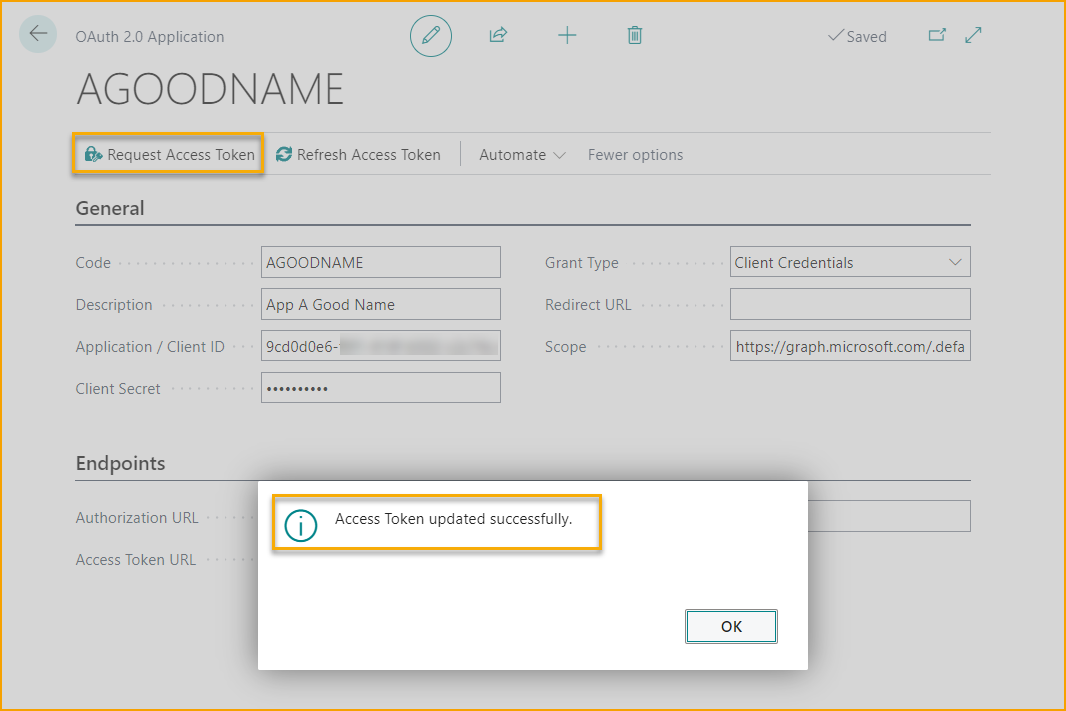
Under the Endpoint section, paste the previously copied URL's for both OAuth2.0 v2 Authorization Endpoint and Token Endpoint.
Test by pressing “Request Access Token”. Following message should be displayed if everything is correct: “Access Token updated successfully.”
SharePoint Setup
In Site Contents, create a new Document Library, this will contain the folder that ExFlow will store data in. Create a folder in the Document Library that was just created. This will be the location of the documents. Click on the newly created folder. Copy the complete URL from the address field in the browser, this will be needed in the configuration below.
Blob Storage Setup for SharePoint
Go to: ExFlow Setup -- > Actions --> Functions --> Blob Storage Mgmt (ExFlow Storage Management Setup)
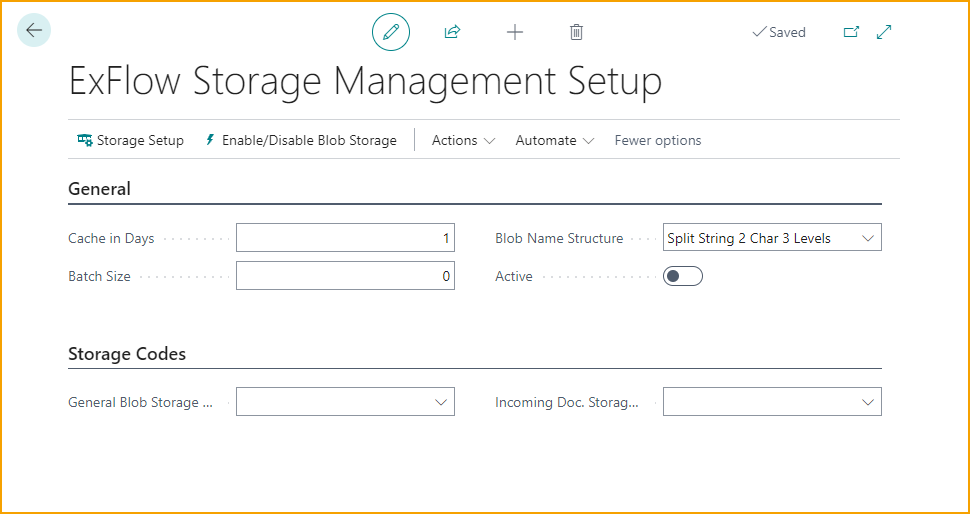
| Blob Storage Mgmt / ExFlow Storage Management Setup menu | |
|---|---|
| Storage Setup | Configure one or more storage configurations |
| Enable/ Disable Blob Storage | Activate or inactivate blob storage |
| Blob Storage Mgmt / ExFlow Storage Management Setup --> General | |
|---|---|
| Cache in Days | Specifies how many days cached content will remain in BC. After the specified number of days, the content will be removed from local storage. |
| Batch Size | Set to 0 and all is transferred in one batch during sync. Set to > 0 and only that many documents will be transferred during sync. Applies to scheduled job and manually triggering complete sync. |
| Blob Name Structure | Specifies the kind of naming convention used for path to blobs. Recommended is to split to a path like ab/cd/ef/abcdefgh |
| Active | Enable Blob Storage for records by activating this switch. |
| Blob Storage Mgmt / ExFlow Storage Management Setup --> Storage Codes | |
|---|---|
| General Blob Storage Code | Specifies what Storage Code to use for general Blob Storage. This is used when the developer/partner would like to develop something for the customer that uses blob storage but they would like to control structure, names and all themselves. Exposed as an API named BSApi. |
| Incoming Doc. Storage Code | Specifies what Storage Code to use for storing blobs from records. This setup is used for blob storage used as storage for incoming document attachment where filenames and the structure is controlled by Blob Storage. Also fetching is controlled by events through blob storage. |
If General Blob Storage code field is set to a storage setup code, can be the same as for Incoming, you can use the file API that Blob Storage in ExFlow exposes. Works like a filesystem. Files can be written or read from. The API is located in the codeunit BSApi (Blob Storage API)
The functionality Blob Storage for Incoming Document Attachment is essentially using the BSApi to handle the files internally.
Storage Setup
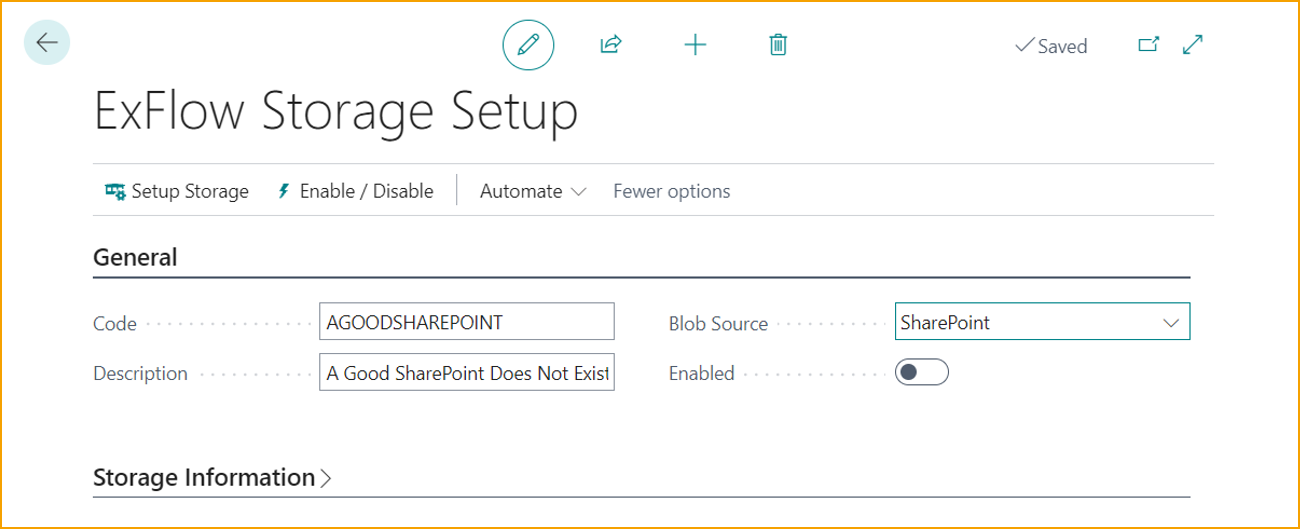
From the ExFlow Storage Management Setup page, click on Storage Setup and then on ‘’New’’ to start with the configuration.

Enter a Code and Description. For Blob Source, select SharePoint.
Then click Setup Storage to continue the configuration.
Copy the URL from SharePoint and paste that into the field ''SharePoint URL''. Once exit the field, values will be extracted and populated into Host, Site, Document Library and Folder. If any of the fields are missing, most likely Folder, it’s possible to enter those manually.
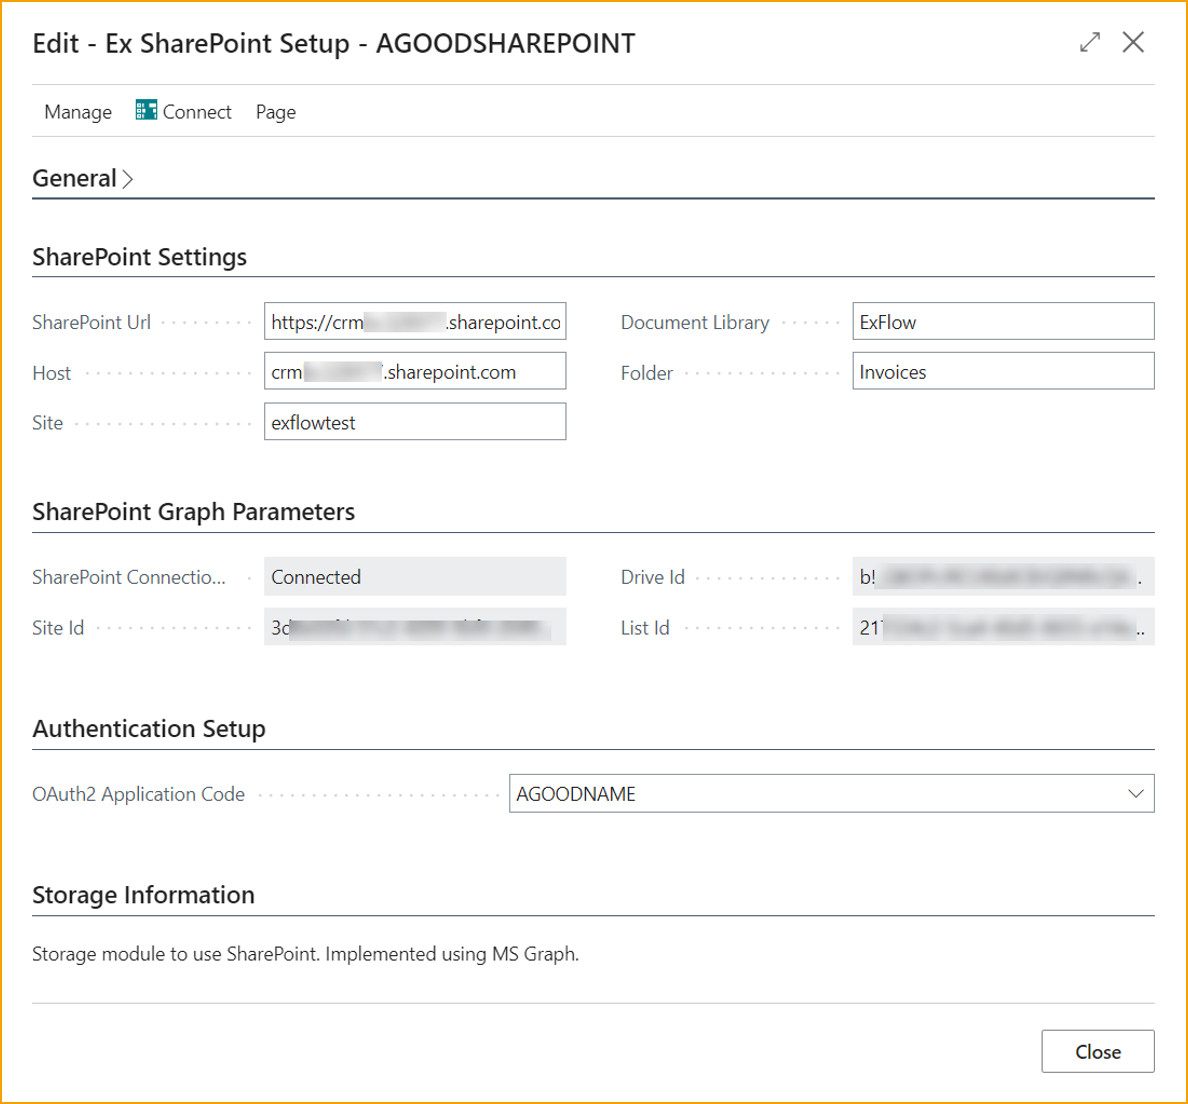
Select the previously created OAuth2 Application and verify by clicking on ‘’Connect’’.
If something is wrong like the folder name, message like “Not Found” will appear.
Moreover, if permissions are missing, a message like “Unauthorized” will appear.
If all is OK, the SharePoint Connection Status will be set to ‘’Connected’’ and parameters will be populated in Site Id, Drive Id and List Id.
It is now OK to close this page since the Blob Storage Setup for SharePoint is completed.
Go back to ExFlow Storage Setup for this setup to click on ‘’Enabled’’.
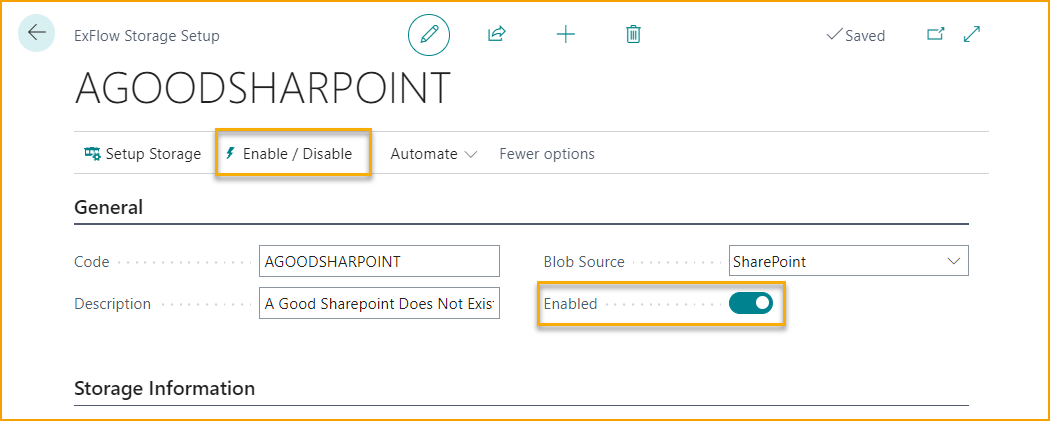
Close ExFlow Storage Setup and return to ExFlow Storage Management Setup / Blob Storage Mgmt.
Select the newly created SharePoint setup in “Incoming Doc. Storage Code”.
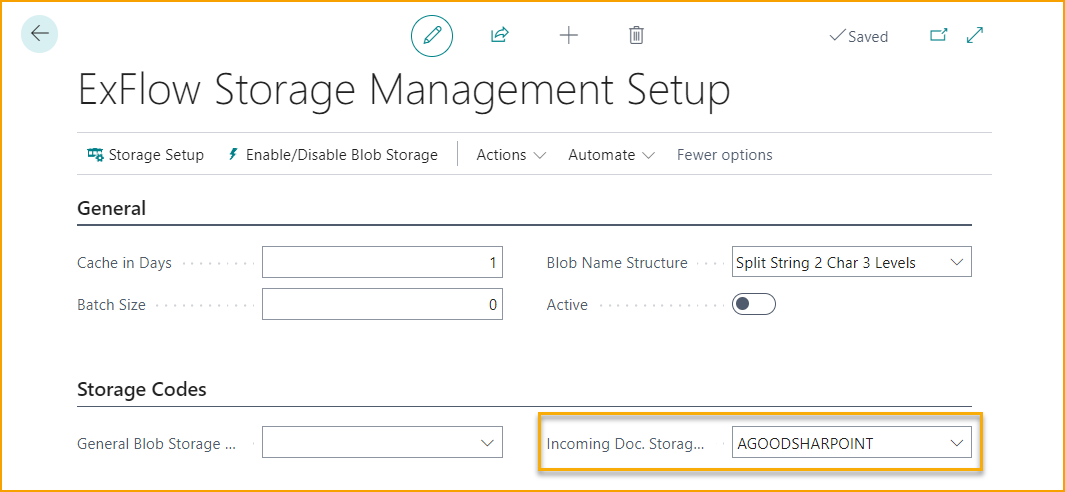
Click on ‘’Active’’ or “Enable / Disable Blob Storage”.
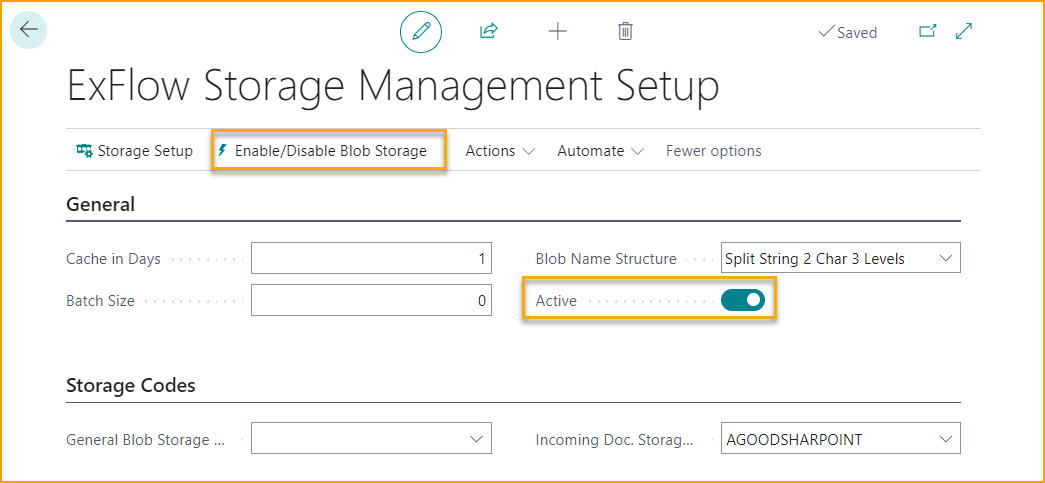
If any existing posted invoices approved using ExFlow, a dialog will ask to transfer those, then it’s possible to choose Yes.
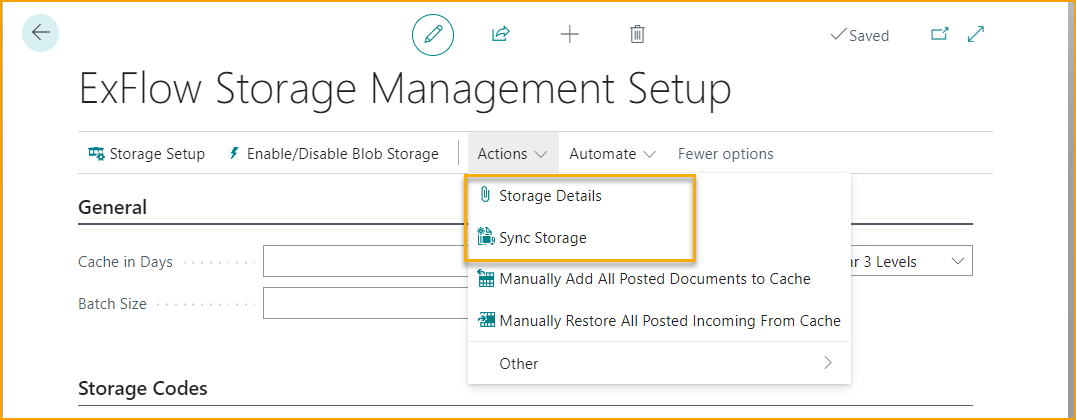
It is now possible to check status for posted invoices in Blob Storage by selecting ‘’Actions --> Storage Details’’.
Click on ‘’Sync Storage’’ to force a transfer over to SharePoint.
Refresh the SharePoint page with the folder previously created, it should now be possible to view the new folders there.

Blob Storage Setup for Azure Container
Go to: ExFlow Setup -- > Actions --> Functions --> Blob Storage Mgmt (ExFlow Storage Management Setup)
The example above is for SharePoint. The setup for Azure Container is similar. Go to ExFlow Storage Setup and choose Blob Source Azure Container. Then go to Storage Setup to configure the Azure Blob Container settings.
For details on working with Azure Blob Containers, please go to Microsoft Learn Introduction to Azure Blob Storage