Overview
Import invoices
The import form is divided into three forms. The main form ('Import form all') shows all imported invoices with the most useful information. If you want to edit or view a selected invoice you click the Edit button to open the detailed import form.
In the import form, the user can push the button Cross company to be able to show invoices from all companies running ExFlow.
| Import forms | |
|---|---|
| Import form All | Shows both cost invoices and purchase order invoices. |
| Import form Expense | Shows only cost invoices. |
| Import form Purch | Shows only purchase order invoices. |
Import form All
ExFlow | Invoices | Import form | Import form All
This is the overview form of all imported invoices with the 'side by side' display activated.
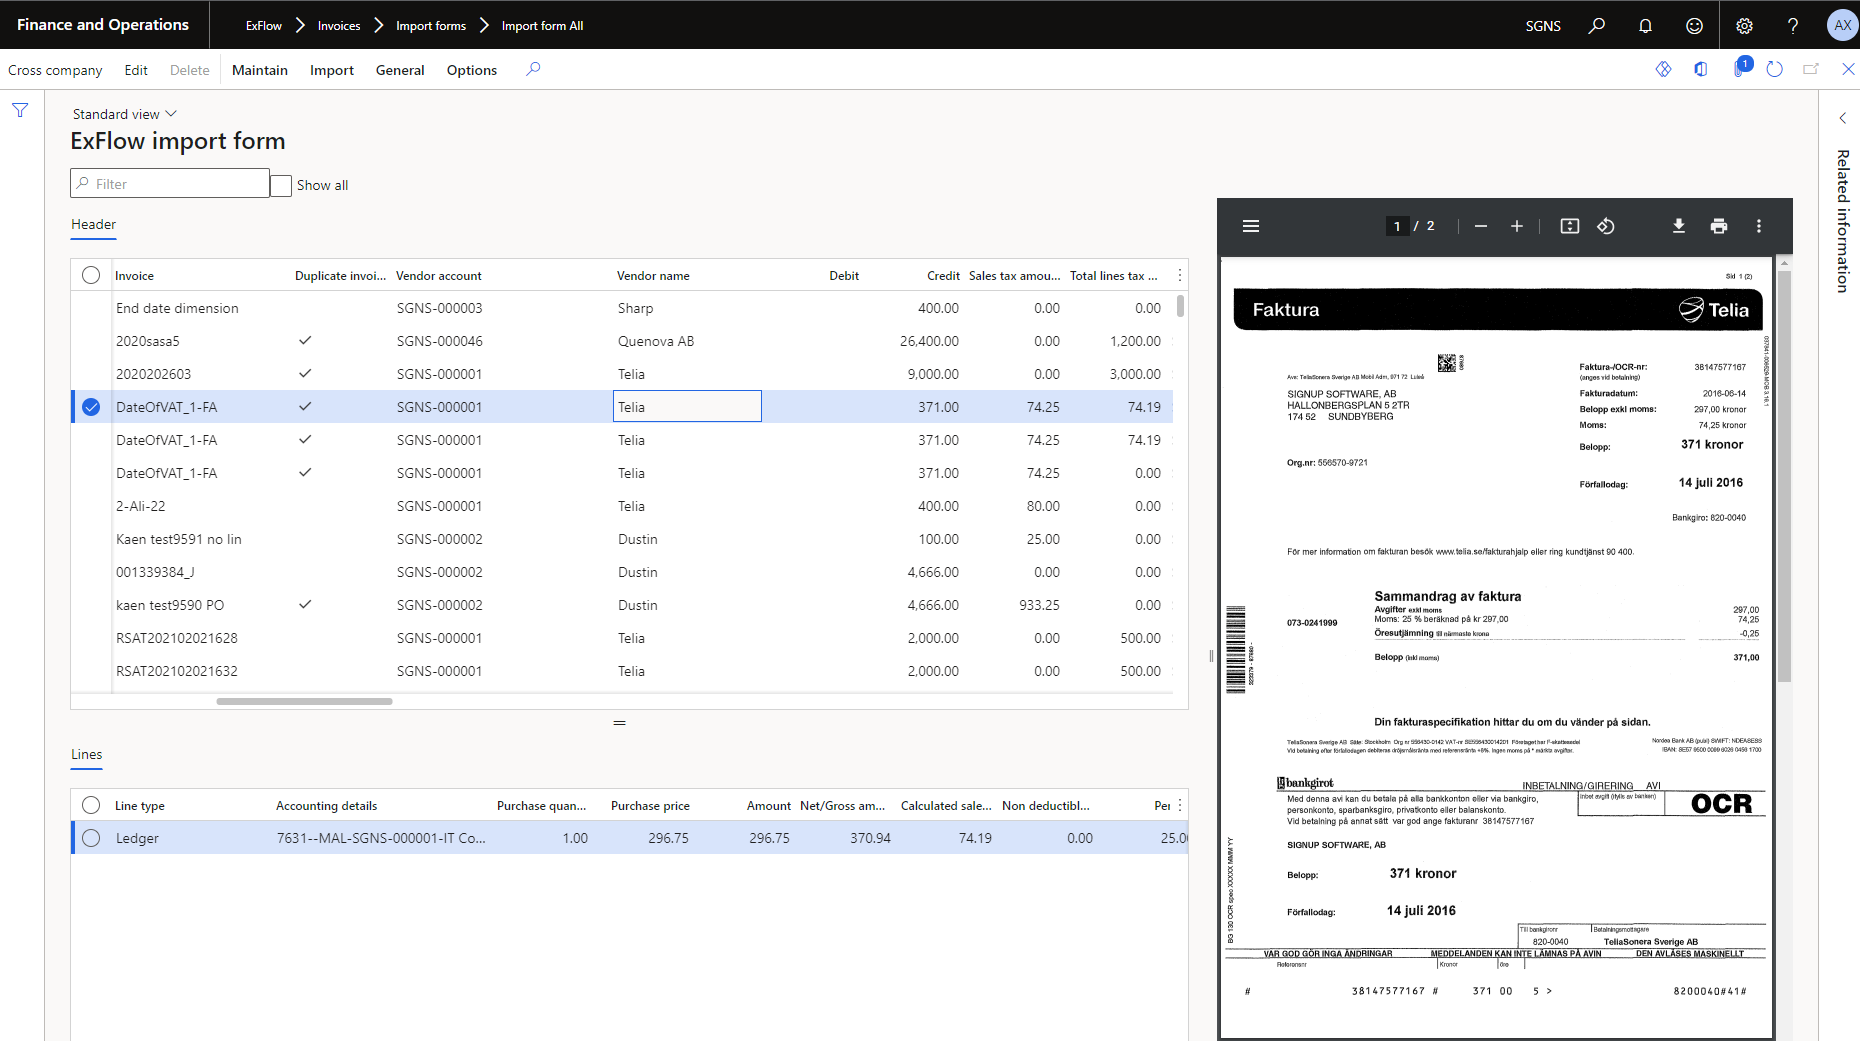
Use this form for the import of invoices to ExFlow, captured and interpreted by an external system or import of an image file (e.g., PDF) only. The button 'Import/Scanned Invoices' fetches the data file/s from the OCR interpretation (XML file) and populates the corresponding fields in D365 FO. The 'Import/Manual Invoices' button fetches the invoice images (PDF files) only, where the information has not been interpreted and will therefore have to be manually entered.
The invoice image can be viewed by clicking the 'General/Show invoice' button in the ribbon at the top. To start working with an invoice, the invoice has to be "Maintain/taken", if not already allocated to yourself as the user. To 'take' an invoice, mark one or more lines in the grid and push the button 'Take'. You will then see that the 'User Id' field displays the user that 'took' the invoices.
To be able to start working with an invoice first mark the invoice and then click the Edit button in the top left corner, and a new form will open.
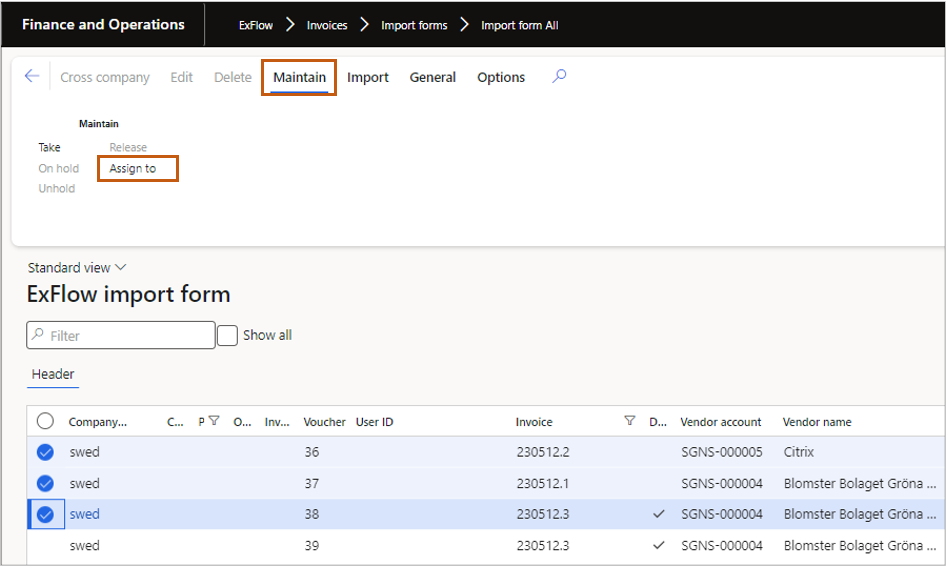
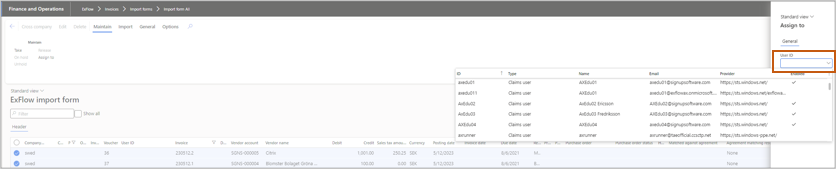
Assign invoices to users
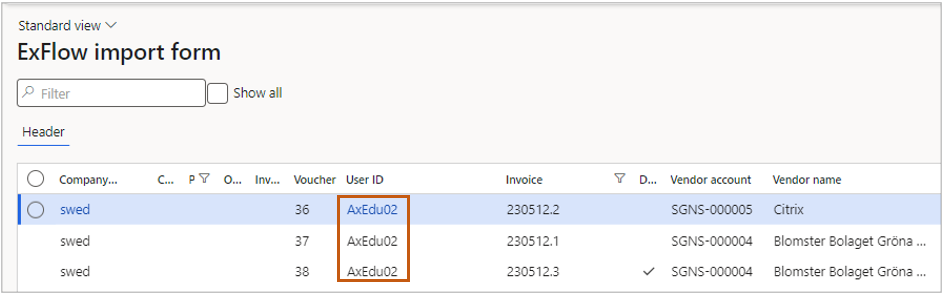
For assigning one or several invoices at once to specific user mark preferred lines, click 'Maintain' and 'Assign to'. In an opened window select preferred user and click 'OK'. 'User Id' field then displays the user that invoices have been assigned to. To be able to see this button user needs to have 'Exflow Purchase Payable admin' role.
| Buttons (Action pane) | |
|---|---|
| Cross company | Opens a new checkbox "Show all companies". When ticked, all companies' invoices will be displayed. The standard filtering can be used so that a user will by default only see (for example) 2 out of 10 companies in Cross company mode. |
| Edit | Open the selected invoice in edit-mode. |
| Delete | Delete the selected invoice. |
| Maintain/Take | Updates the field 'User id' to the current user and allows the current user to edit the invoice. The reverse button is 'Release'. |
| Maintain/Release | This button releases the User id allocated to an invoice and changes the field to blank. The reverse button is "Take". |
| Maintain/On hold | Stops the invoice from posting to General ledger. In the grid the column 'Stopped' is ticked. The reverse button is "Un-hold". |
| Maintain/Unhold | This button releases the invoice to be included in posting. The reverse button is "Un-hold". |
| Maintain/Assign to | Updates the field "User Id to the assigned user and allowes the assigned user to edit the invoice. The reverse button is "Release". |
| Import/Scanned Invoices | Press this button to start the import of interpreted invoices including corresponding image file (e.g., PDF) into ExFlow. The data (XML) comes from the Import history form and the PDF image from the file share. The standard D365 FO function 'AIF inbound ports' needs to be set up to import the XML from the file share. |
| Import/Manual Invoices | Press the 'Manual' button to initiate the import of image files from the Manual import folder on the file share. |
| General/Post | This function will post the invoices into the D365 FO invoice pool, ExFlow 'Document' form and send the invoice to the first approver in the approval route. This also executes the 'Validate' function. |
| General/Validate | This function validates that all information is correct on the invoice. It validates against the ExFlow set up and also standard D365 FO Invoice register journal rules. |
| General/Show invoice | This function opens a preview window with the attached image file (invoice). |
| General/View side by side | This function shows the invoice image side-by-side on the same screen as the Import form. |
| General/Move invoice | This function is used to move an invoice from the active company to another D365 FO company within the same database. |
| General/Invoice History | This function shows the history of the header information for the selected invoice. |
| General/Update invoice date | This function updates the invoice date for all invoices. |
| Run action workflow | This function will run any action import workflow set up. |
| Fields (Upper pane) | |
|---|---|
| Show all (check box) | Ticked: All imported invoices will be shown in the list, regardless of invoice status. Unticked: Only not yet posted invoices are shown. |
| Company ID | Shows the company id for the imported invoice. |
| Posted | This box is ticked when an invoice is "invoice journal registered" (posted). |
| On hold | This box is ticked when an invoice is put on hold (stopped) and is prevented from being posted. |
| Voucher | Voucher numbers created by standard D365 FO. |
| User ID | Displays the User who has ‘taken’ an invoice. |
| Invoice | Displays the invoice number. |
| Vendor | Displays the D365 FO standard vendor id. |
| Vendor name | Displays the D365 FO standard vendor name. |
| Debit | If a credit invoice/adjustment note, the credit amount is shown, otherwise it is blank. |
| Credit | Invoice amount is displayed. |
| Currency | Invoice currency code is displayed. |
| Due date | Invoice due date is displayed. |
| Reference | The captured Reference field on the invoice. |
| Project id | If the Project id is captured from the invoice, it is shown in this field. |
| Purchase order | If the Purchase order number is captured, it is shown in this field. |
| Scanned by user | Displays the User id for the person scanning the invoice. |
| Scanning date | Displays the date when the invoice was scanned. |
| Fields (Lower pane) | This pane shows the lines on the selected invoice. |
|---|---|
| Line type | Shows the line type. Ledger: Line with General ledger accounting only. Item: Line with stocked items linked to a purchase order Charges: Charges that are added to an invoice. Project: Line related to the Project module with a project id. Asset: Line related to the Fixed assets module with an asset id. Procurement: Line that defines the Procurement category. |
| Accounting details | Displays the accounting/coding of the invoice. |
| Purchase quantity | The line’s quantity. For an expense invoices the default value is 1. |
| Amount | The invoice line’s amount. |
| Approvers | Shows the approval route and each approver’s actual status for the line. |
| Below fields for PO invoices only: | |
|---|---|
| Purchase order | Purchase order number. NB: To apply a line of type ‘Item’, you need to also select the Lot id from the drop-down in the Edit mode/form. |
| Charges code | If the line type is ‘Charges’, the selected Charge code (e.g., Freight, Penny difference etc.) is shown. |
| Lot ID | The received Purchase Order lines number that the invoice line is matched against. |
| Item number | The D365 FO item number. |
| Product name | The D365 FO product name. |
| Product description | The D365 FO product description. |
| Procurement category | The Procurement category. |
| Vendor item number | The External vendor’s item number. |
| Vendor item description | The External vendor’s item name. |
| Purchase quantity | The line’s quantity. For expense invoice the default value is 1. |
| Purchase price | The invoice line’s unit price. |
| Amount | The line sum. |
| Calculated net amount/amount origin | Calculated net amount per line. |
| Calculated sales tax amount | Calculated sales tax amount. |
| Sales tax code | Display’s the tax code based on the tax combination per line. |
| Percent | Calculated tax displayed in percentage per line. |
| Non-deductible % | Display’s nondeductible VAT in percentage. |
| Discount | Discount in percentage. |
| Line Discount | Discount amount. |
| Unit | Unit of measure. |
| Tax exempt number | Tax exempt number from the purchase order |