Import Methods
ExFlow | Setup | Import methods
This form is used for setting up methods of importing invoice data and images into ExFlow, allowing more than one transport method per company. They are run by the separate batch job “Import invoice XML files (Multiple methods)”. This means that both the standard import setup in ExFlow parameters can be used in combination with multiple import methods.
File
Can only be used where you have full access to the D365FO machine. Never used in a production environment. Data can be imported from the file area on the computer, XML and PDF import.
FTP
Deprecated feature, The method is no longer supported by Microsoft.
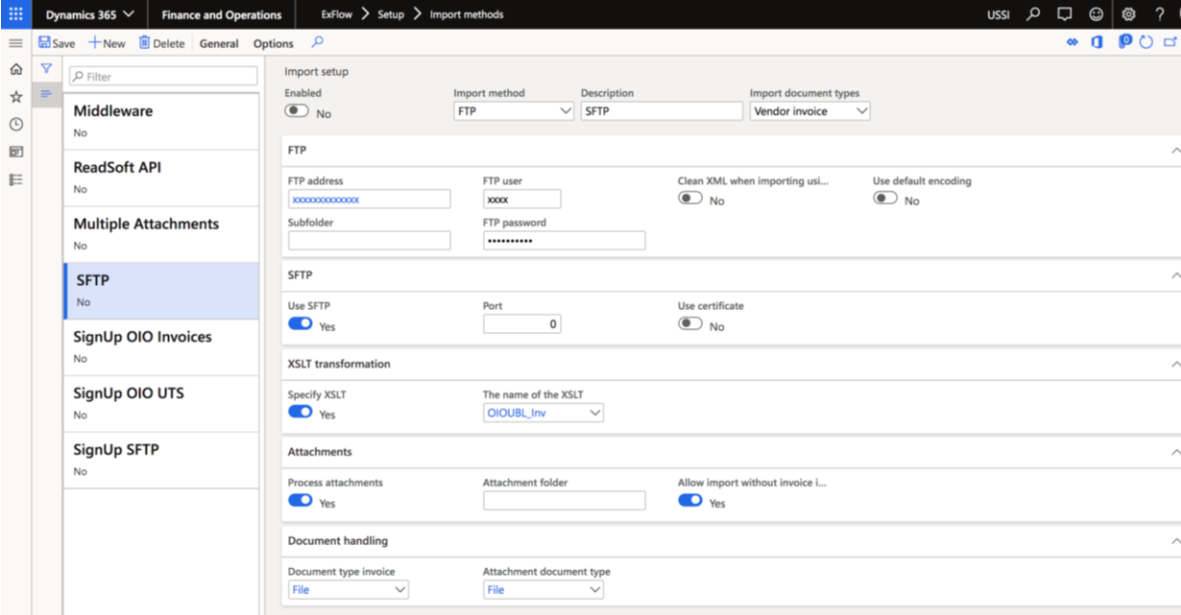
SFTP
Used to transfer XML and PDF data from a file area with a SFTP service connected. Customer or external partner must be responsible for the SFTP service. E.g., used for external scanning services, EDI service providers or none pre-packaged OCR tool integrations.
ExFlow Data Capture API
Only applicable for ExFlow Data Capture integration. Will connect by REST API calls to transfer data.
Azure Blob storage
Used to transfer XML and PDF data from Azure Blob storage. Customer or external partner must be responsible for setup of the Azure blob storage and the transfer of files to it. *You cannot use sub folders. E.g., used for external scanning services, EDI service providers or none pre-packaged OCR tool integrations.
Middleware
Deprecated feature, The method is no longer supported.
Setup Import method for ExFlow Data Capture
ExFlow | Setup | Import methods
Preparations before setup
- ExFlow Data Capture installation has been submitted to the data capture team, configured, and returned with connection details provided.
- Download standard XSLT or prepare your own Recommended to use Master Data upload (select correct XSLT).
Step by step configuration:
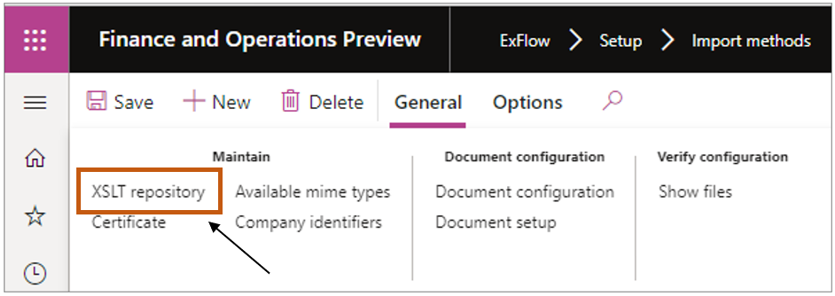
Add XSLT repository
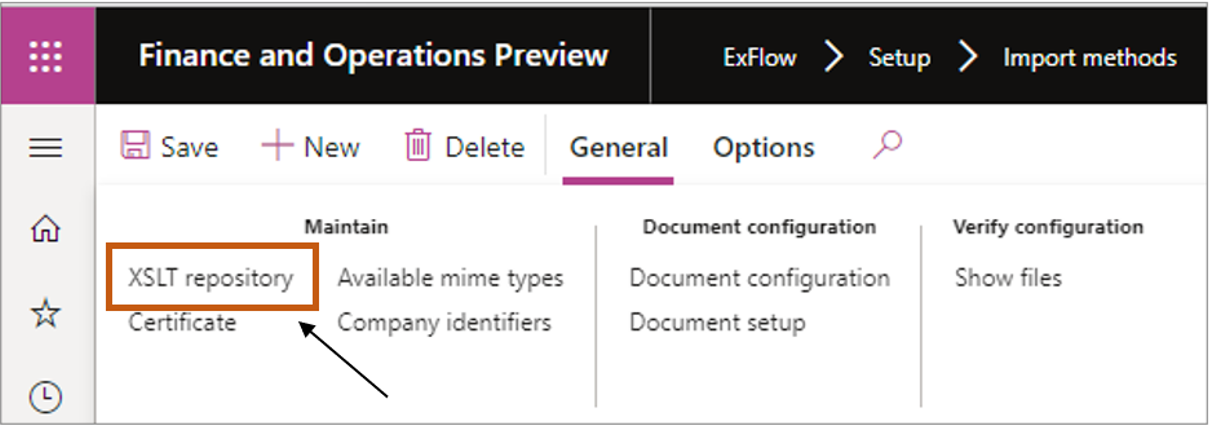
- Go to General – XSLT repository
- Select
New - Add the name of the XSLT (e.g., ‘EDC XSLT’)
- Description
- Stylesheet for image generation
No - Select ‘Edit’ and browse to the file you have stored
- Select ‘Upload’
- Save
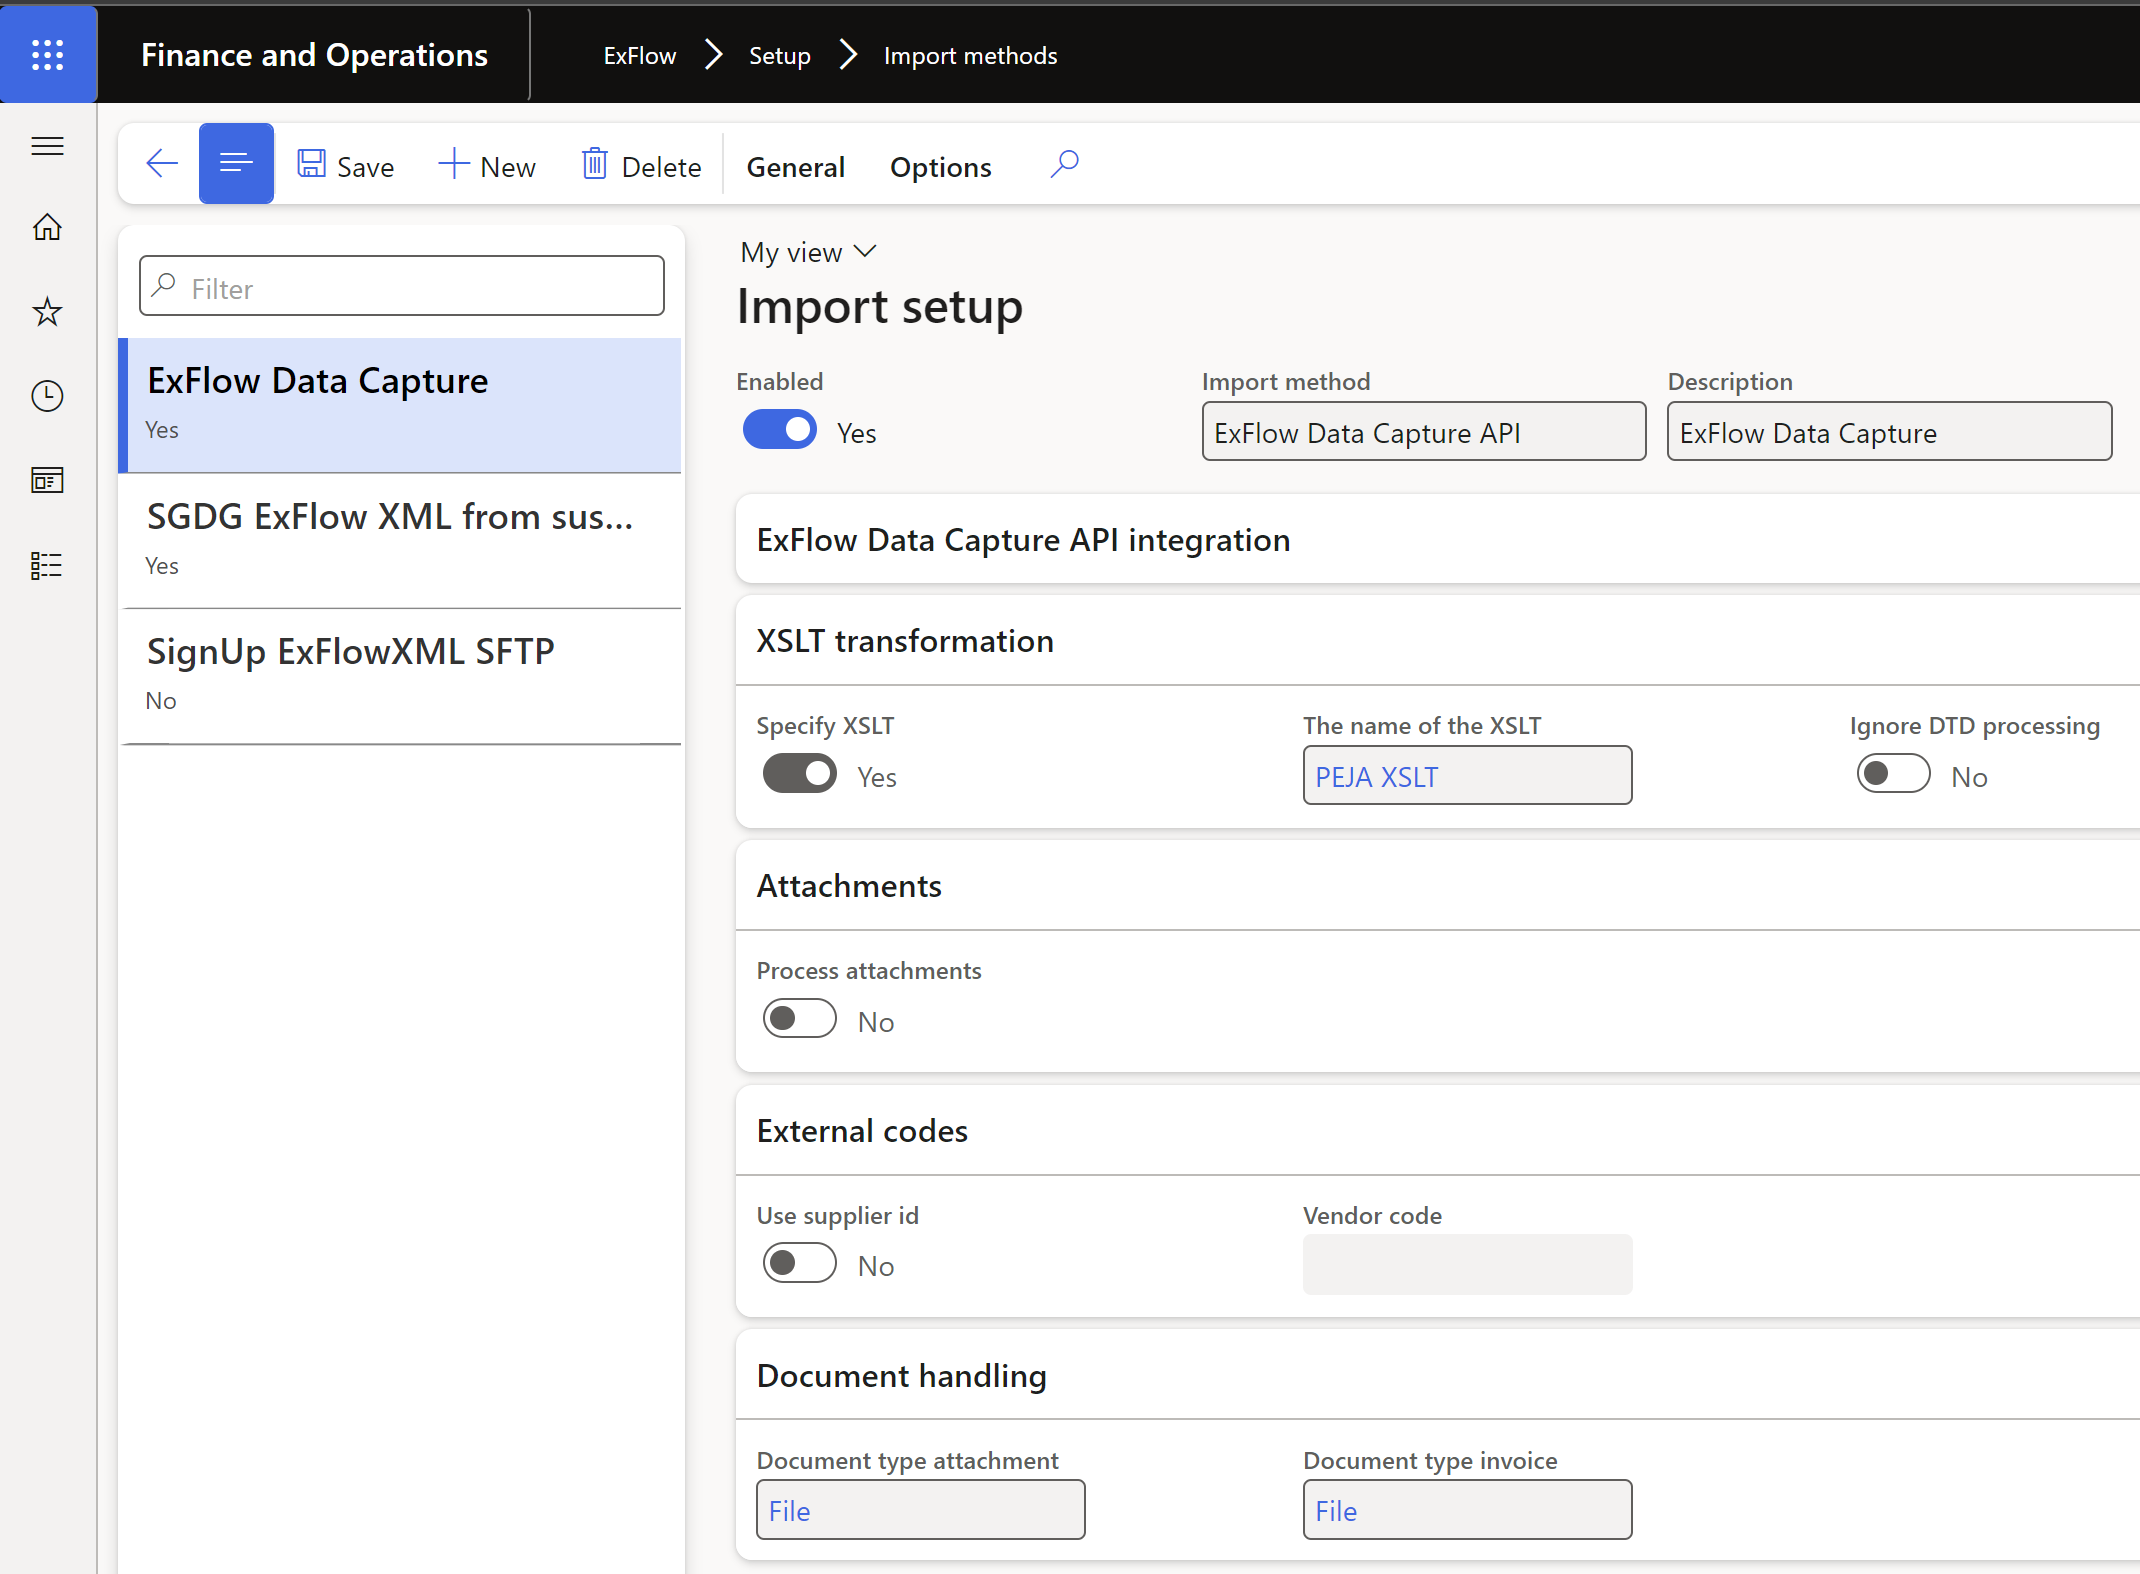
Setup of method
- Select ‘New’
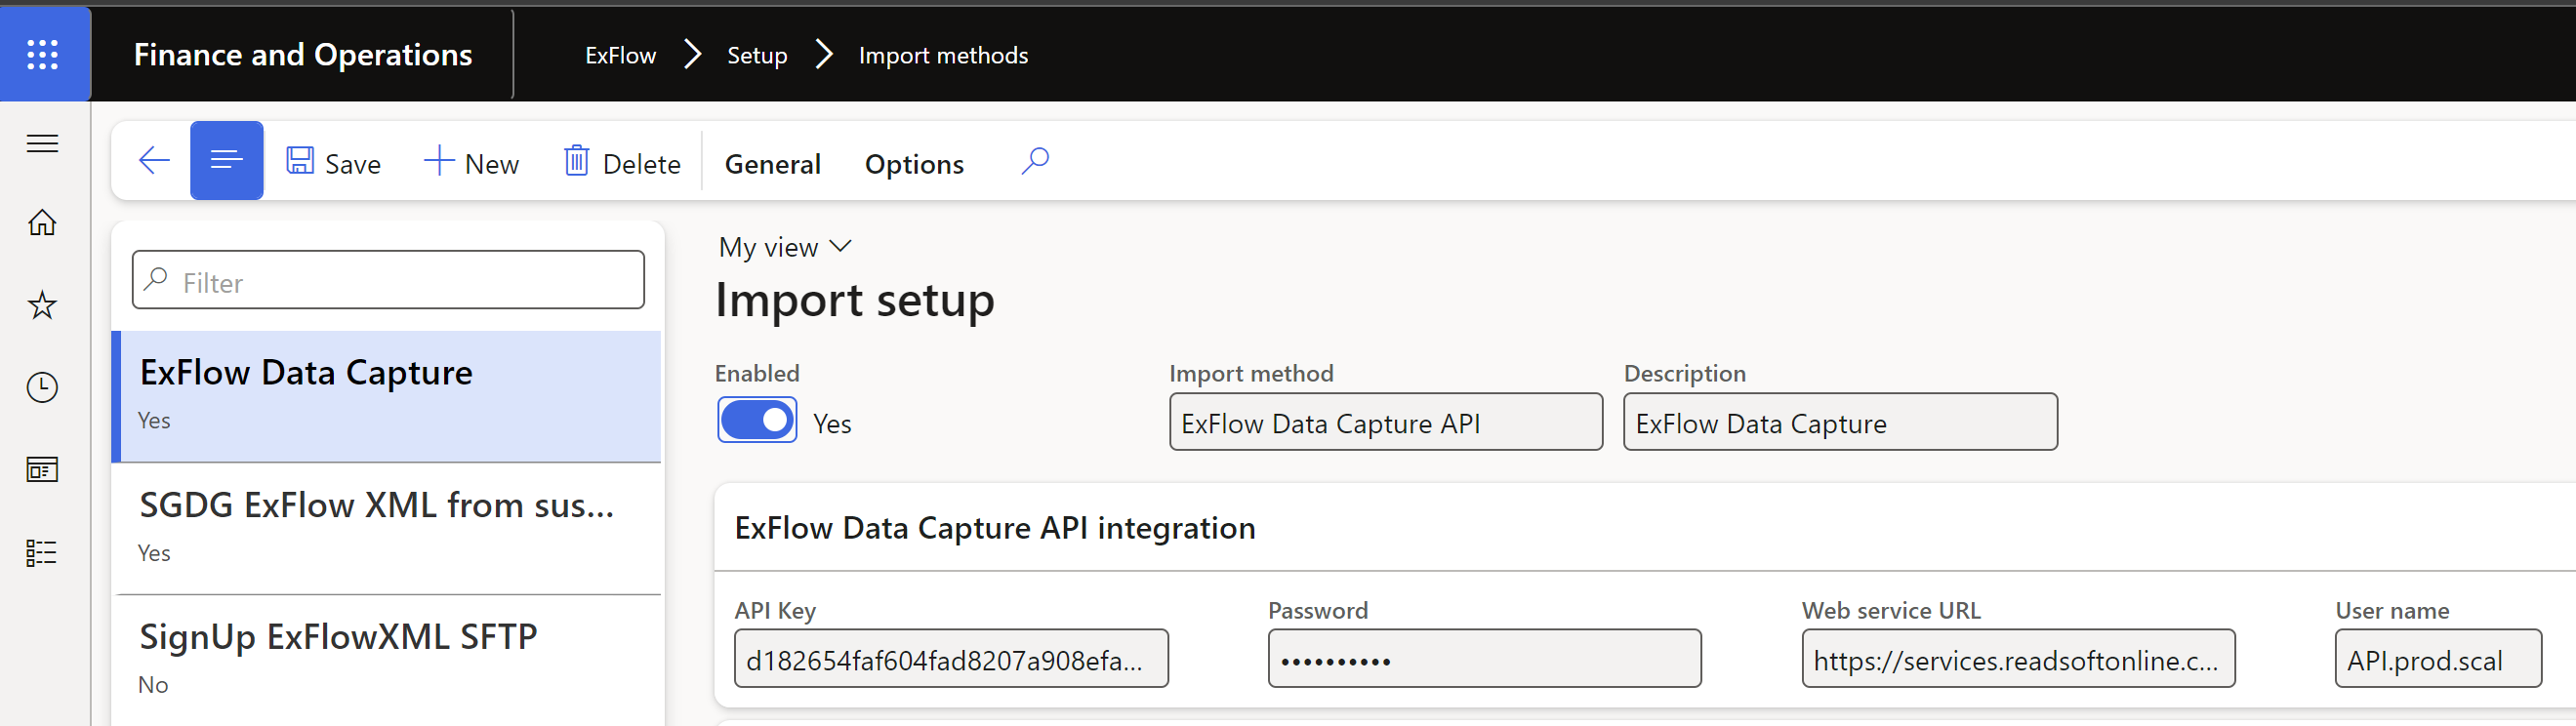
- Import method: ExFlow Data Capture API
- Description: e.g., ‘EDC TEST’ / ‘RSO PROD’
- Fill in the ExFlow Data Capture API integration fields from the EDC Installation form.
- Specify the XSLT by setting toggle to
Yes - Choose name of the XSLT that you uploaded previously (e.g., ‘EDC XSLT’)
- Ignore DTD processing
No - Process attachments
No(possible to import original email from Exflow data capture as a file type EML (email)) - Process attachments
Yes(possible to split the EML file (email) to read attachments and import them separately). In this case setup the method:
Depending on the license agreement with Kofax different methods can be used.
GetAttachments -> Requires an extra license for the Storage Service provided by Kofax.
The method will import the original email as (.EML) when imported into EDC and all its attachments attached to the Document handler.
GetBatchOriginalEmail -> Will give you the original email as .EML file attached to Document handler.
GetBatchOriginalEmailAttachments -> Will give you all the attachments that where included in the email sent to EDC. Same as GetBatchOriginalEmail but you get the attachments unpacked.
NOTE: File type EML needs to be created in document management parameters.

- Use supplier id
No - Attachment document type and Document type invoices; select your preferred document type for storing the invoice image and attachments
- Enabled
Yes
Setup Import method for ExFlow EDI/XML
ExFlow | Setup | Import methods
Preparation before setup
- Decide area/service to import files from (SFTP or Azure Blob Storage)
- Make sure you have connection details for the method of choice
- For PEPPOL or OIOUBL format, you need the package including stylesheets and transformation XSLTs, to setup the import method.
Using Azure Blob storage
- Select ‘New’
- Import method: Select Azure blob storage
- Description: e.g., Peppol invoices, OIOUBL or EDI in ExFlow format
- Import document types: Vendor invoice.
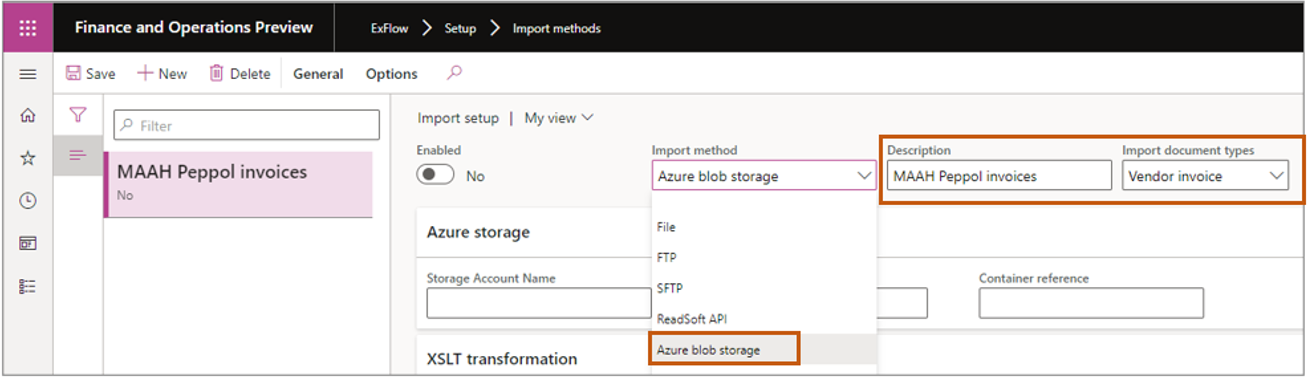
- Fill in the
- Storage account name
- Storage account Key
- Container reference

Using SFTP
- Select
New - Import method: Select SFTP
- Description: e.g., Peppol or OIOUBL invoices
- Import document types: Vendor invoice
- Clean XML when Importing using FTP:
No - Use default encoding: Yes (Use default encoding if UTF-8 can't be found)
- Save
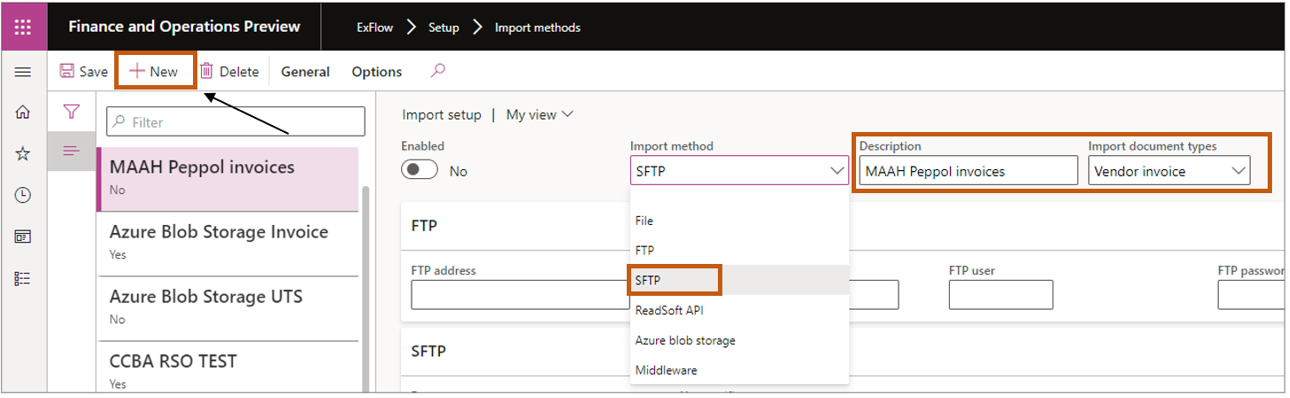
- Fill in the FTP address, subfolder, FTP user, FTP password and Port (if applicable) Important: Depending on the FTP service software, information can be required to be entered differently (e.g., sftp://ftp.signupsoftware.com or ftp.signupsoftware.com, /UAT, /UAT/ etc.)

Setup Peppol format - EHF 3.0
Step by step configuration:
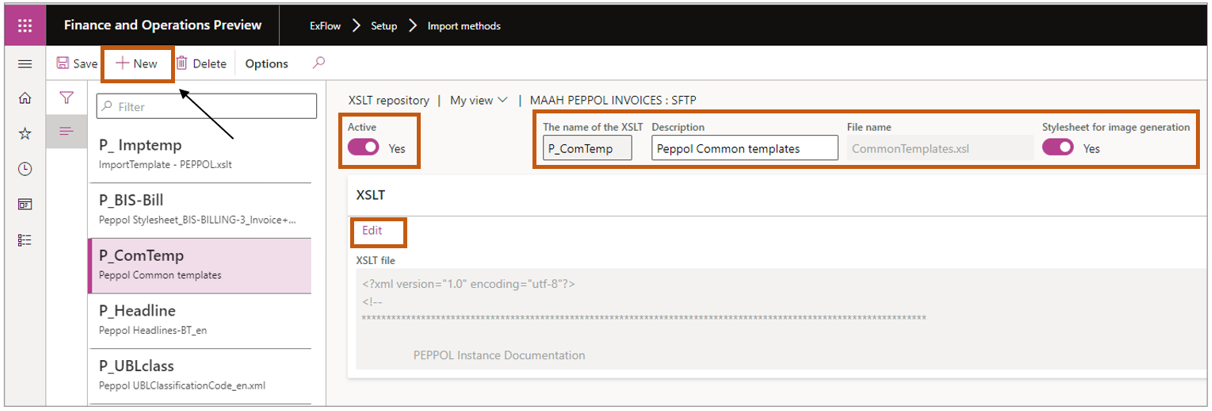
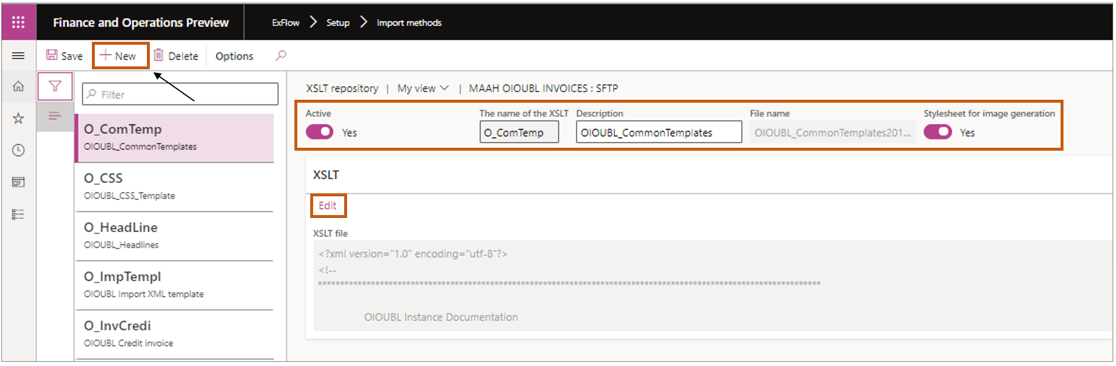
Add XSLT repository
- Go to General – XSLT repository
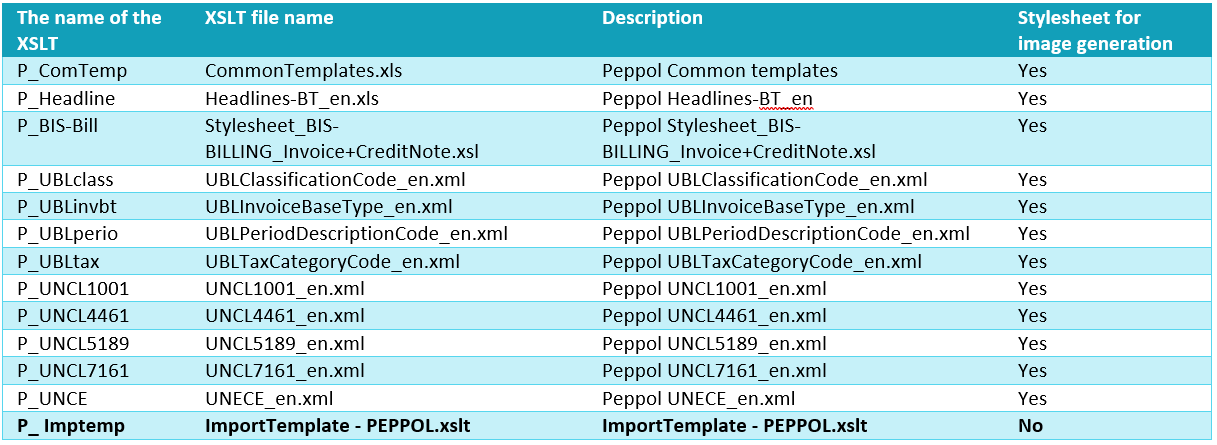
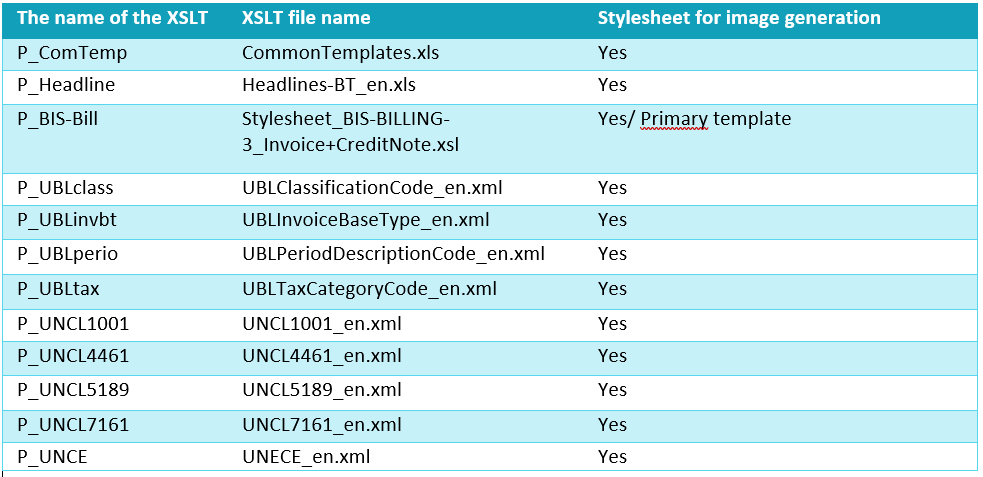
- You need to add all 13 stylesheets

- Select
New - Add the name of the XSLT (see below table)
- Description (see below table)
- Stylesheet for image generation Yes/No
- Select
Editand browse to the file you have stored - Select
Upload - Save
- Return to main view and setup XSLT transformation
- Specify XSLT to
Yes - The name of the XSLT – select P_Imptemp
- Specify XSLT to
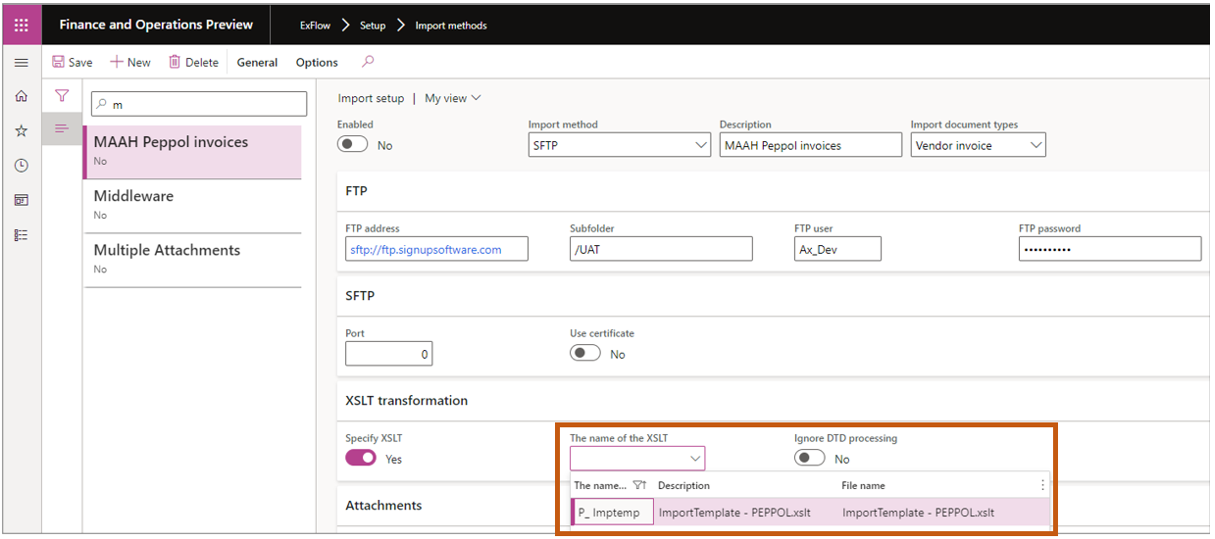
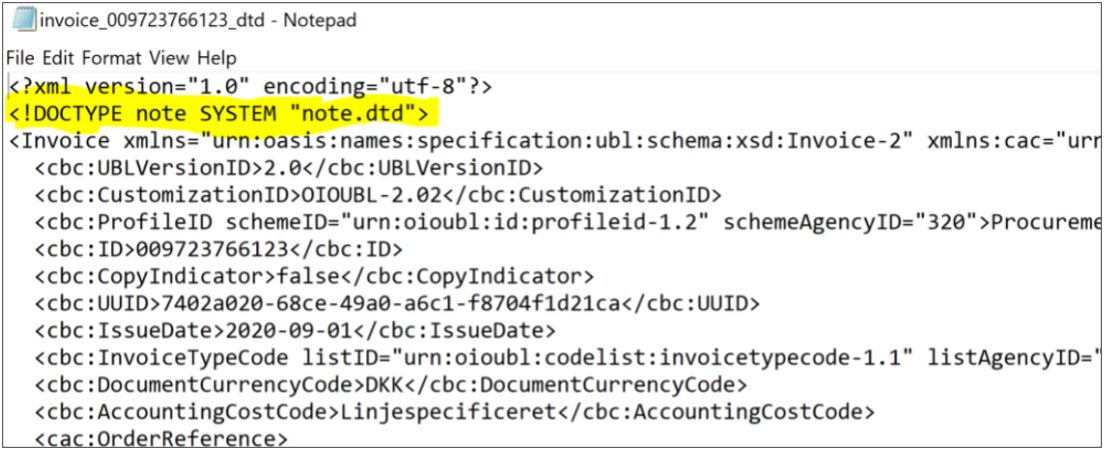
- Ignore DTD processing: Yes, if tag in XML source file, see image below, includes Note.dtd, otherwise No.
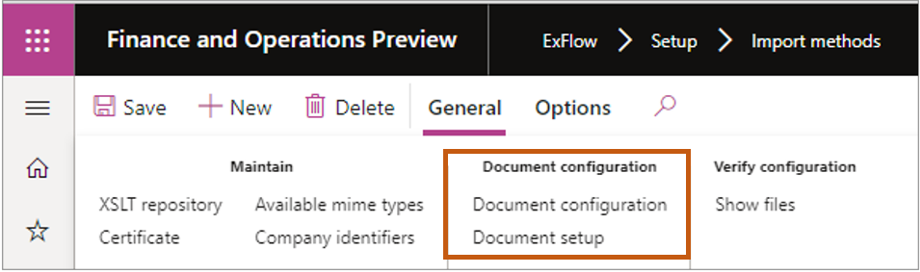
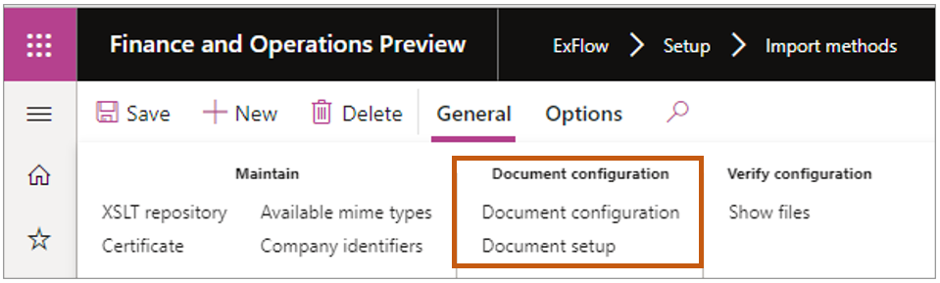
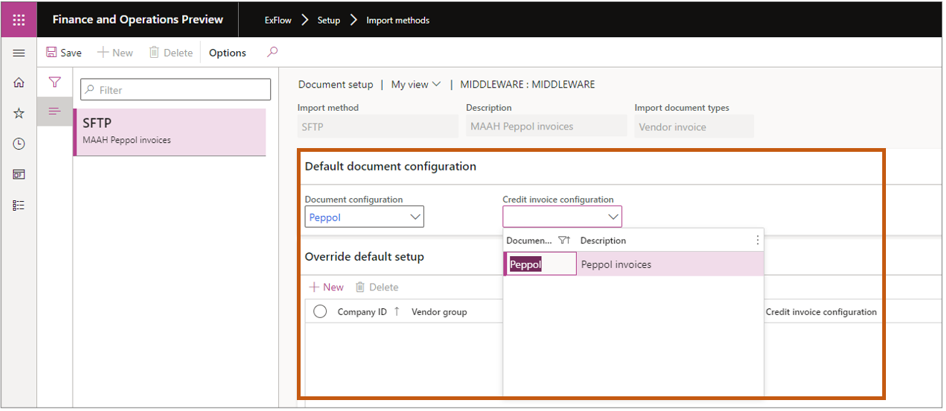
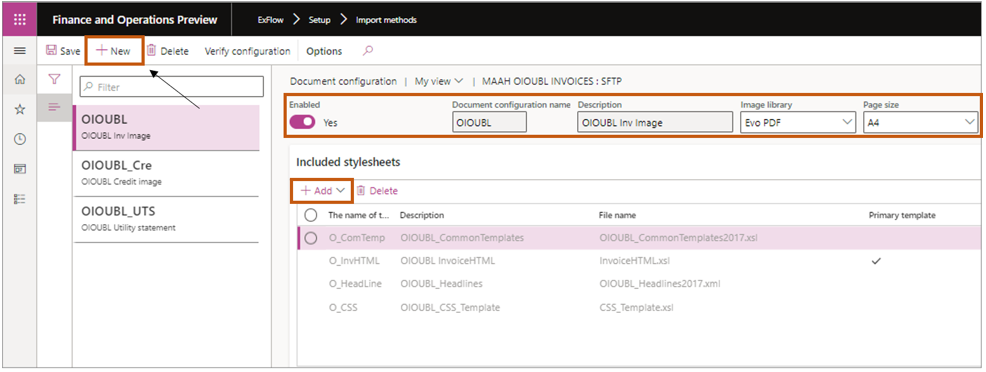
Document configuration
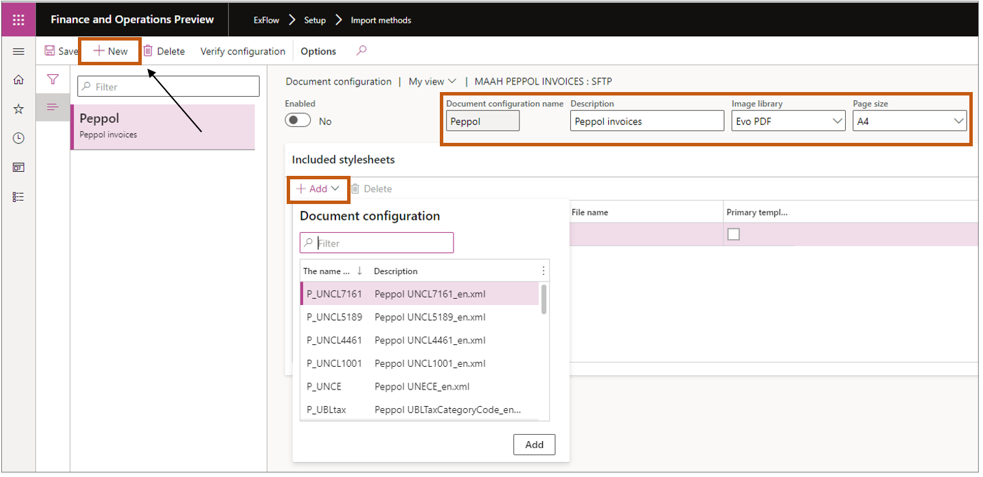
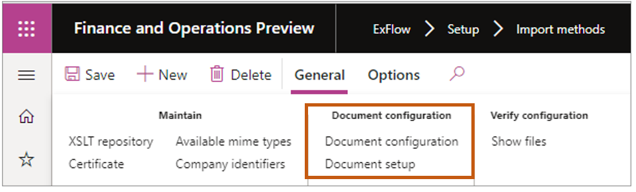
Import methods - General – Document configuration
- Select
New - Document configuration name: Peppol
- Description: Peppol invoices
- Image library: Evo Pdf (recommended) or PDF sharp
- Page size: Select the page size for invoice images
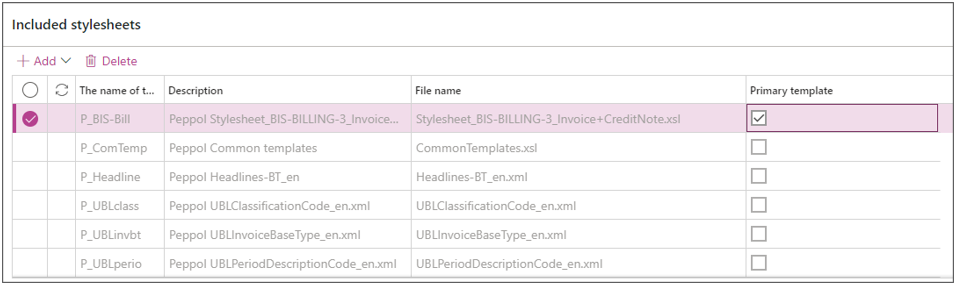
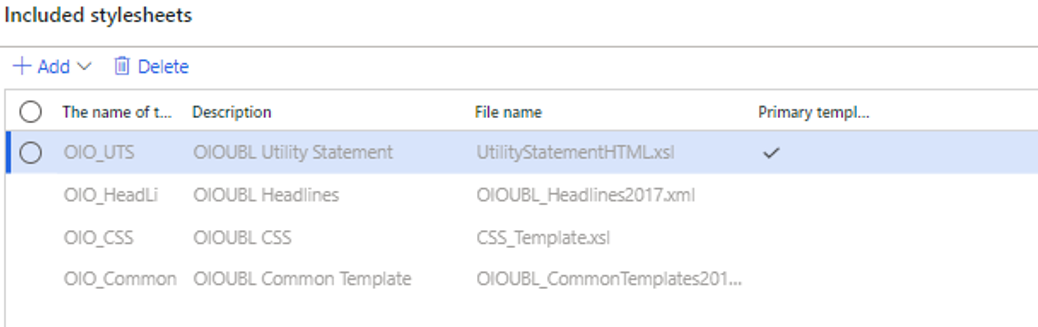
- Included Stylesheets: Select
Addand select the 12 xml´s withYesin stylesheet for image generation that you earlier added to the Xslt repository (See below list) - Set the stylesheet with name “Stylesheet_BIS-BILLING-3_Invoice+CreditNote.xsl” as Primary.
- Save and activate the configuration.
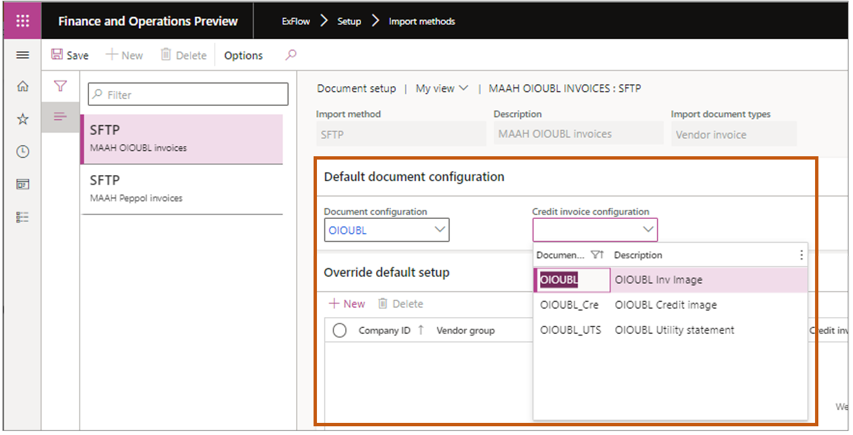
Document setup
Import methods | General | Document setup
- Search the import method name that you have created.
- Select the created configuration from previous step.
- If needed, you can add separate stylesheets per Legal entity or vendor.
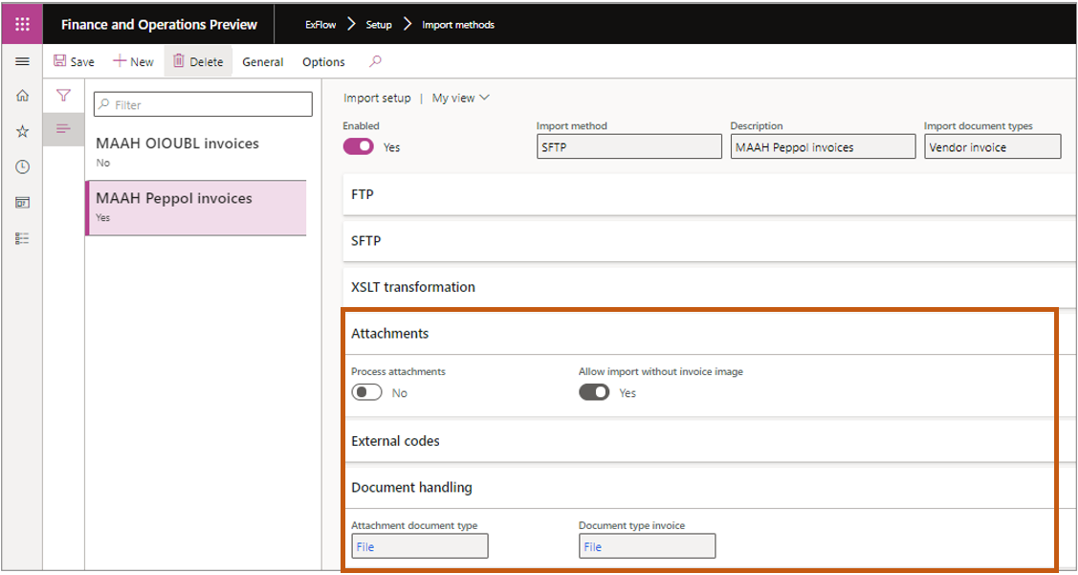
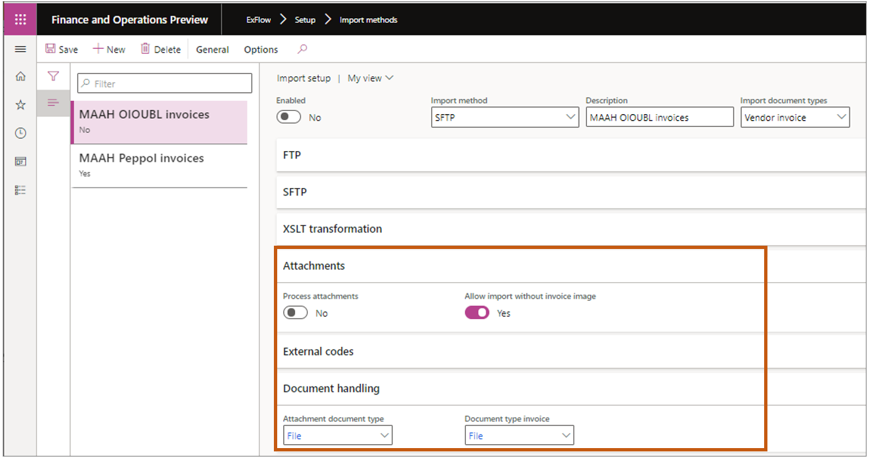
Attachments and Document handling
ExFlow | Import methods |
- Attachments
- If required set Process attachments to
Yes - Allow import without invoice image set to
Yes
- If required set Process attachments to
- Save
- Document handling
- Document type attachment, select where the attached/embedded invoice image shall be stored
- Document type invoice, select where the generated invoice shall be stored
- Save
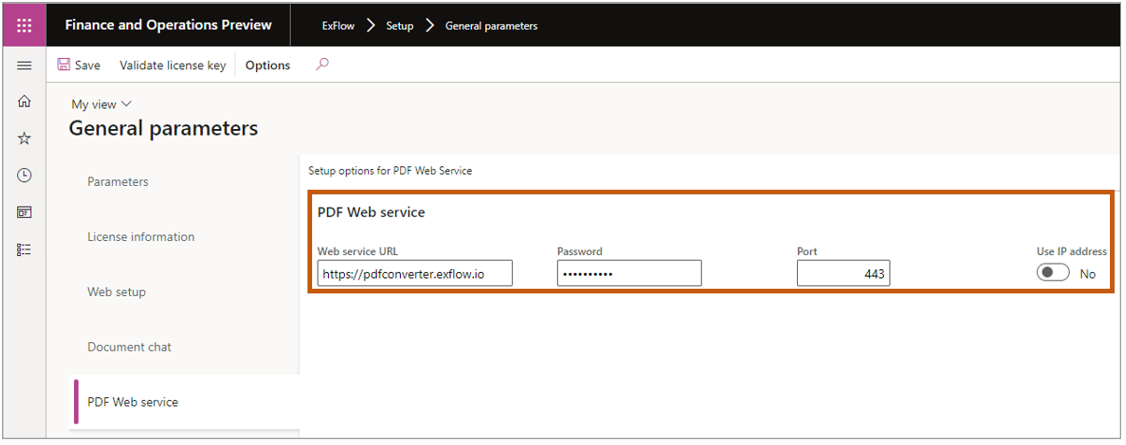
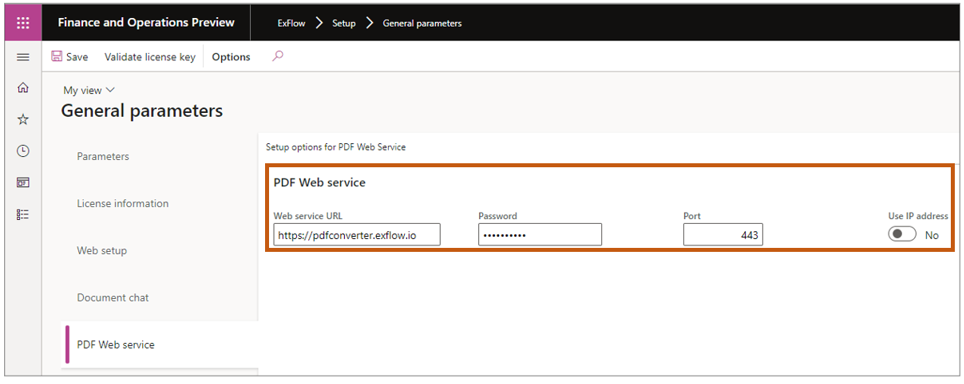
PDF Web service
ExFlow | General parameters | tab - PDF web service link.
You need to setup the URL link to the PDF web service provided by Signup if you use EVO PDF. Signup sends the invoice information from Xml to the web service which returns a PDF image.
URL - https://pdfconverter.exflow.io
Password: request from Truvio
Port: 443
Use IP address: No
This service will in the future require a customer specific configuration. Applicable for customers that wants to generate invoice images in ExFlow according to the PEPPOL base definition.
Setup OIOUBL format
OIOUBL – Mostly used in Denmark, but also in Swedish companies that have legal entities in Denmark. See section 3.6 for Danish utilities "OIO UTS".
Step by step configuration:
Add XSLT repository
- Go to General – XSLT repository
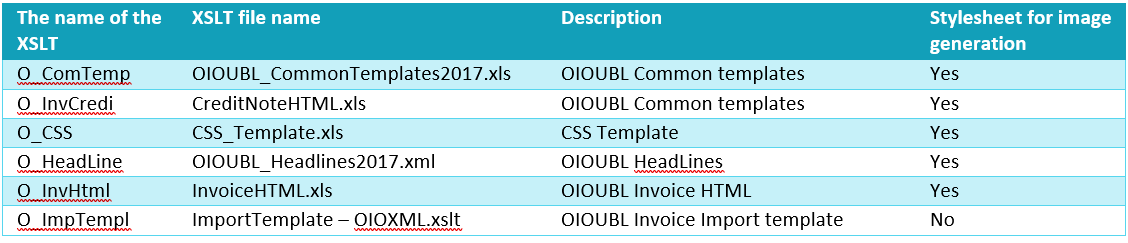
- You need to add all 6 stylesheets
- Select
New. - Add The name of the XSLT (see below table)
- Description (see below table)
- Stylesheet for image generation Yes/No
- Select Edit and Browse to the file you have stored
- Select
Upload - Activate and save
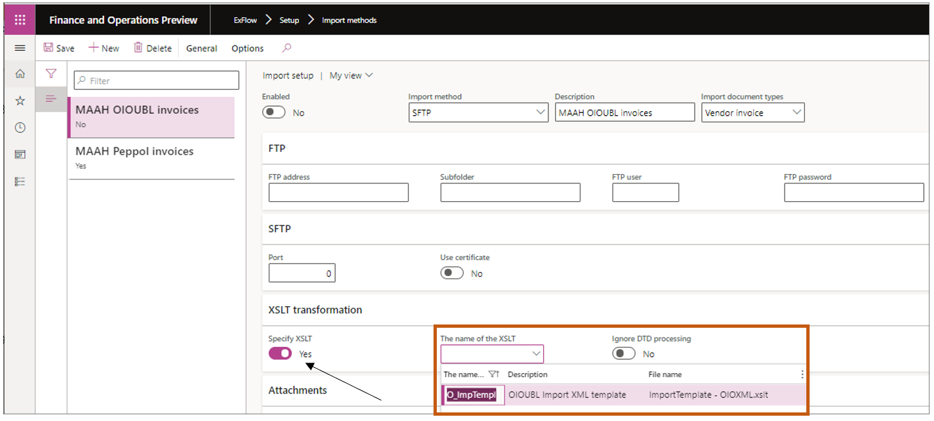
- Return to main view and setup XSLT transformation
- Specify XSLT to
Yes - The name of the XSLT – select O_ImpTempl
- Specify XSLT to
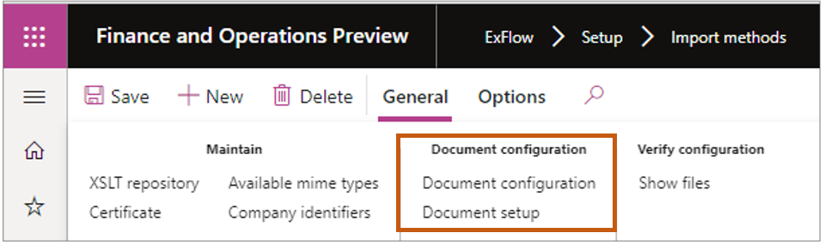
Document configuration
Import methods - General – Document configuration
- Select
New - Document configuration name: OIOUBL
- Description: OIOUBL invoices
- Image library: Evo Pdf (recommended) or PDF sharp
- Page size: Select the page size for invoice images.
- Included Stylesheets: Select ´Add´ and select the 5 xml´s with
Yesin stylesheet for image generation that you earlier added to the Xslt repository. (See below list) - Set the stylesheet with name “CreditNoteHTML.xsl” as
Primary. - Save and activate the configuration.

Document setup
Import methods | General | Document setup
- Search the import method name that you have created.
- Select the created configuration from previous step.
- If needed, you can add separate stylesheets per Legal entity or vendor.
Attachment and document handling
ExFlow | Import methods |
- Attachments
- If required set Process attachments to
Yes - Allow import without invoice image set to
Yes
- If required set Process attachments to
- Save
- Document handling
- Document type attachment, select where the attached/embedded invoice image shall be stored.
- Document type invoice, select where the generated invoice shall be stored.
- Save
PDF Web service
ExFlow | General parameters | tab - PDF web service link.
You need to setup the URL link to the PDF web service provided by Signup if you use EVO PDF. Signup sends the invoice information from Xml to the web service which returns a PDF image.
URL - https://pdfconverter.exflow.io
Password: request from Truvio
Port: 443
Use IP address: NO
This service will in the future require a customer specific configuration. Applicable for customers that wants to generate invoice images in ExFlow according to the PEPPOL base definition.
Setup OIO UTS- Utility Statement
ExFlow | Setup | import method
Step by step configuration:
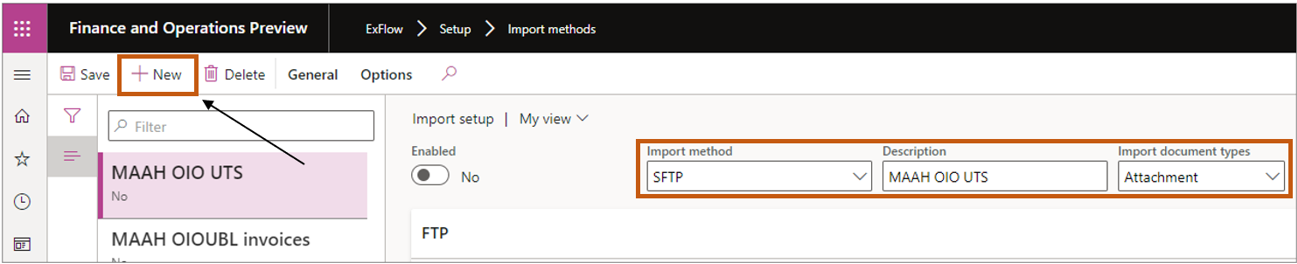
Import setup
- Select New.
- Import method select SFTP or Azure blob storage.
- Add description: e.g., OIO UTS.
- Import document types: Select ´Attachment´.
- Save.
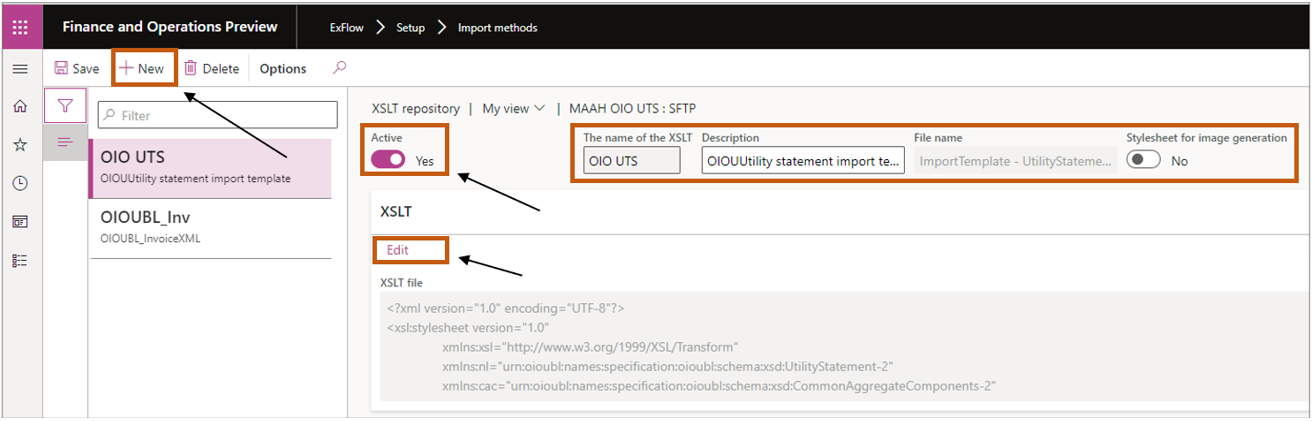
Add XSLT repository
- Go to General – XSLT repository.
- You need to add 2 stylesheets.

- Select
New. - Add The name of the XSLT (see below table).
- Description (see below table).
- Stylesheet for image generation Yes/No.
- Select Edit and Browse to the file you have stored.
- Select
Upload. - Activate and save.

- Select
Edit. - ´Browse´ and select the file you have stored.
- Upload – Select
OK. - Save.

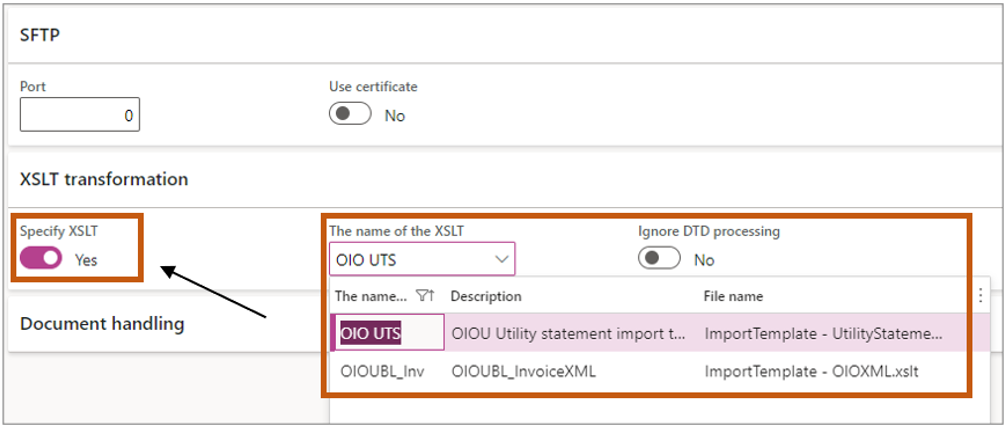
XSLT transformation and document handling
ExFlow | Import methods |
- XSLT transformation:
- Set specify XSLT to
Yes. - The name of the XSLT – select ´OIO UTS´.
- Set specify XSLT to
- Save.
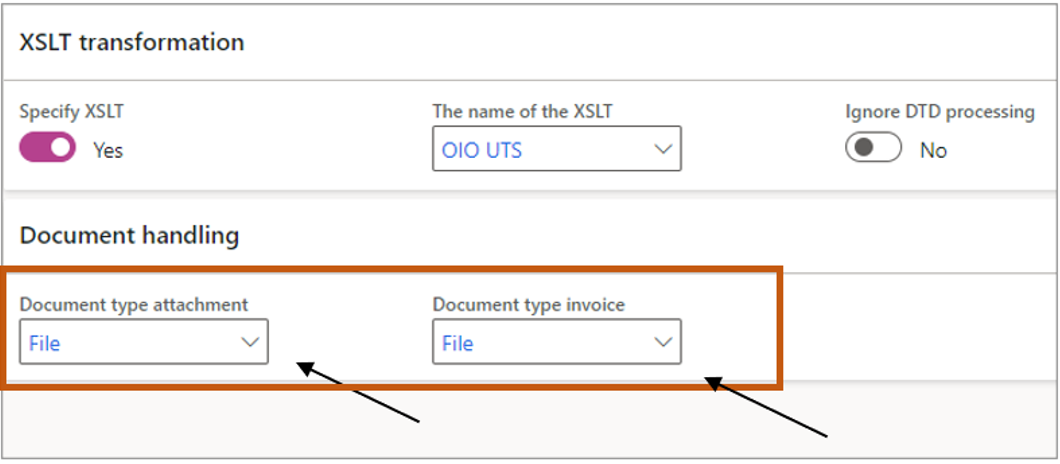
- Document handling:
- Document type attachment, select where the invoices should be stored.
- Document type invoice, select where the invoices should be stored.
- Save.
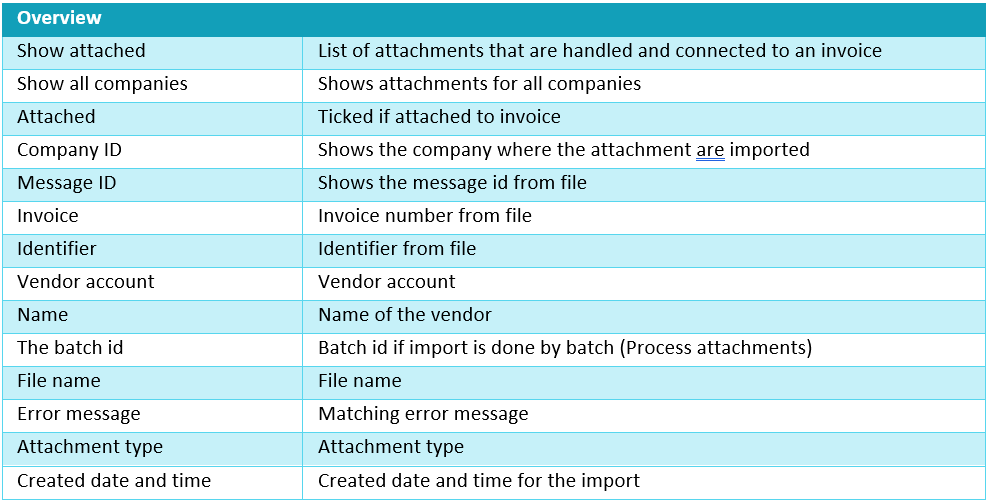
Attachment form
Exflow | Inquiries and reports | Attachment form
When you have attachments imported related to a specific invoice i.e. for Danish utility statements, they are usually imported after the invoice has arrived. From this form you can easily connect the attachment to the invoice.
Note: This form does not show attachments added within ExFlow or ExFlow web.
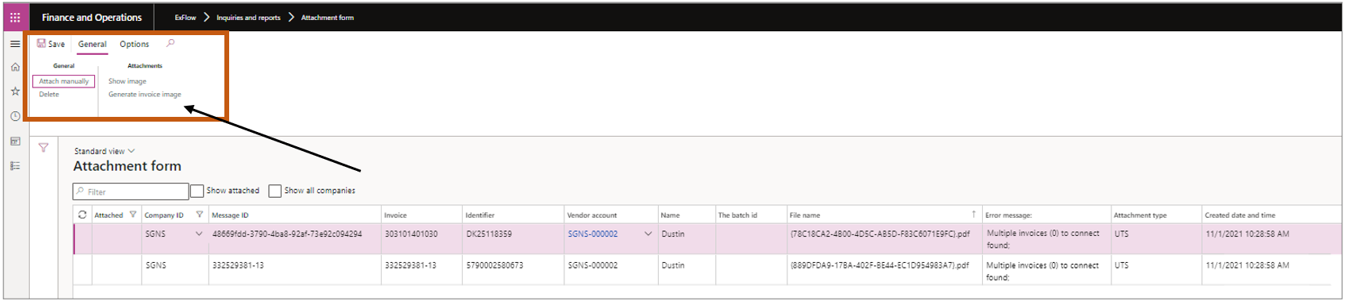

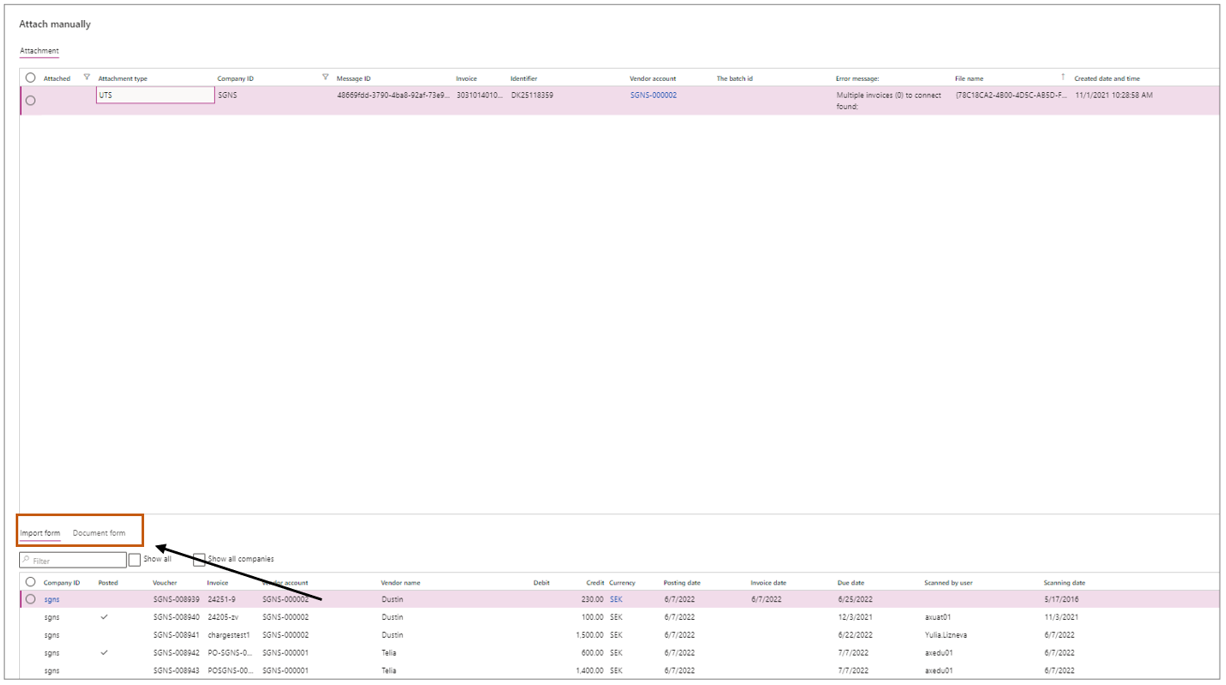
Attach manually to invoice
- Select Attach manually
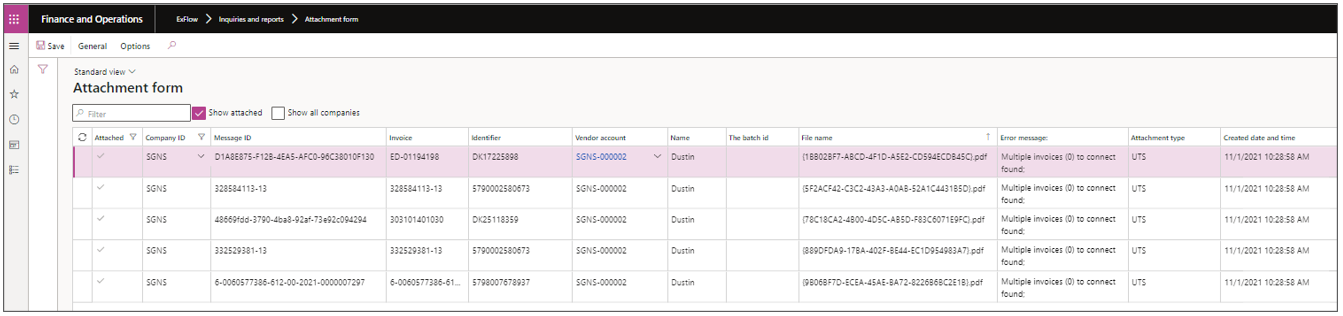
- Find the invoice in import form or document form lists
- Select
ok
The attachment is now added to invoice and visible from ExFlow forms.
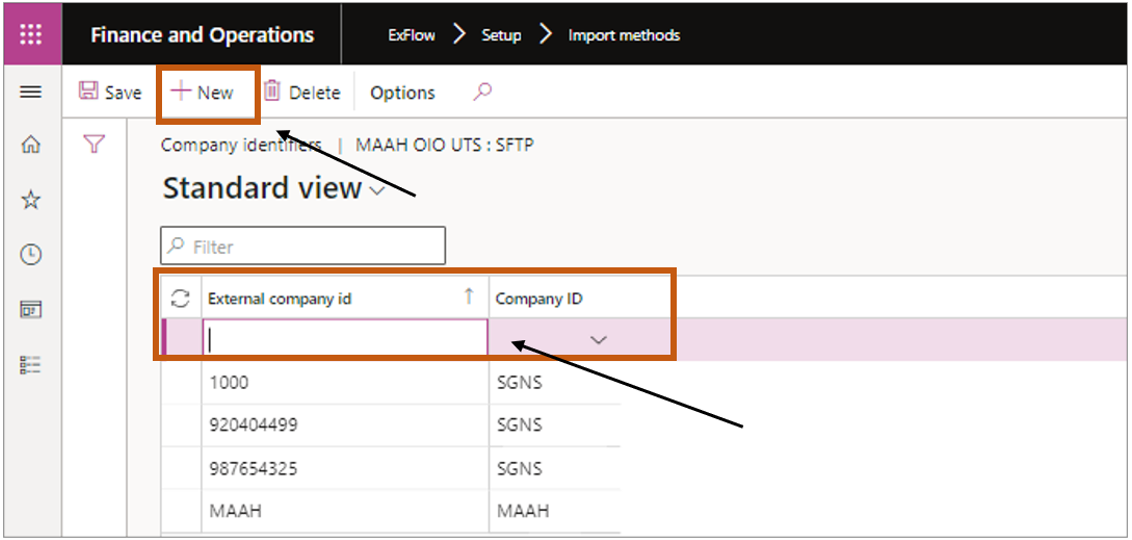
Company identifiers
To make sure that the legal entities are found when ExFlow imports the invoice files, and if you are missing the company id in the Xml file you need to setup EAN, Tax no. etc. and point them to the correct D365FO legal entity (company area id).
- Go to General | Company identifiers.
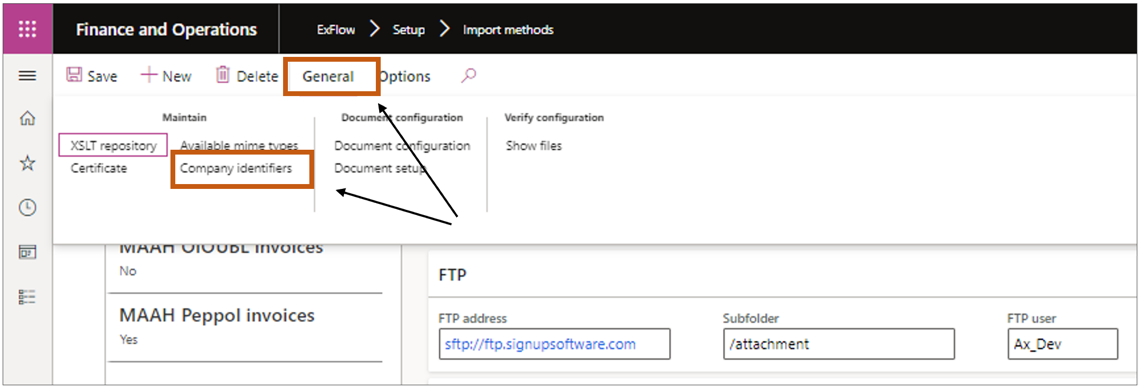
- Select
New. - External company id; Type the company id that is received the import files.
- Company ID; Type the legal entity in D365FO.
- Select
Save.
Generate vendor XML and upload vendor information
To generate the XML file containing the current vendor information, users can navigate to: ExFlow | Setup | Import method | General | Verify configuration | Generate vendor xml.
After the execution, a vendor XML file will be generated and downloaded, containing the up-to-date vendor details. Like: “Supplier number”, “Name”, “Organization number", “Currency”, etc. This downloaded XML file can be used as a draft for future uploads when there are additional vendors to be included. Users can utilize this file as a template, making it easier and more efficient to update vendor information in occurring uploads.

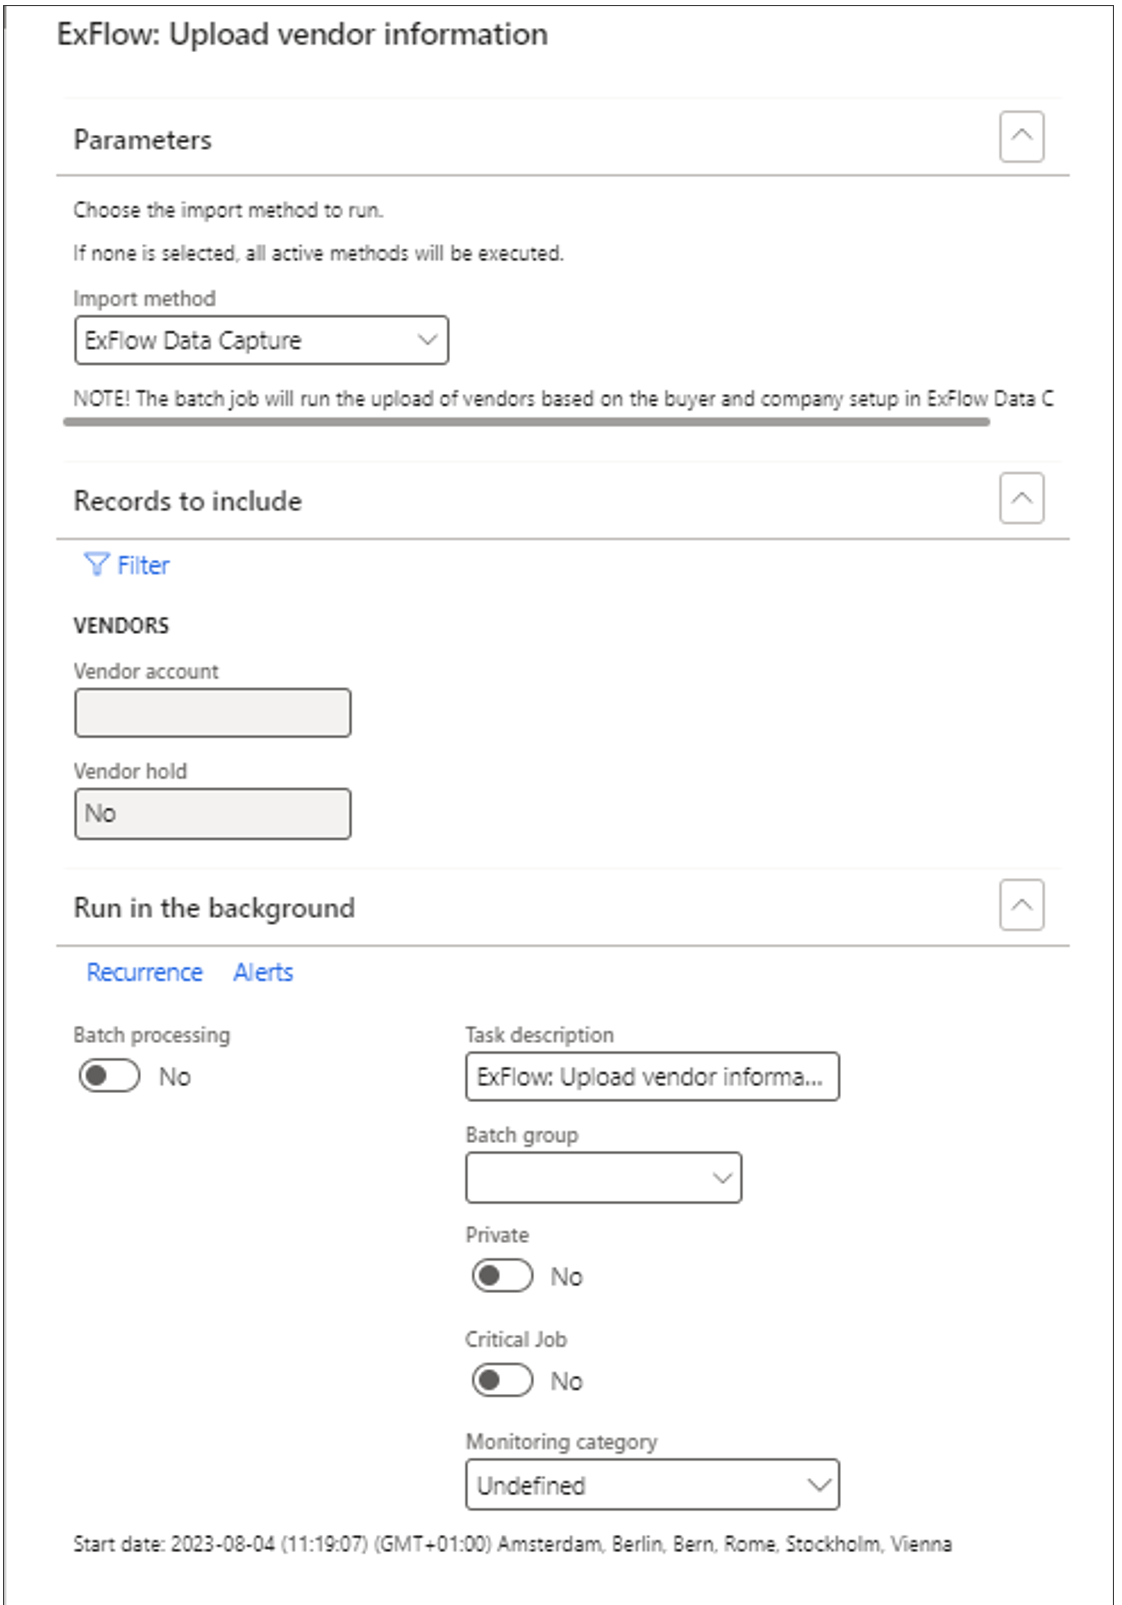
The new button, "Upload vendor information to ExFlow Data Capture (Multiple methods)," provides users with a convenient way to upload vendor information. This feature offers flexibility by supporting various methods for importing vendor data.
The dialog form associated with the "Upload vendor information" allows users to specify their preferred import method. They can choose from the available options, ensuring that the system accommodates their specific requirements and facilitates a seamless vendor data upload process as well it can be run a batch job.