Introduction
ExFlow Web (EFW) is a comprehensive invoice management system designed to facilitate the easy handling of invoices. This user manual will guide you through the process of editing and approving invoices using EFW, ensuring a smooth and efficient workflow.
Getting Started
Upon logging into EFW, you'll be directed to the Inbox page, which is your primary interface for managing invoices.
To view the details of an invoice, simply click on the desired invoice from the Inbox list.
The invoice detail page allows you to modify various fields such as the amount, company account, cost center, and more.
If the invoice is ready for processing, you can directly click on 'Approve'.

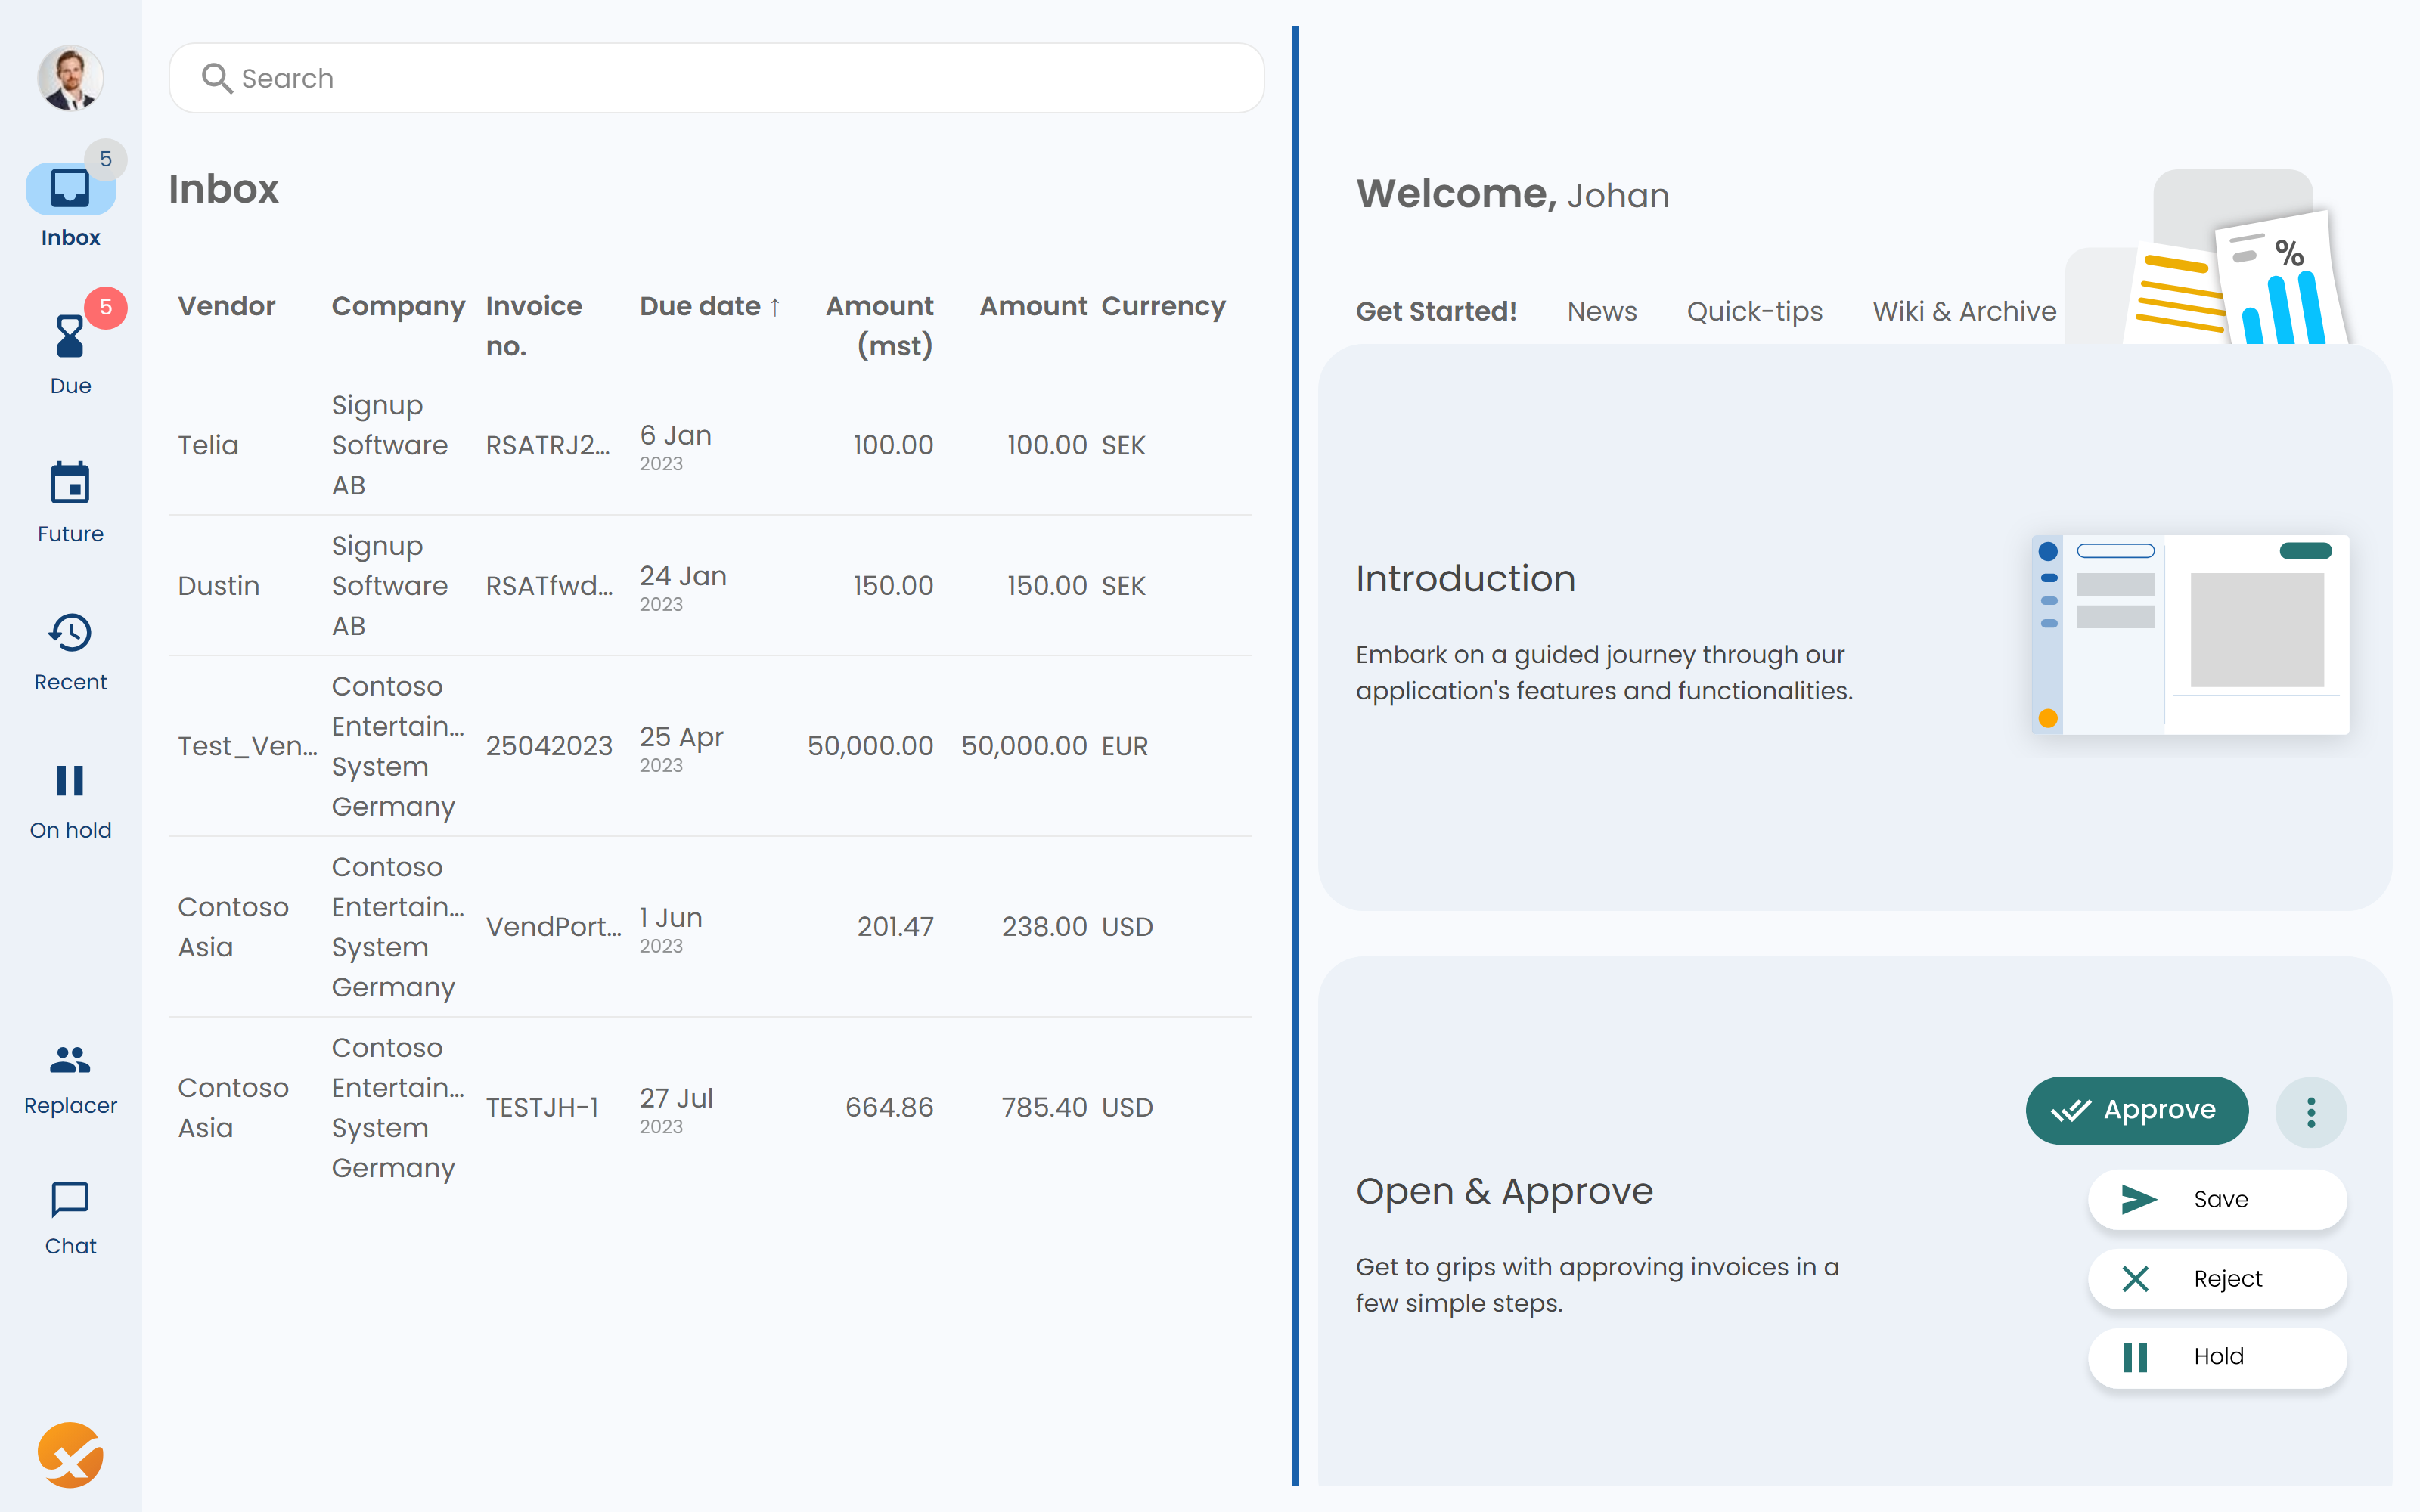
Inbox
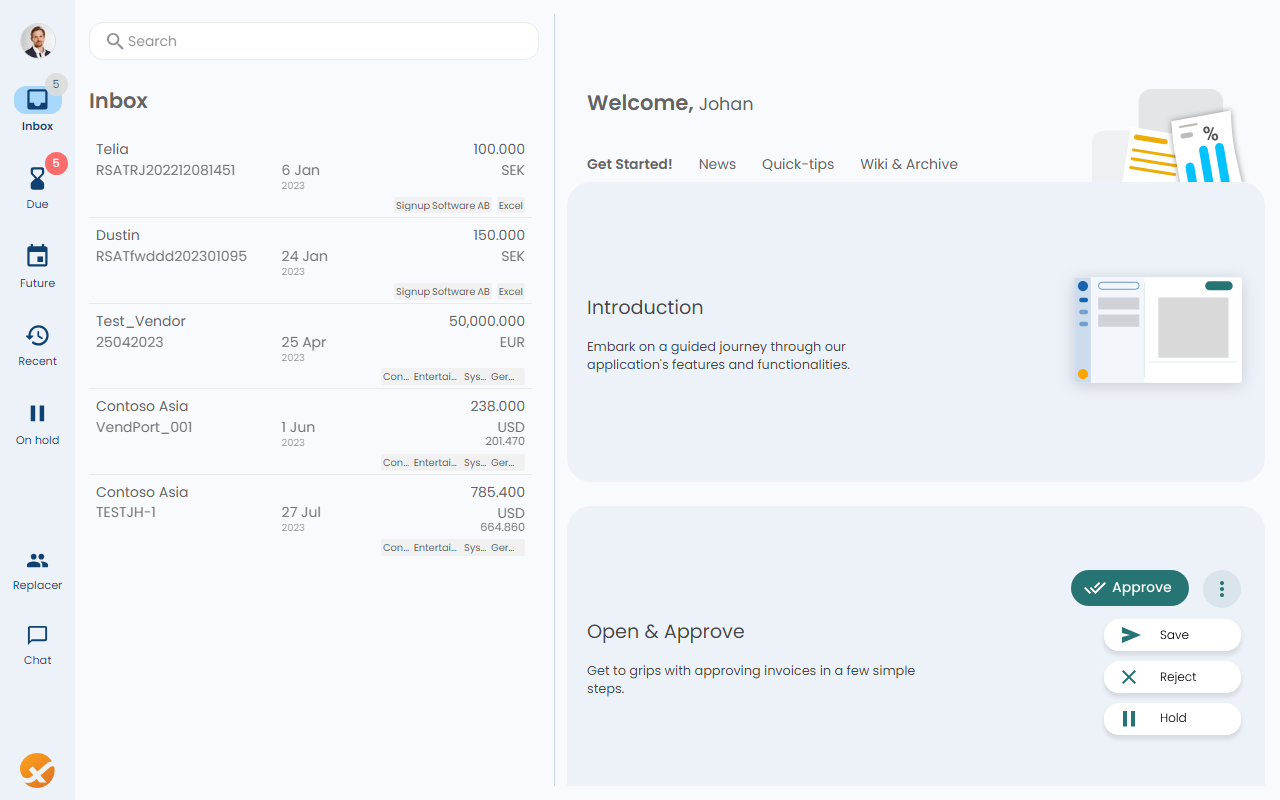
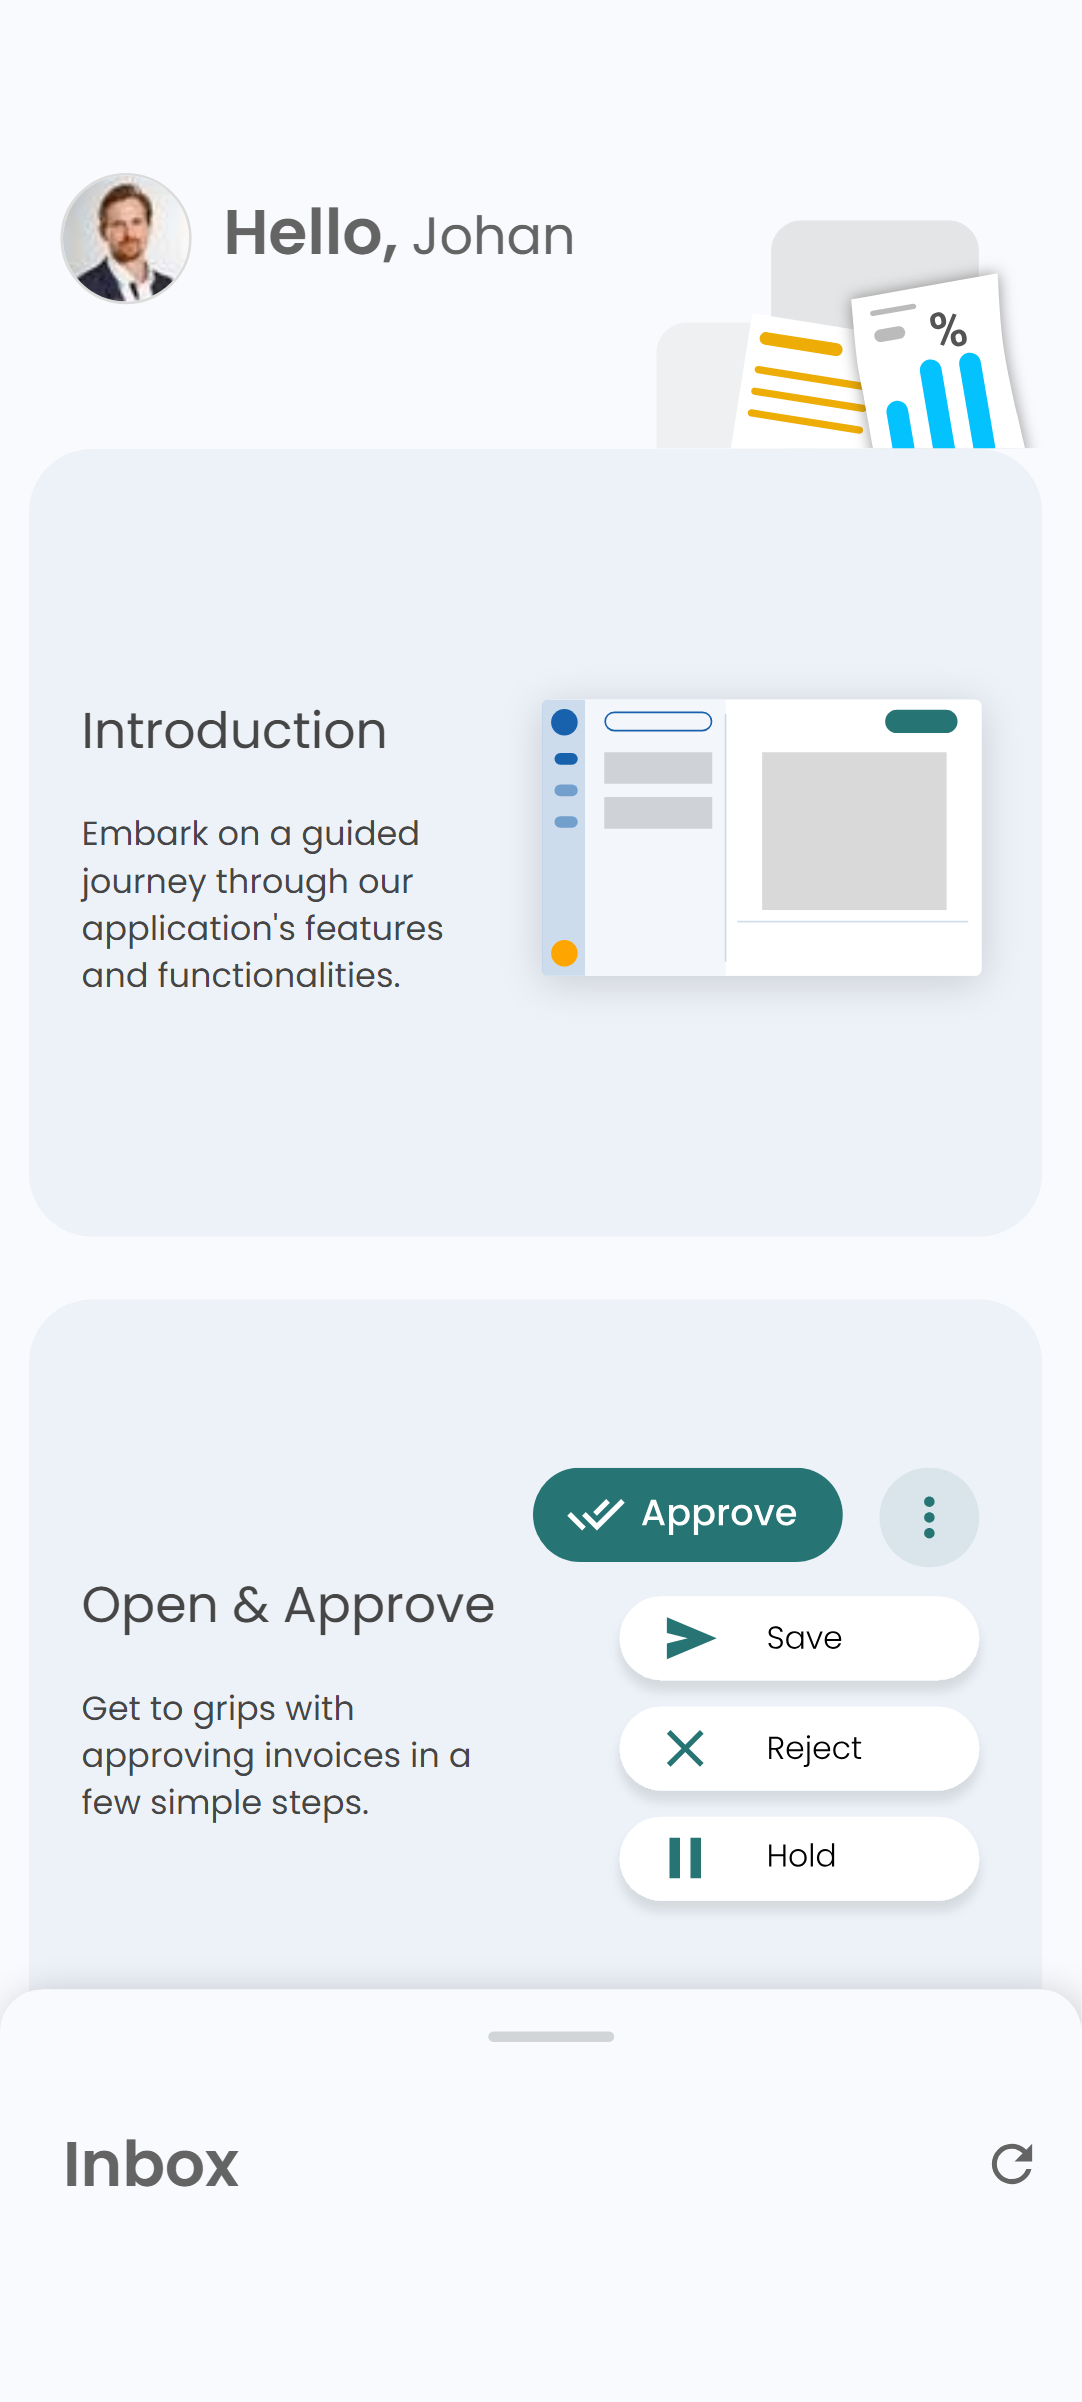
Once you log into EFW, the Inbox page will be your first point of contact. This is where you'll reach all your invoices.
- Navigation Panel: On the left, use this to switch between sections like Due, Future, Recent, and On hold invoices. You can access the settings by clicking on your profile picture located at the top right corner of the ExFlow Web interface. This will open a dropdown menu where you can select 'Settings' to customize your ExFlow Web experience.
- Inbox List: Displays all incoming invoices with details such as Vendor, Company, Invoice Number, Due Date, and Amount.
- Get Started!: To help you get started, we've provided short animations that guide you through the basic functionalities of ExFlow Web. You can view these animations to familiarize yourself with the system. Additionally, you can find detailed release notes and comprehensive documentation for further information and troubleshooting. These resources are designed to provide you with all the knowledge you need to effectively manage your invoices.
Search
The search functionality within our system is designed to streamline the process of finding specific invoices or sets of invoices based on various criteria. The screenshots provided demonstrate how to utilize the search bar and bookmarks to effectively filter and locate invoices.
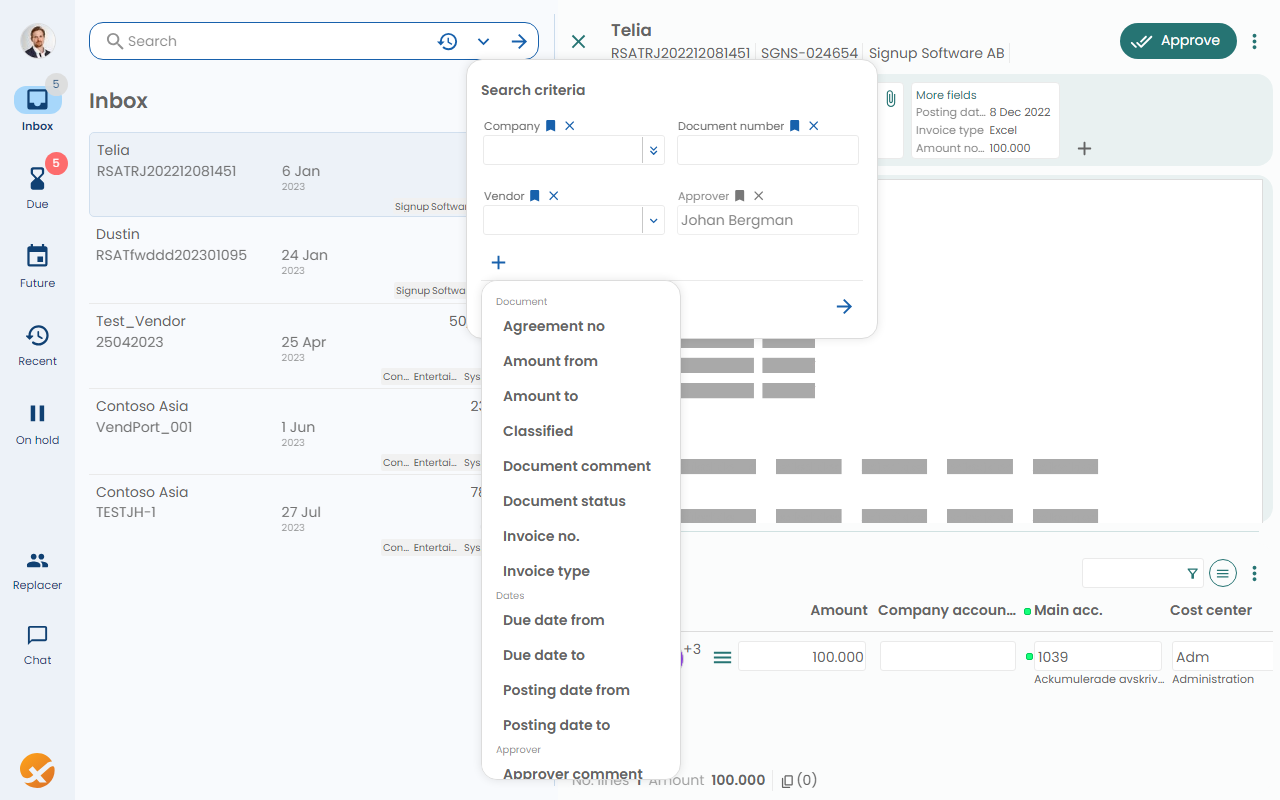
Using the Search Bar Location: At the top of the page.
Search: Click on the search bar and select from the dropdown menus to search by various attributes such as company, document number, or vendor name. For faster access in future searches and sessions, you can bookmark your preferred criteria/attributes by clicking on the small bookmark icon located above each.
Adding Criteria: To refine your search, you can add specific criteria by clicking on the "+" sign next to the search filters. This allows you to narrow down your search results based on detailed attributes like document status, due date, amount, etc.
Search History
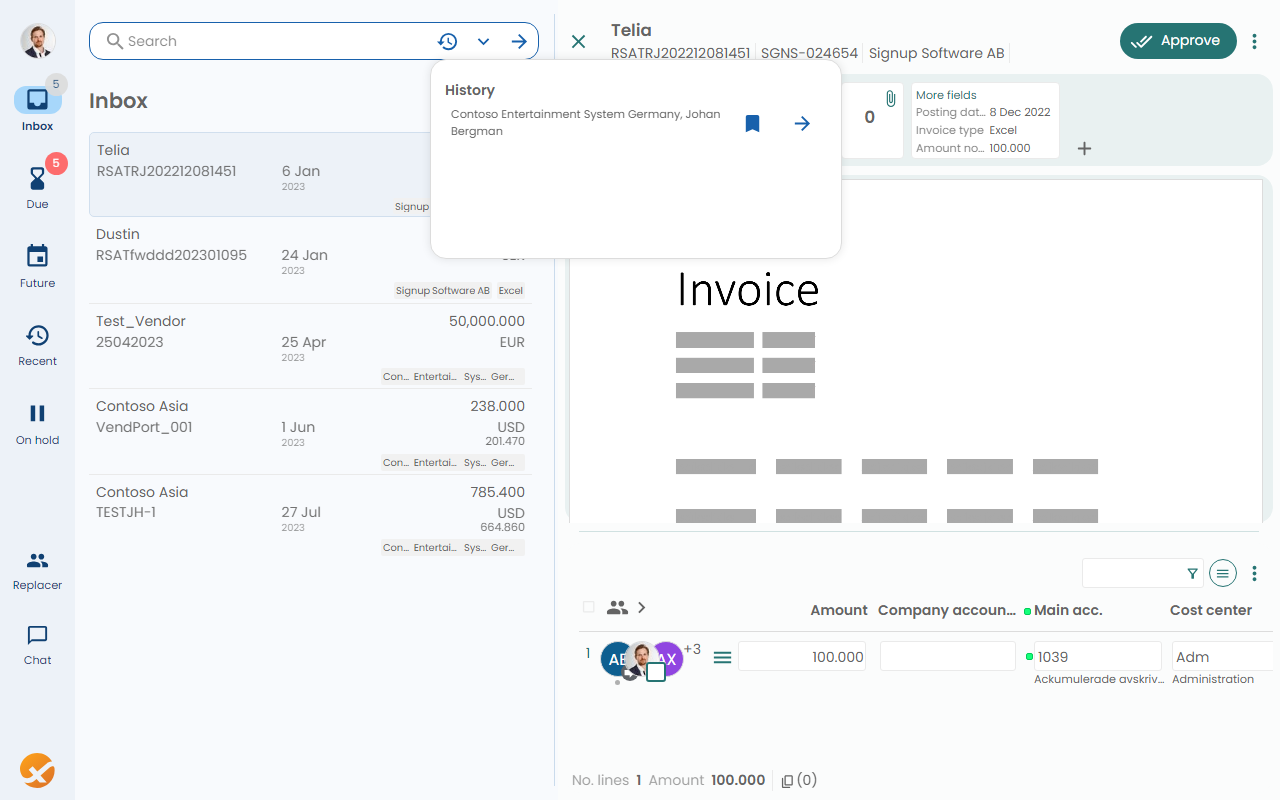
Creating Bookmarks: For frequently used search queries, you can create bookmarks to save the set of criteria. This can be done by clicking the bookmark icon on the search bar.
Accessing Bookmarks: Once saved, these bookmarks can be quickly accessed from the search bar. Clicking a bookmark will automatically apply the associated set of criteria to the search. To initiate the search with the selected criteria, click on the '->' button.
Remember to use the search bar and bookmarks to work more efficiently, reducing the time it takes to find the invoices you need to process. These tools are designed to make the invoice management process both faster and more intuitive.
More options
Inbox Display Modes:
The Inbox, which displays your list of invoices, can be viewed in two modes: Cards and Table. The display mode automatically adjusts based on the width of the Inbox.
- Cards Mode: When the Inbox width is smaller, invoices are displayed as individual cards.
- Table Mode: When the Inbox width is larger, invoices are displayed in a table format. This mode allows you to see more details at a glance.
You can adjust the width of the Inbox using the splitter located on the side of the Inbox. Simply drag the splitter to manually adjust the width, or double-click the splitter for a quick switch between the two modes.
Remember, the display mode is designed to enhance your user experience and make invoice management more efficient. Choose the mode that best suits your workflow.
Inbox Tools:
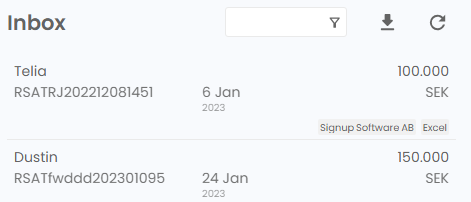
Above the Inbox, you'll also find several tools designed to help you manage your invoices more efficiently:
-
Filter Text Box: Use this tool to quickly find specific invoices. Simply type in the relevant information (such as the invoice number or supplier name), and the Inbox will automatically display matching invoices.
-
Download as CSV Button: This tool allows you to download the list of invoices displayed in the Inbox as a CSV file. This can be useful for record-keeping or for further analysis in a spreadsheet program like Microsoft Excel.
-
Refresh Button: Click this button to refresh the list of invoices in the Inbox. This ensures that you're always working with the most up-to-date information.
Remember, these tools are designed to make your invoice management process faster and more intuitive. Use them to enhance your workflow.
Quick Tips: Editing & Approving Invoices
Here are some useful tips for editing and approving invoices:
- To view the details of an invoice, simply click on the desired invoice from the Inbox list.
- The invoice detail page allows you to modify various fields such as the amount, company account, cost center, and more.
- Remember, any changes you make can be saved using the 'Save' button.
- If the invoice is ready for processing, you can directly click on 'Approve'.
Invoice Approval
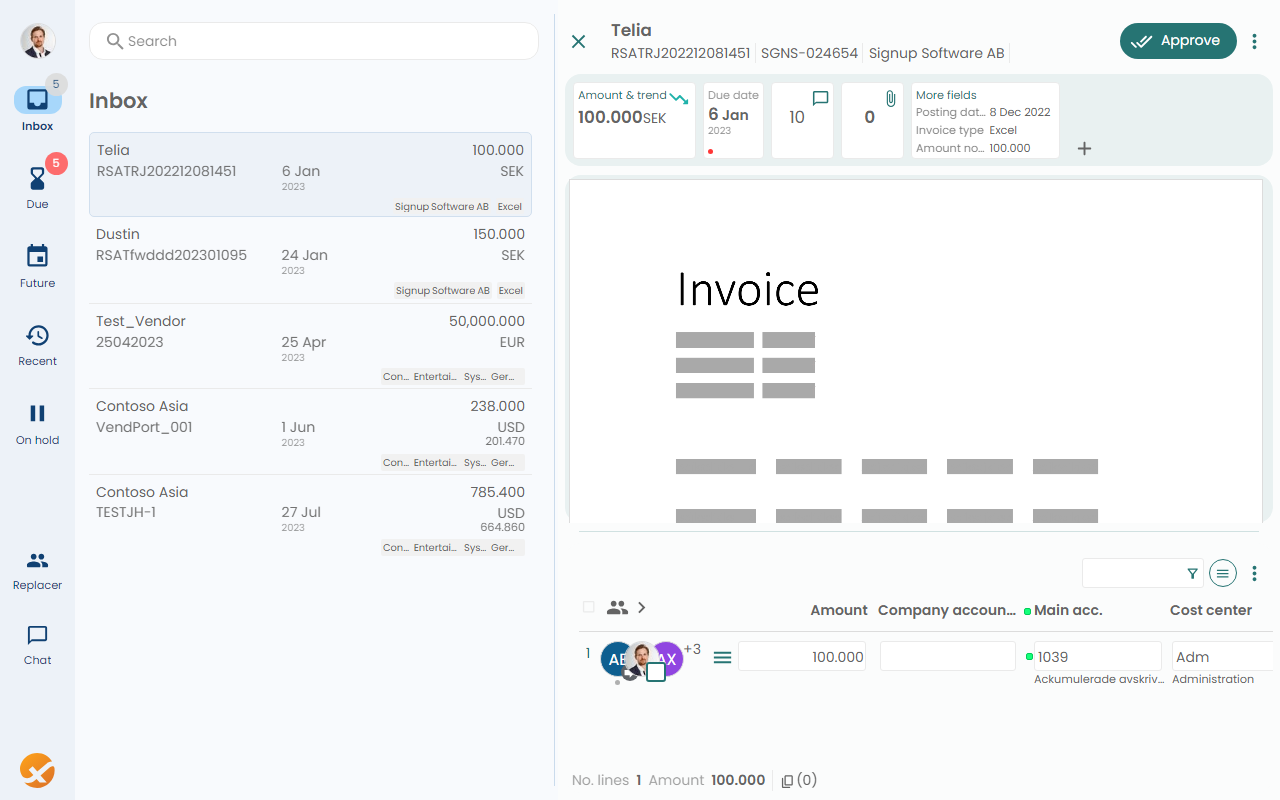
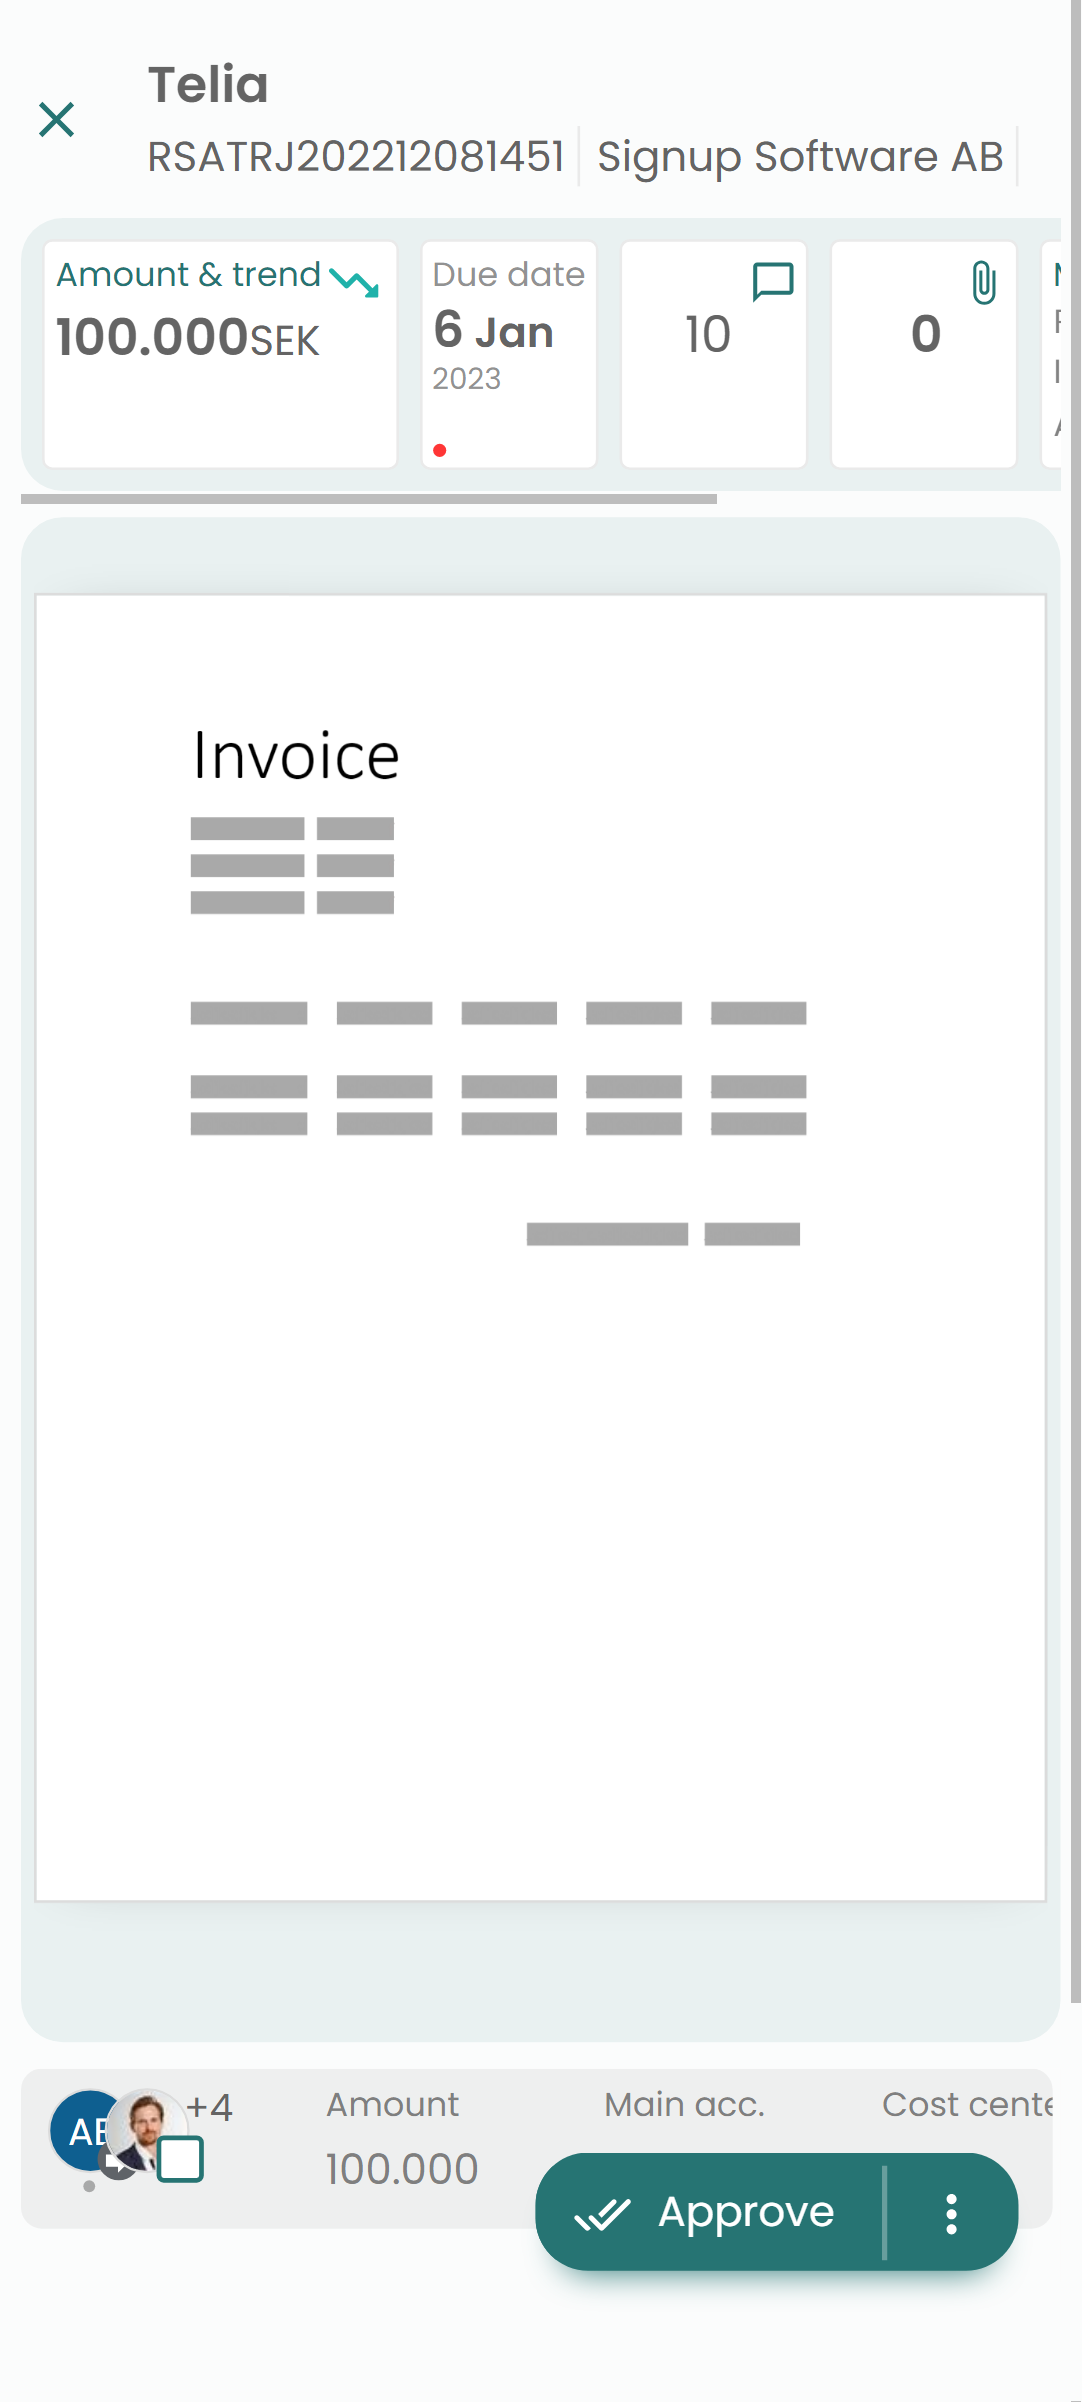
In the ExFlow Web application, once you have navigated to the desired invoice, you will see a detailed view that provides comprehensive information and several actions that you can take.
At the top of the invoice screen, you will find:
- Close Button: Close/Minimize the current invoice.
- Invoice Number: A unique identifier for the invoice.
- Vendor's Invoice Number: The number used by the vendor to identify the invoice.
- Company Name: The name of the company that has recieved the invoice.
- Approve Action: In the upper right corner, there is an "Approve" button. Clicking this button will send the invoice through to the next stage in the workflow. Please ensure all details are correct before approving.
- More Actions: In the 3-dots to the right of the 'Approve' button menu more option such as Save, put on hold, forward.
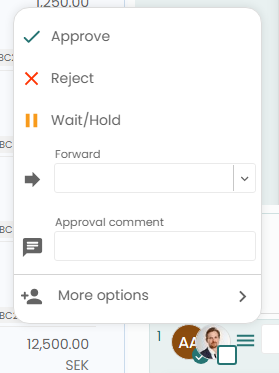
Each invoice entry in the Inbox list can be managed through various actions:
- Approve: To finalize the invoice and proceed with payment.
- Save: To keep changes made to the invoice for later review or approval.
- Reject: To decline the invoice if it does not meet the required standards or contains errors.
- Hold: To temporarily suspend the processing of the invoice, usually pending further information or clarification.
- Forward: You can forward the invoice to another team member for further action.
- Approval Comment: Add comments when approving, rejecting, or holding an invoice, which is mandatory for tracking purposes.
- Validate: To ensure that the data entered conforms to predefined rules and criteria.
- Side by Side: For a comparative view of the invoice details and the actual invoice document.
- Expand/Collapse Lines: To view more or fewer details of the invoice lines as needed.
Next panel contains information a bout the current invoice. These panels can be customized by your admin. Typically they display:
- Amount & Trend: The current amount, amount in default currency, VAT. The trend icon indicates if the current amount is higher or lower thant the last invoice. By clicking on 'Amount & Trend' a list and chart of past invoices is opened. See also, 'Amount & Trend'.
- Due Date: The deadline by which the payment should be made. A red dot indicates that the invoice is or soon will be due.
- Chat: See 'Using Chat on an Invoice'
- Attachments: Opens list of attachments in a new layer.
- More Fields: By clicking on this, you can access additional details about the invoice such as posting date, invoice type, and more.
In the center (depends on selected layout) of the screen, there is a placeholder or an image of the invoice. This provides a visual representation of the invoice document for verification against the invoice details. Use the buttons to zoom in or out or open in an external tab.
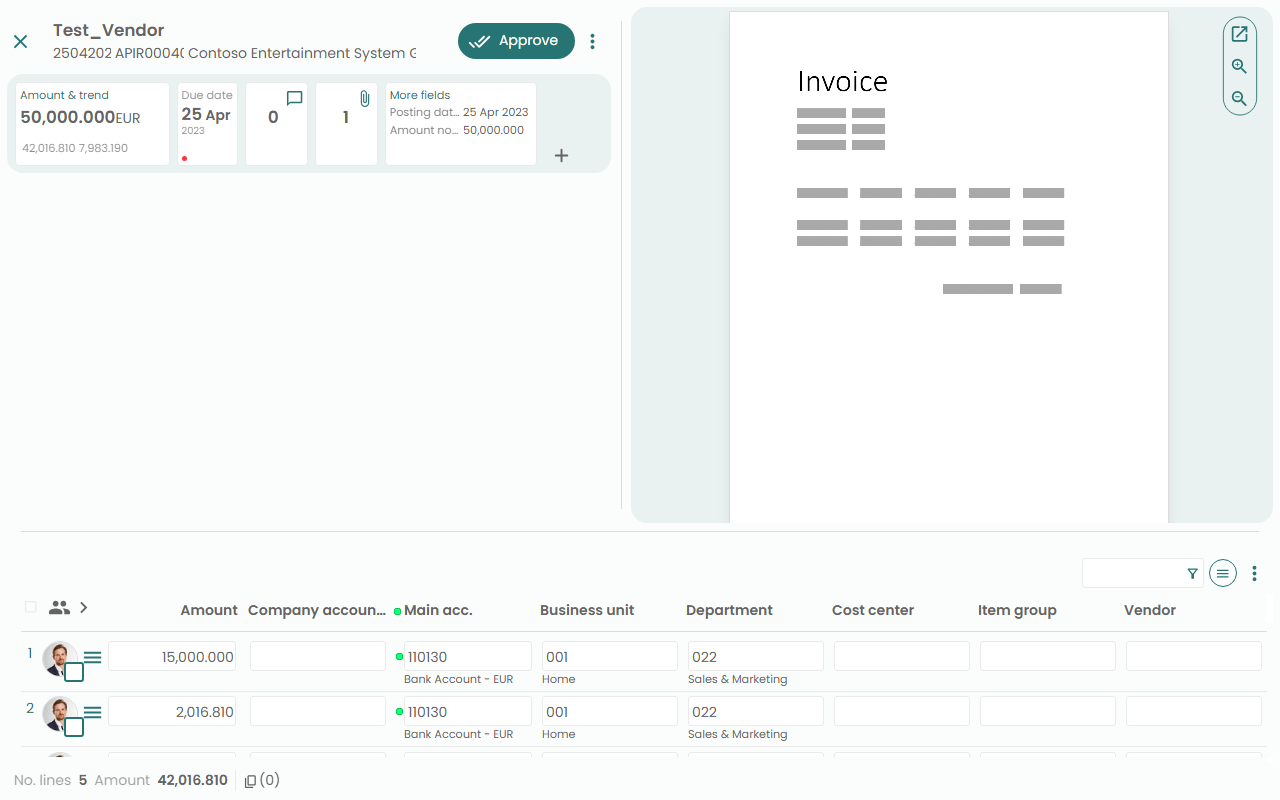
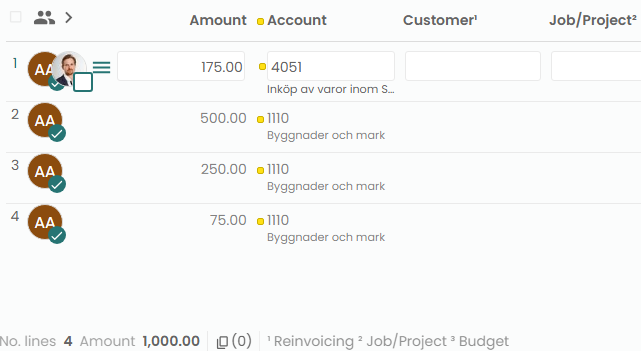
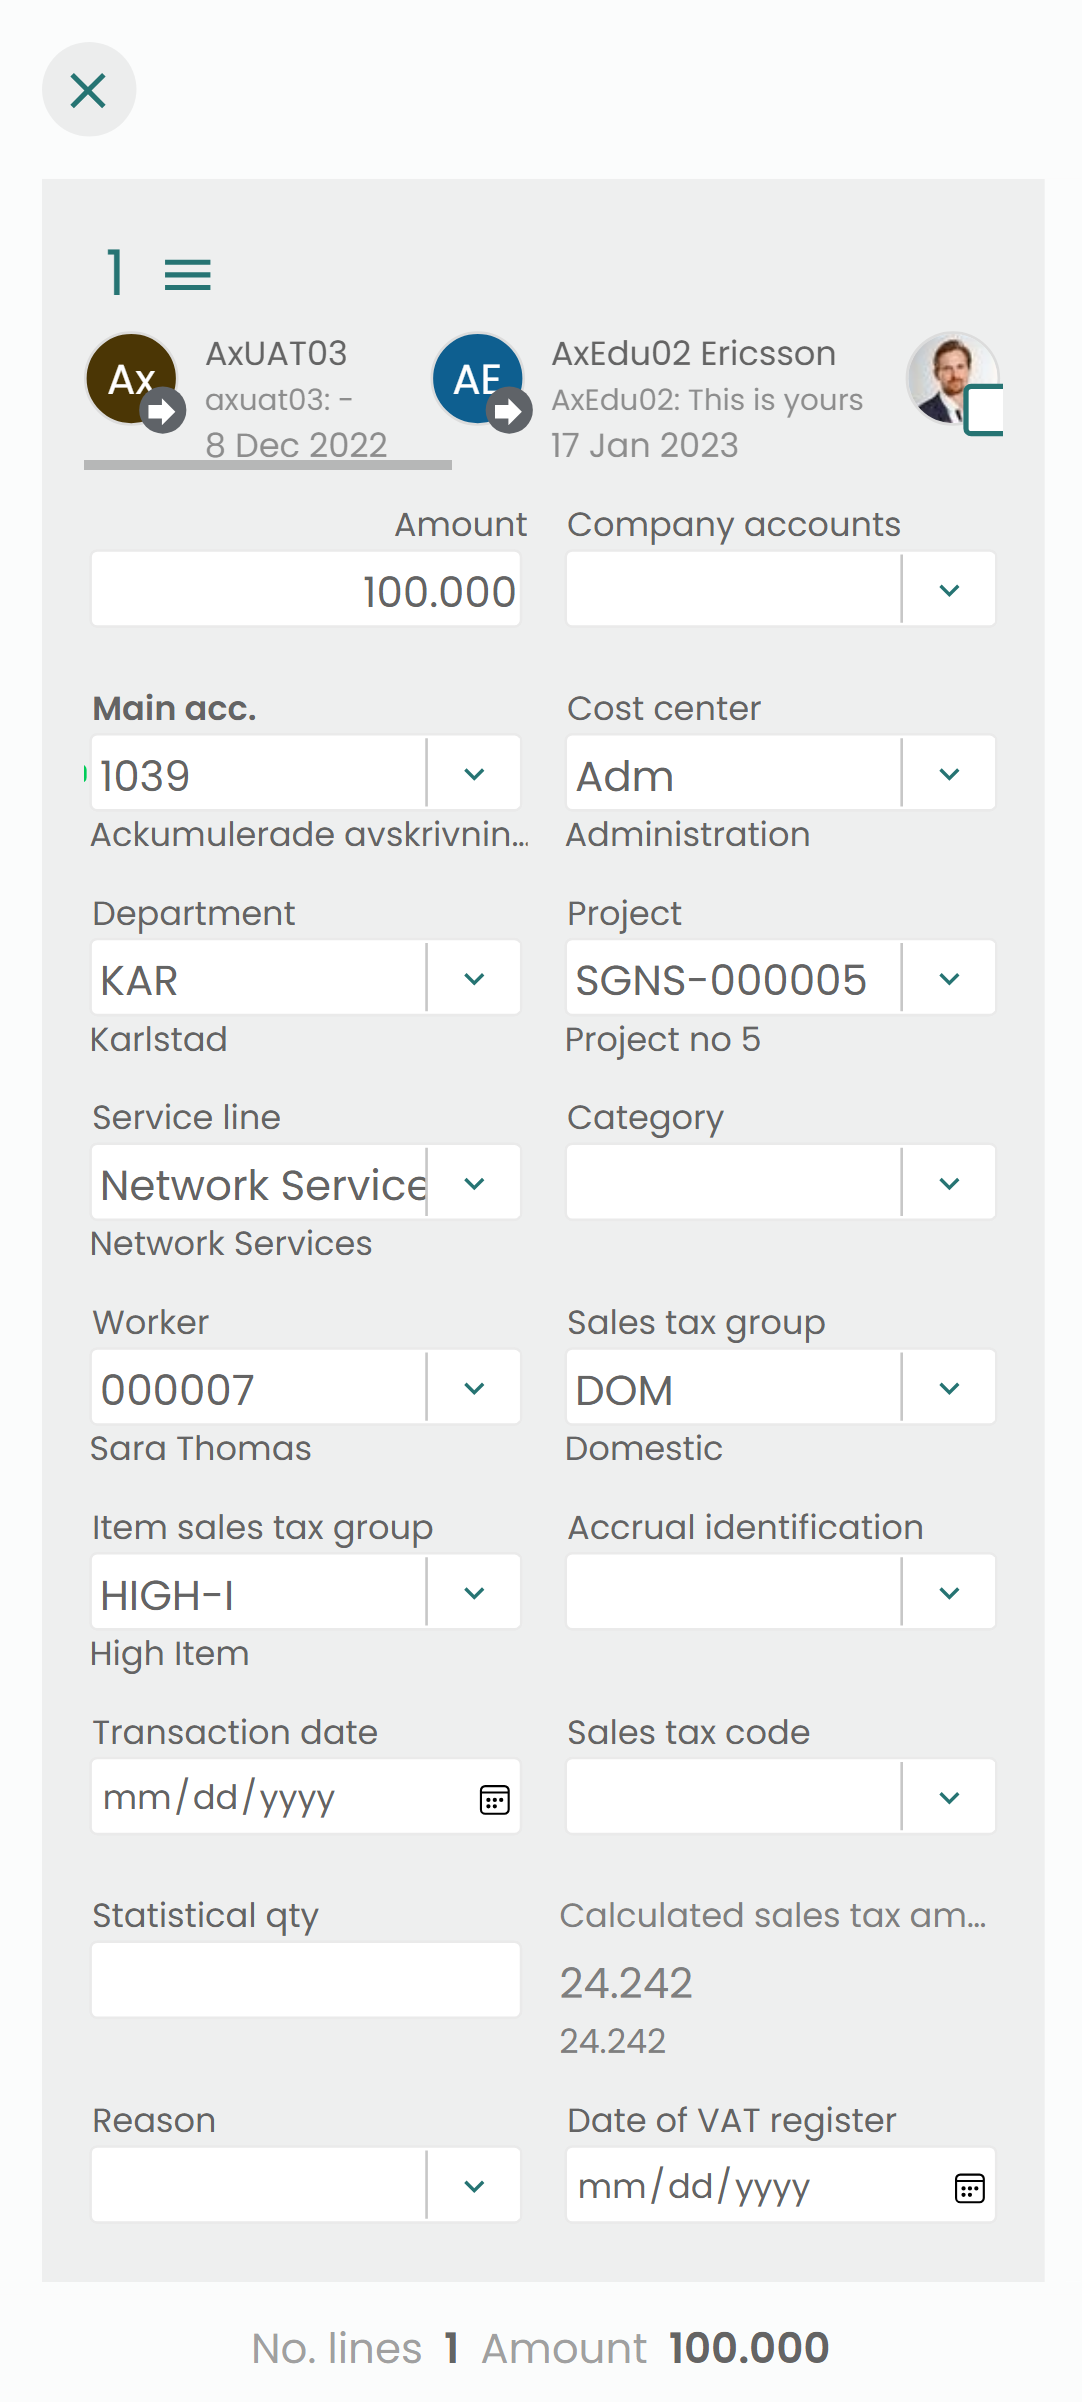
Below the invoice image, there is a detailed breakdown of the invoice:
- Line Number: Each item or service billed is listed as a separate line item.
- Amount: The amount charged for each line item.
- Company Account...: This section displays the company account details.
- Project: Each line item is associated with a project code, detailing the specific project or department the charge applies to.
- Business Unit, Department, Service: These fields provide additional classification details for better tracking and accounting.
At the very bottom of the invoice screen, you will find:
- Total Number of Lines: This indicates the number of lines on the invoice.
- Total Amount: The aggregate amount for all the line items, reaffirming the total invoice value.
- Attachments: Indicated by a paperclip icon, it shows whether there are any attachments, such as receipts or purchase orders, associated with the invoice.
- Copy & Paste: See Copy & Paste
- Coding Columns Footnotes: To make the labels in the coding columns more intuitive, we've added footnotes. These footnotes provide additional context or explanation for the labels, making it easier for you to understand and use the coding columns effectively.
Additional Line Actions:
- Lines Filter Textbox: This tool allows you to filter the invoice lines displayed. You can filter by line number (using the syntax
#3-#5to display lines 3 to 5), lines awaiting your approval, or any other text present in the lines. This feature helps you quickly locate specific lines, making your invoice review process more efficient. - Show dropdown menu on click in textboxes: When checked, clicking on a textbox will automatically display any associated dropdown menu for quicker data entry.
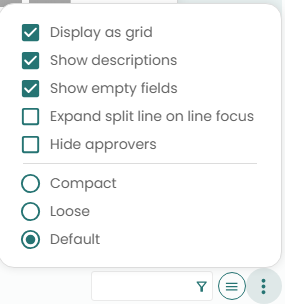
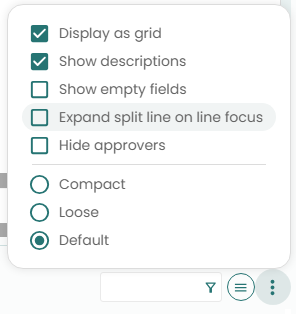
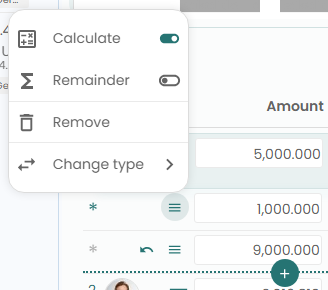
- Line Options: The three vertical dots open a menu for more line options.
- Display as Grid: Arranges the information in a structured grid layout for improved organization and comparison.
- Show Descriptions: Displays additional details or descriptions beneath each value to provide more context.
- Show Empty Fields: Includes fields that have no data in the current view, ensuring that users are aware of all available coding slots.
- Expand Split Line on Line Focus: Show a new staged line when a line selected.
- Hide Approvers: Omits the approvers' information from the display, which can declutter the view when approver details are not needed.
- Density Options (Compact/Loose/Default): This setting allows you to choose the density of the invoice lines display. You can choose from Compact, Loose, or Default modes. Compact mode provides a more condensed view, allowing more information to be displayed at once. Loose mode offers a more spacious layout, making each line easier to read. Default mode strikes a balance between the two. Choose the option that best suits your viewing preference.
Note:
- Remember to save any changes made to the invoice details before exiting the invoice screen to ensure that all adjustments are updated in the system.
- Always refer to your organization’s internal policies and procedures on invoice approval to maintain compliance and financial integrity.
Working With Lines
Most users spend a significant amount of time adjusting lines and coding. This section provides guidance on how to work more efficiently. For experienced ExFlow users, we've introduced several new features and improvements that we believe will enhance your productivity.
Split/Add Lines
The Line Split feature allows you to divide a single invoice line into multiple lines. This can be useful when you need to allocate costs to different accounts or cost centers. The following images provide a step-by-step visual guide on how to use this feature:

If there's a difference in the amount after splitting an invoice line, the "Expand Split" button will appear. Click this button to add a new line and adjust the allocation of costs.

When you change the amount on a split line, new lines will be added automatically to accommodate the difference. Once you've made all necessary adjustments, click the "+" button to add the new lines to the invoice.
The new line has been successfully added.
You can opt to display the staged new line immediately when a new line is selected. This eliminates the need for an extra button click.
In rare instances, you may want to pause the automatic addition of new lines and manually select which new line should be used to accommodate the remaining amount.
Line Actions
For each line that requires your approval (and you have editing rights to), a menu is available. This menu provides various options including: approve, hold, reject, forward, write an approval comment, and add approvers.
Keyboard
Navigating with the keyboard is straightforward. Simply use the arrow keys to move between fields and buttons.
Keyboard Shortcuts:
Here are some commonly used key combinations that can help you navigate and perform actions more efficiently in ExFlow Web:
- Arrow keys: Navigate between fields and menus.
- Space: Select or click the active element.
- Alt+1/2: Switch between the Inbox (1) and Invoice (2) views. When a document or invoice opens, the close button at the top-right will be selected. Use the down arrow to navigate to the lines or the right arrow to navigate to the approve button.
- Ctrl+Space: Open the menu in coding textboxes.
- End/Home keys or Ctrl+Arrow Left/Right: Move the cursor within the text of a field. If the cursor is at the end of the text in a field and you press the arrow key in the same direction, the next or previous field will receive focus.
- Esc: Close menus and forms.
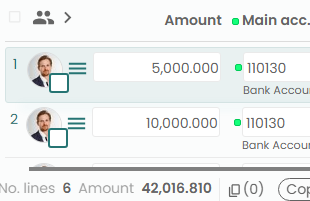
Selection & Multi-edit
The application supports multi-selection of lines. Any changes made to a field will be applied to all selected lines. This functionality extends to changes in amount, coding, approvers, and approval actions.
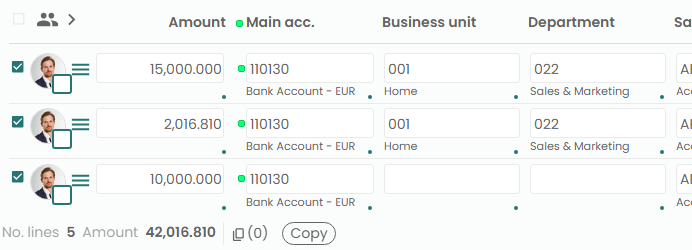
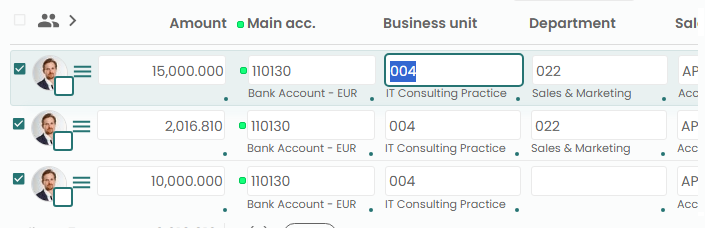 Images demonstrate the multi-selection of lines and the process of changing the
 Business Unit to 004 on the first line.
You can select all lines that you have editing rights to by checking the checkbox located in the header menu.
In the following section, we will demonstrate how the multi-selection of lines can be utilized in the Copy & Paste feature.
Copy & Paste
With line selection, you can utilize the advanced yet straightforward Copy & Paste feature. This feature works within the same document or between documents from the same company and of the same line type. In this section, we'll refer to the lines being copied as 'source lines' and the lines where the copied data is pasted as 'target lines'.
Here's how it works:
- To copy an entire line: Click on a textbox and then click the Copy button (or use the Ctrl+C shortcut). Then, select another line and click the Paste button (or use the Ctrl+V shortcut). You can also select multiple target lines for pasting.
- To copy part of a line: Use Ctrl+Click to select individual fields. Alternatively, you can tick the line's checkbox and deselect fields using Ctrl+Click. Once you've selected the fields you want to copy, click the Copy button. Only the fields highlighted with a dot will be copied.

- To clear the selection: Toggle the line's checkbox.

- To clear the clipboard: Click the Clear button.
- To copy multiple lines: Select multiple lines as described in the previous point, then click the Copy button.
- Many-to-Many: To overwrite multiple lines, the number of source lines must match the number of target lines.
- Many-to-One: When multiple source lines are pasted onto a single target line, a split operation is performed. Please note that the Amount field should be included in the selection, and the amount of the first source line must differ from the target line's amount.
- Amount & Trend: A useful tip is to utilize the
Amount & Trendfeature to search for past invoices and copy lines from a previous invoice.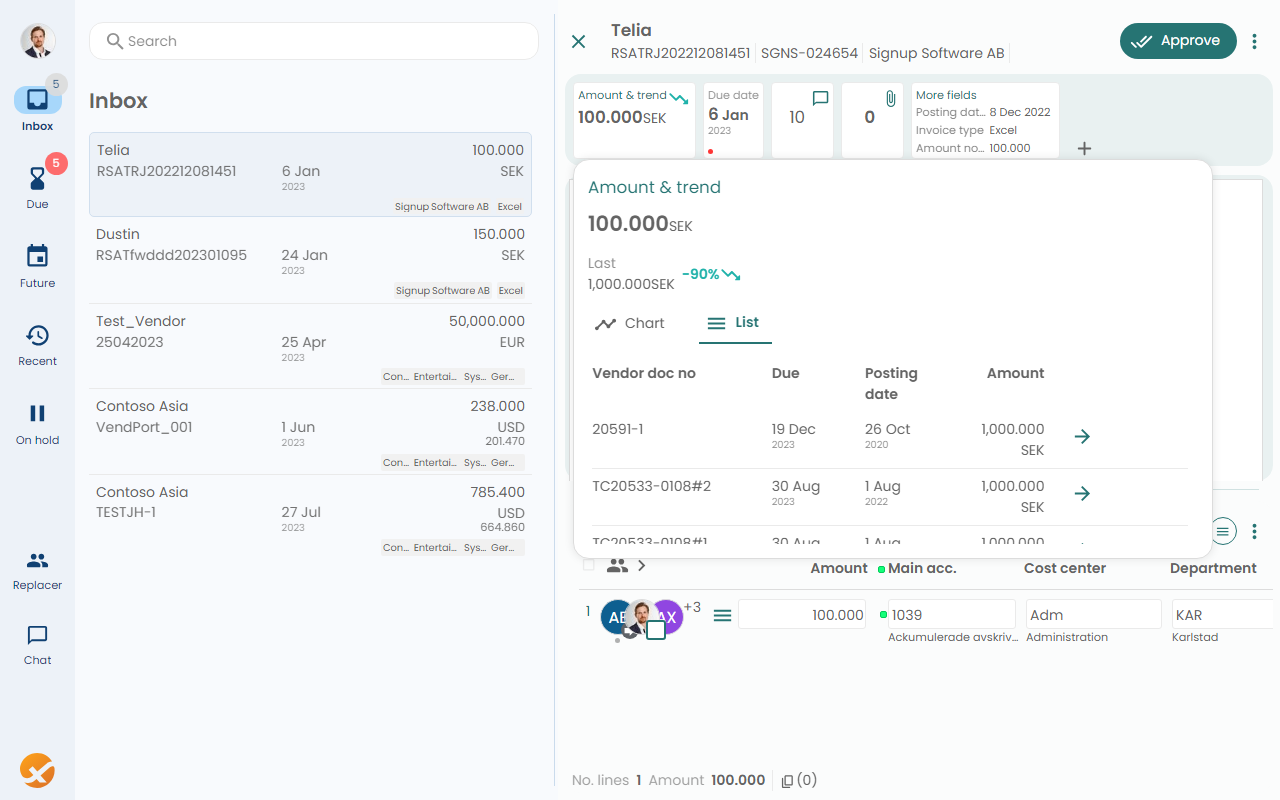
Settings
Customizing your ExFlow Web (EFW) experience is straightforward with our range of settings. This section of the manual will walk you through configuring your language preferences and general application settings.
Language Settings
Display Language
Choose your preferred language from the dropdown list of supported languages.
Formatting Language
This setting is used to change the number formatting. Dates are always displayed in the 'Day Month' format, with the year omitted if it's the current year. The selection of dates uses the browser's default component, and the date format is determined by your browser setup.
General Settings
Start-up Options
- Load the first document in the inbox: When enabled, EFW will automatically load the first document in the Inbox upon logging in for quick access.
- Show release notes and quick-tips: Toggle this to receive updates on new features and helpful tips for using EFW.
Theme & Layout
- Auto-selected theme: EFW will determine the best theme based on your system settings.
- Light/./media/image/Teams theme: Manually select your preferred theme to customize the appearance of EFW.
- Default/Loose/Compact layout: Adjust the density of information displayed on the screen. The Default option offers a balanced layout, Loose provides more space, and Compact maximizes the amount of information on the screen.
Accessibility
- Increase contrast: Check this option to enhance the visual accessibility of EFW by increasing color contrast.
- Reduce transparency: Reduce the transparency of interface elements for better readability.
- Avoid using color to differentiate: Enable this option if you prefer not to rely solely on color to distinguish between elements of the UI.
More
- Show dropdown menu on click in textboxes: When checked, clicking on a textbox will automatically display any associated dropdown menu for quicker data entry.
Conclusion
Customizing your settings in ExFlow Web ensures that the interface meets your individual preferences and accessibility needs. By adjusting these settings, you can create a more personalized and comfortable environment that supports your workflow. If you require assistance or further clarification on any of the settings, please consult the help documentation or contact your system administrator.
Replacer Feature
The Replacer feature in ExFlow Web (EFW) allows users to designate a substitute to manage their invoices when they are not available. This section of the user manual explains how to set up and manage replacers within the system.
Setting Up a Replacer
Accessing Replacer Settings
- Navigate to the 'Replacer' section from the main navigation panel on the left side of your EFW dashboard.
Adding a Replacer
- Open the Replacers Panel: Click on the 'Replacer' icon to open your list of replacers.
- Add a Replacer: Click the '+ Add' button to initiate adding a new replacer.
Configuring Replacer Details
- Add to all companies in common: Check this option if you want your replacer to approve invoices on your behalf across all companies you have access to within EFW.
- User: Select the user who will act as your replacer from the dropdown menu.
- Start Date: Set the date from which the replacer should start managing your invoices.
- End Date: Set the date when the replacer’s authority to manage your invoices will end.
Finalizing the Setup
- Add Replacer: After filling in the user and date details, click the 'Add' button to finalize the process.
Managing Replacers
Current and Future Replacers
- The 'My replacers' section will show any replacers currently set up or scheduled for the future.
- If no replacers are listed, it will indicate that you have no current or future replacers set.
Editing or Removing a Replacer
- To change the details of an existing replacer or to remove them, select the replacer from your list and make the necessary changes.
Conclusion
The Replacer feature ensures continuity in the invoice approval process during your absence. By delegating this responsibility effectively, you can maintain seamless operations within EFW. Remember to communicate with your chosen replacer(s) to ensure they are aware of their role and responsibilities. If you need assistance with the Replacer feature, please refer to the help section or contact your system administrator.
Chat Messages
Communication is integral to efficient invoice management. ExFlow Web (EFW) provides a Chat feature that allows for quick and direct communication between users on specific invoices. This section will guide you on how to use the chat feature to send, receive, and manage messages.
Accessing Chat Messages
Viewing Unread and Read Messages
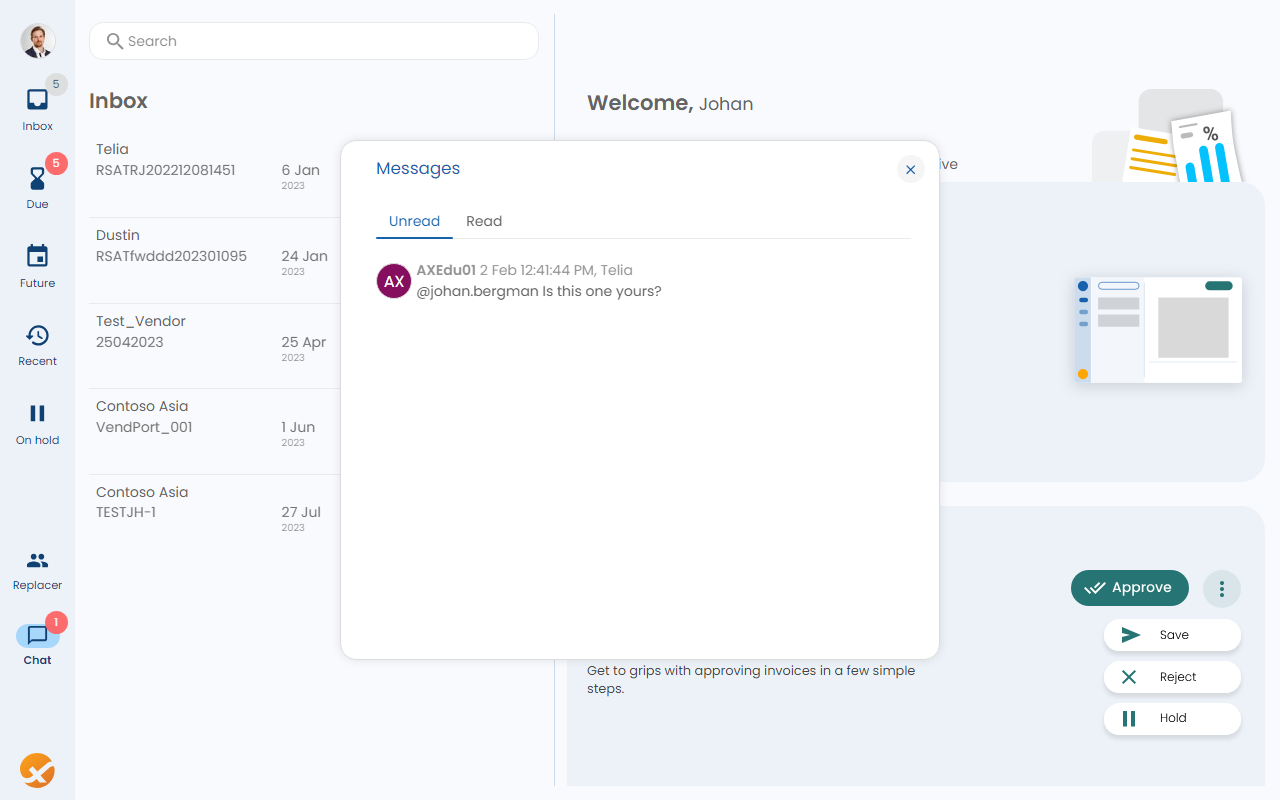
- Click on the 'Chat' icon in the navigation bar to access your messages.
- Here, you will see two tabs: 'Unread' and 'Read'. This helps you to easily track which messages you have not seen yet and review those you have already read.
Interacting with Messages
- Unread Messages: These are messages you haven't opened yet.
- Read Messages: After you read a message, it will move to the 'Read' tab. You can always refer back to these messages if needed.
- To access the invoice associated with a specific chat message in ExFlow Web, simply click on the message. This action will promptly open the invoice for your review and further processing.
Using Chat on an Invoice
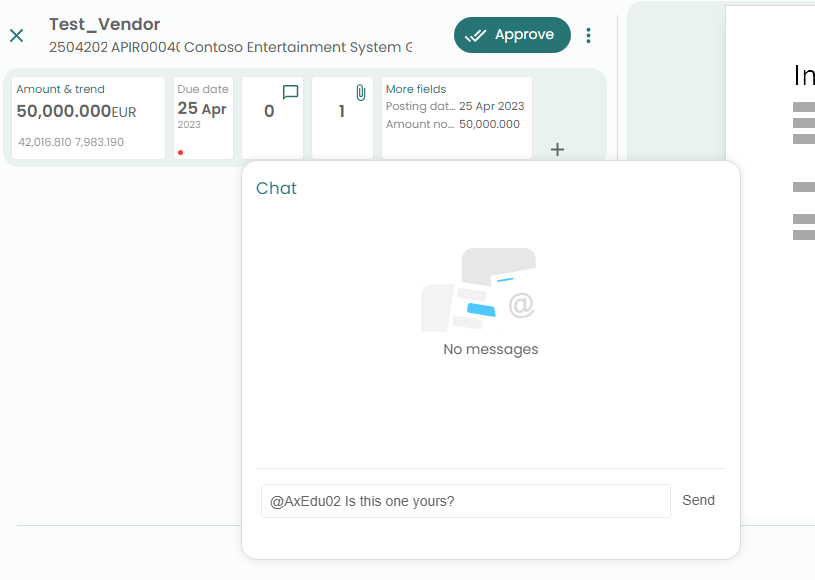
- To discuss a specific invoice, first navigate to the invoice.
- To view, respond to existing messages, or compose a new message, simply click on the chat icon. This will take you to the messaging interface where you can easily manage your communications.
- To mention a colleague and draw their attention in the chat, begin typing your message in the text box at the bottom. To specifically mention someone, type the "@" symbol followed by their username without any spaces (for example, "@johan.bergman"). Once you send the message, they will receive a notification that they've been mentioned. You can also use this feature to quickly respond to a previous message by clicking the "Reply" link under any message, which will automatically include the original sender's username with the "@" symbol in your response text box.
Administration & Setup
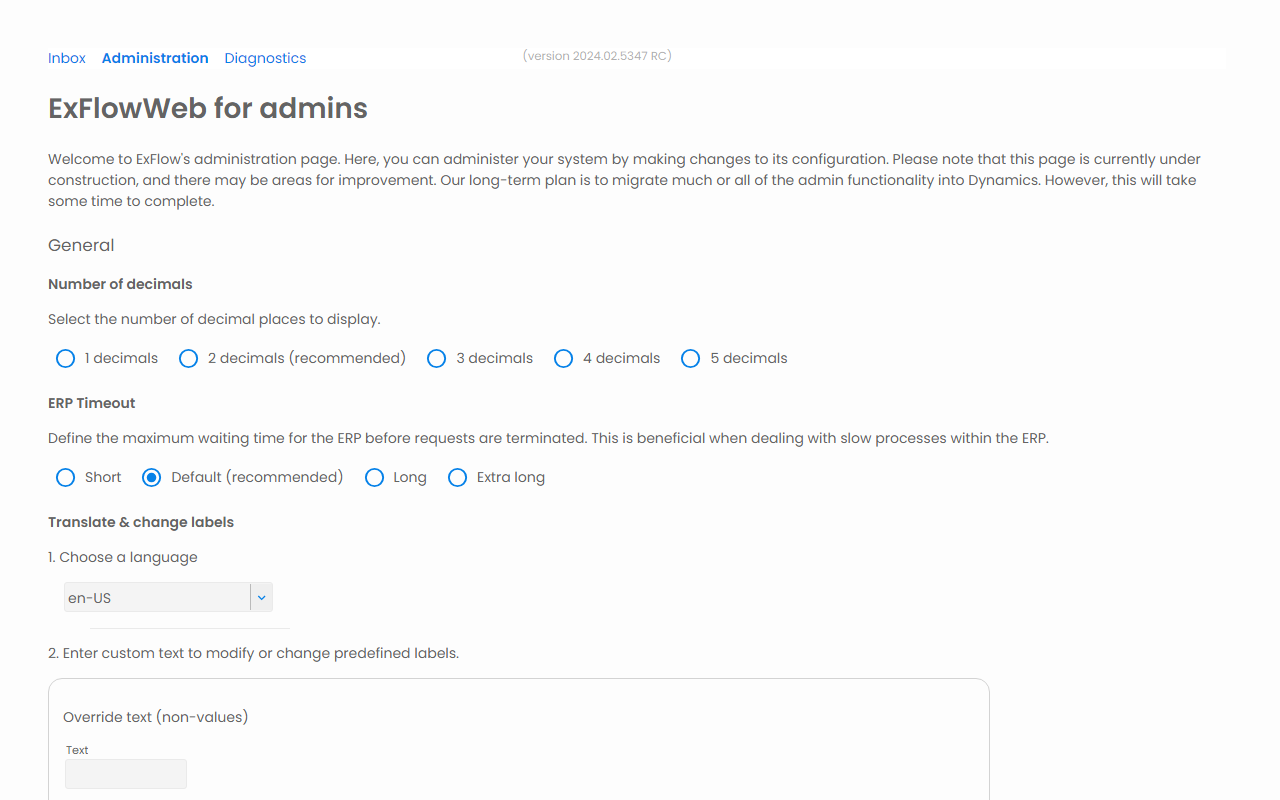
Users who are set up as web administrators in Dynamics ERP have the ability to administer and configure various aspects of the application's behavior and appearance. Detailed instructions for these configurations are provided directly on the page for easy reference.
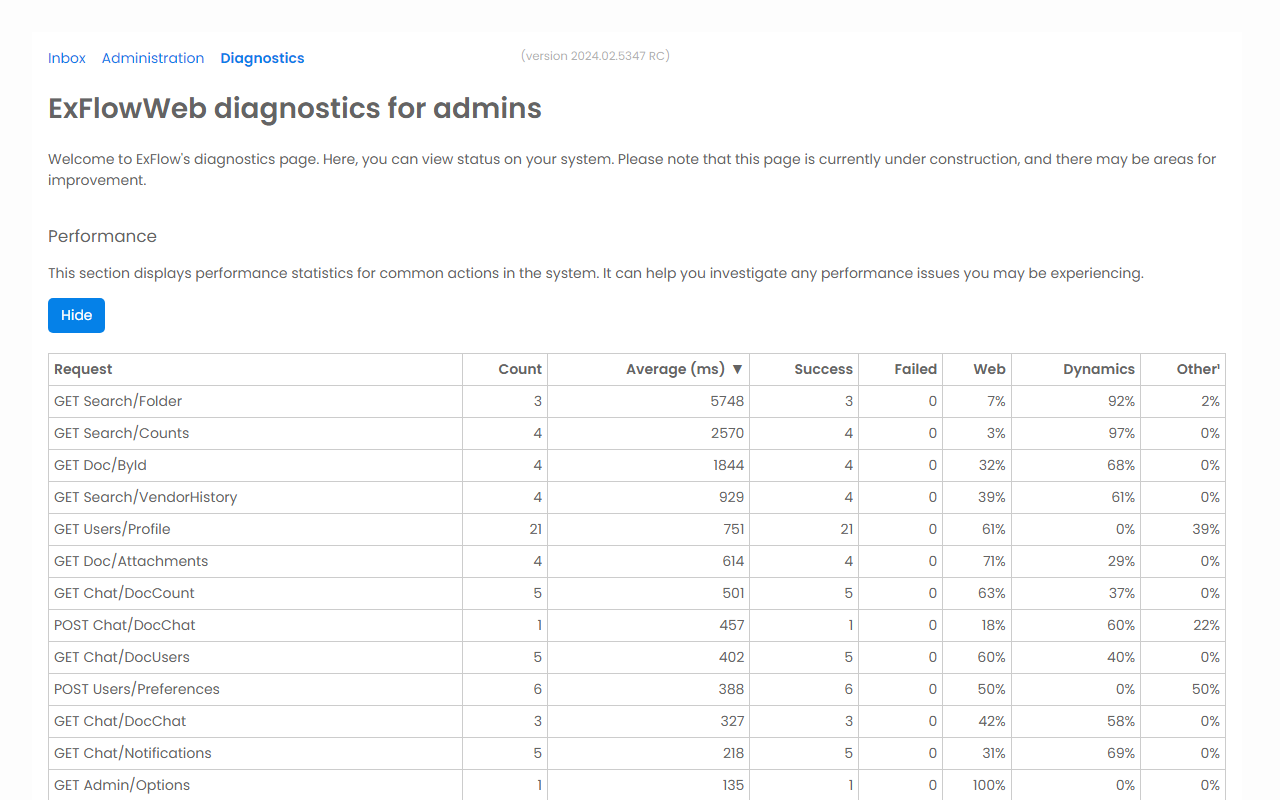
Diagnostics
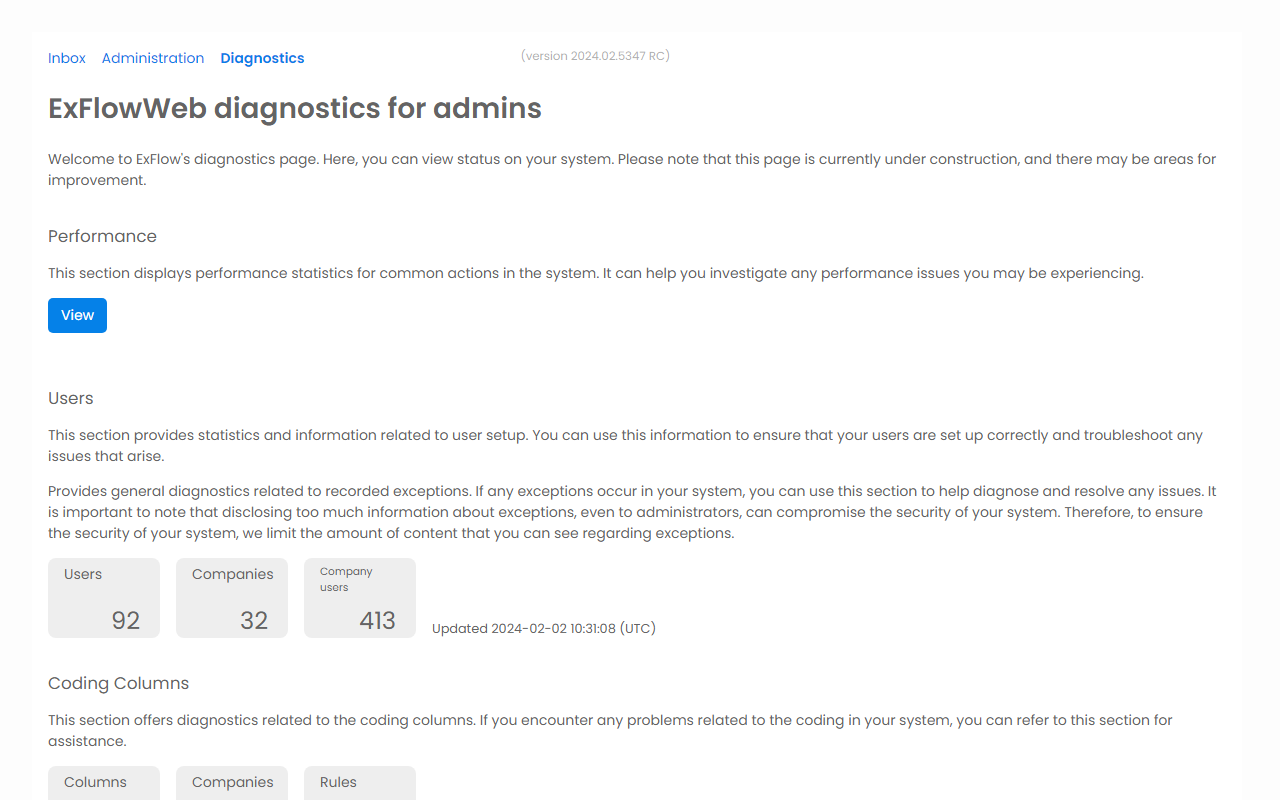
Users who are set up as web administrators in the ERP have access to the Diagnostics page. This page provides valuable information about the application's performance and can assist in troubleshooting and resolving issues.
Important: Always remember to check the final section of the page, which contains a list of classified issues that have been identified. Typically, this section includes instructions on how to directly resolve these issues, ensuring that you can continue to use the application smoothly and efficiently.
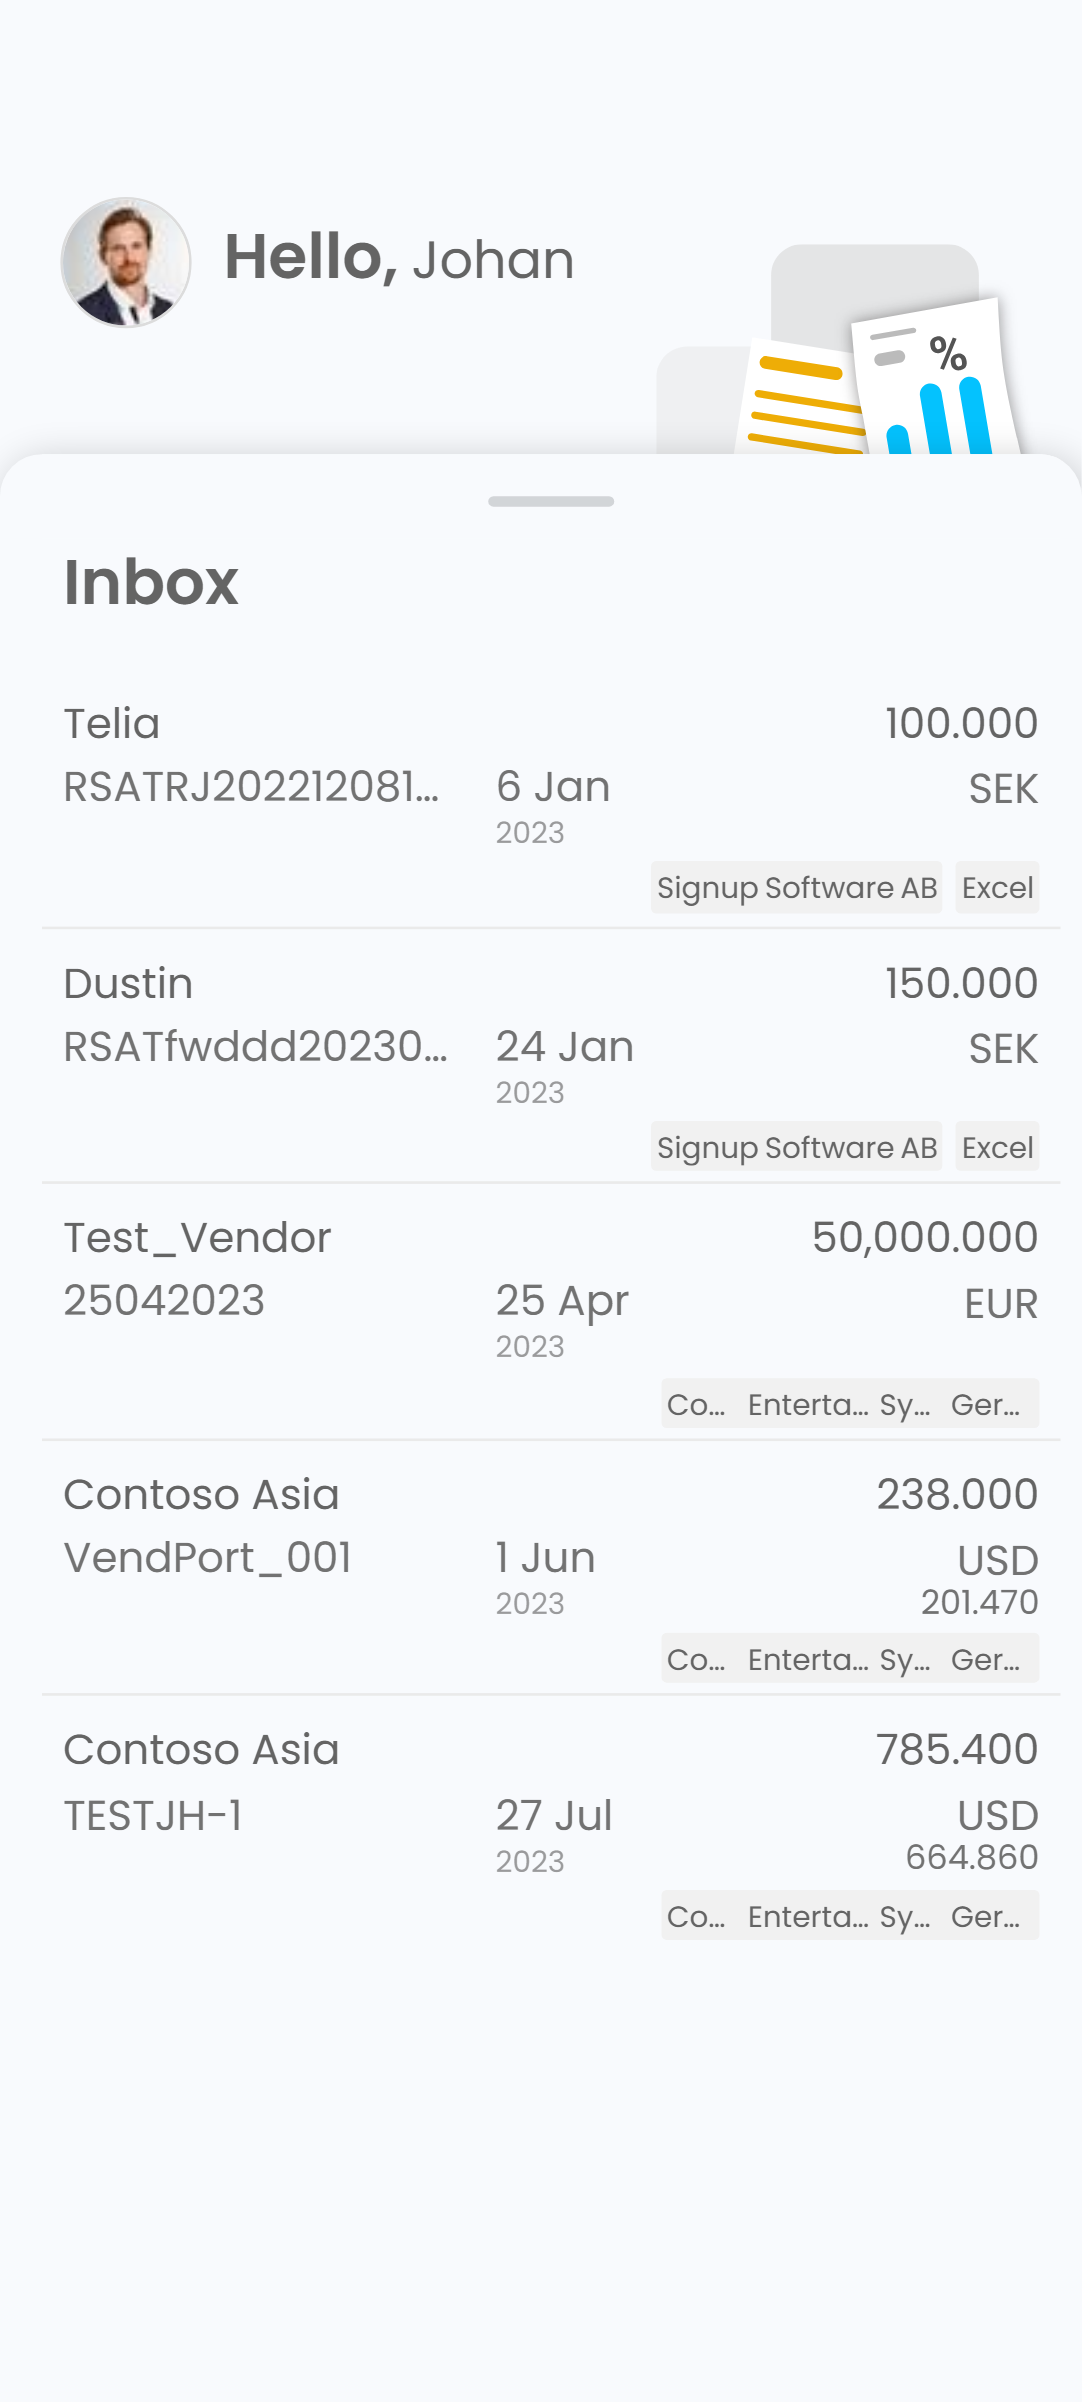
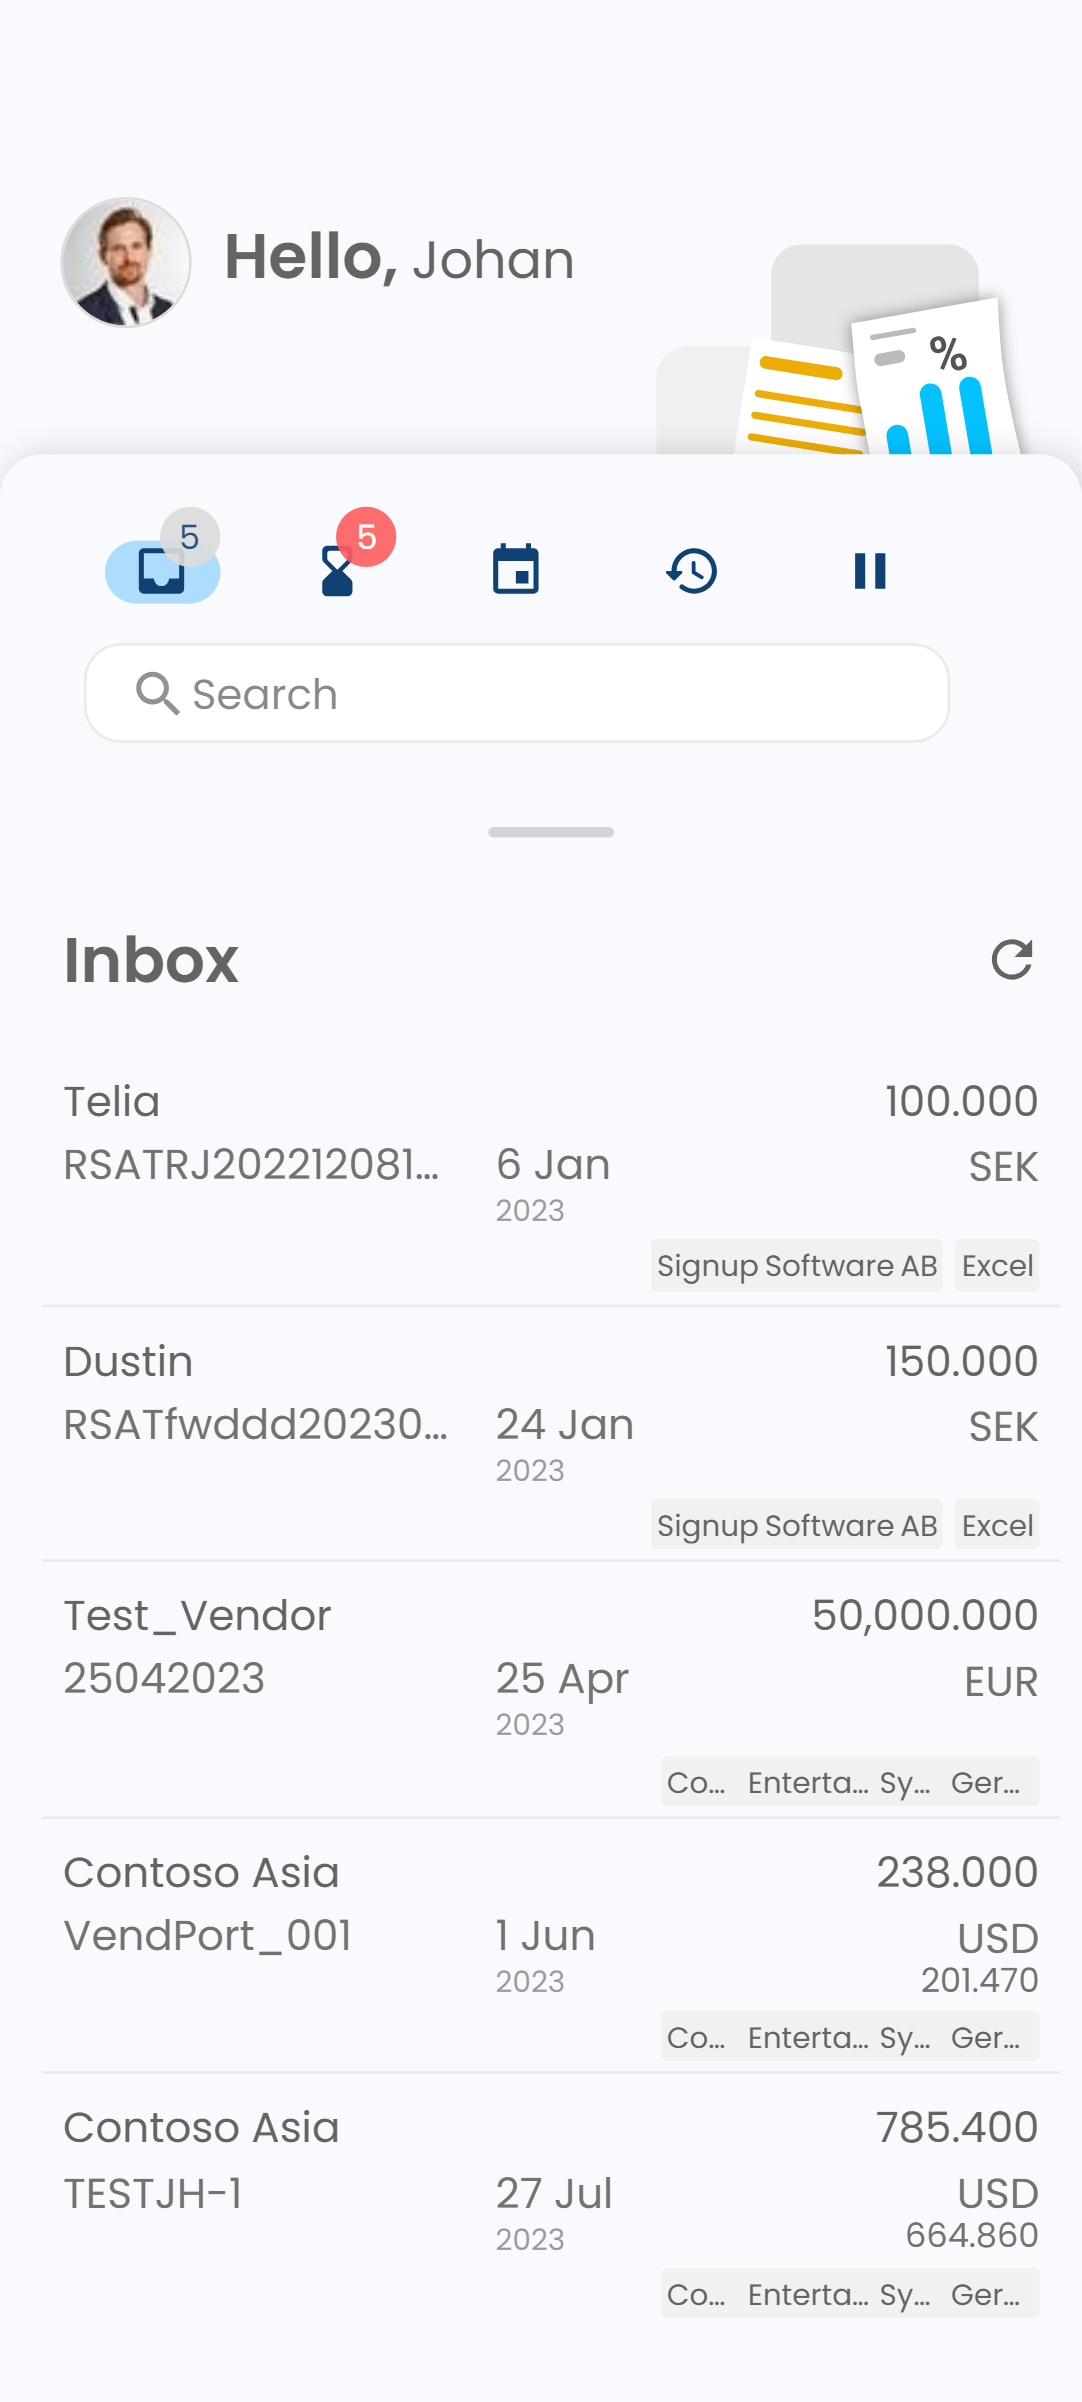
Mobile
The mobile user interface of ExFlow Web offers the same functionality as the desktop version, but it's optimized for mobile devices. Here are some screenshots to give you a better understanding of how it looks and operates:
Deprecated Features
In our continuous effort to improve and streamline ExFlow Web, certain features may be deprecated over time. Deprecated features are functionalities that are no longer recommended for use and may be removed in future updates.
Here are some of the features that have been deprecated:
- Line Templates: This feature has been replaced by a more efficient and user-friendly Copy & Paste feature. Additionally, we plan to introduce the ability to tag and bookmark historical invoices, making it easier to copy from past invoices.
- Dynamics BC Open PDF: The functionality to open a PDF in a separate window has been discontinued due to performance issues. The Dynamics BC team is actively developing an alternative solution.
- Ticket Auth for On-Prem BC: or improved security and user convenience, we advise customers to transition to using Entra ID. Please note that migrating from version 2023 to 2024 of ExFlowWeb for on-prem BC is not currently supported. However, we plan to introduce this feature in the future.
- NAV support: Has been discontinued. 2023 edition of ExFlowWeb will still be maintained for NAV customers.
- AX2012 support: Has been discontinued. 2023 edition of ExFlowWeb will still be maintained for AX2012 customers.
Please note that while deprecated features may still function, their use is discouraged as they will not receive updates or bug fixes. It's recommended to transition to the updated features or alternatives as soon as possible to ensure smooth operation.
For more information on these changes, please refer to the release notes or contact our support team.
Known Issues
In our commitment to transparency and continuous improvement, we want to share some known issues that we're currently working on:
- Split (38362): Splitting (or pasting) hundreds of lines can be error prone. We're working on a solution to make this process more efficient.
- Large Documents (38739): Saving large documents may be subject to timeouts caused by slowness in the ERP. We're working on a solution.
- Paste on FO (38804): If source line has a Company Account, coding will be cleared.
- Replacer (35005): The replacer feature in version 2024 is more sensitive to data errors. We are collaborating with the two ERP teams to address this issue.
- Attachments BC (32410,39342): Attachments after upload in web are not removable or viewable on Web until document is reloaded/saved. Our BC team need to add support for this.
- Line Approval Menu: The line approval menu is currently hidden when the user lacks edit rights. While this simplifies the UI/UX, it is a change from previous versions of ExFlow. Please provide feedback.
- PO Information: The display of PO-related information is under investigation. Currently, quantity and unit cost are shown under the amount field, but they are hidden if the quantity equals 1. We will likely update this to display these details for all PO-based lines.
We appreciate your patience as we work to resolve these issues. If you encounter any other problems or have any questions, please don't hesitate to contact our support team.
Work in Progress
We're constantly working to improve ExFlow Web and add new features that enhance your experience. Here are some of the features that are currently under development:
- AI/ML: We're integrating Artificial Intelligence into ExFlow. This will enable the system to predict lines and coding, provide suggestions in dropdown lists, and intelligently decide which fields to show or hide based on the context. This feature aims to make your workflow more efficient and intuitive.
- Line Template Replacement: Support for line templates, primarily used by FO customers, has been removed. We recommend customers use the Amount & Trend panel with the Copy & Paste feature. We plan to enhance these features by adding bookmarks and direct copy capabilities. Additionally, with the advent of AI predictions, you will be able to let AI handle your splitting and coding tasks.
- Extended Search: This feature requires additional configuration/setup, which we are actively working on automating.
- Invoice Drafts: This feature is planned to be reintroduced. More details will be provided soon.
- Invoice Pre-loading: This feature is under consideration.
- Browser Back: We are considering adding support for browser history navigation in ExFlow Web. This potential feature would allow you to use your browser's back and forward.
- Admin Messages:
More details will be provided soon.Completed.
Please note that these features are still in the development phase and are not yet available for use. We'll update you as soon as they're ready for release. We appreciate your patience and look forward to bringing you these enhancements soon.